|
I realize not everyone has the same goals in costuming. If you are just having fun playing dress-up in pretty Victorian-esque dresses, living out alternate realities in Steampunk timelines, or just having tea with the girls, this is probably is not the blog post for you. IF HOWEVER, you are wanting to get involved in living history, or volunteer at historic sites. If you care that your kit be fairly close to what was worn "back then" this will be a VERY basic guide to things to be aware of when looking for vendors/dressmakers. This is not the be all end all, simply some hints to at least help you winnow out the chaff from the dresses that will at least be a decent starting point. What Time Period is "Late Victorian" For the purposes of this article Late Victorian is 1870 through 1900. There ARE several major changes pattern shapes will go through and when there are specifics I will attempt to point them out. I am also going to attempt to explain why some details make a difference. What to Look/Not Look ForPrincess Bodice Seams on the Front are out- Darts are in If you see a curved front seam to help fit the bust area, be EXTREMELY cautious. The greatest majority of late 19th century dresses are fitted with two vertical darts on each side of the front piece (darts extending to armscye are generally not seen on the fashion fabric layer in 19th century clothing.) There are a few bodices that only have a single dart (half-fitted) and some that are loose with no fitting darts (saques). Princess cut seams (a seam that goes from the front armscye over the bust to the waistline,) are generally only seen on 1870s princess wrappers- a dress without a waistline seam, and even then only rarely. By the 1880s the curved front seam is nearly non-existant for all practical purposes. Most bodices that appear to have a curved seam will be found most often to be an overlay, rather than a seperate seam.
Synthetic Fabrics are out- Natural Fabrics are In Stick with Natural fabrics, you may not think the casual observer can tell the difference, and perhaps they may not. HOWEVER, there are two big reasons to not use polyester, nylon and other petroleum based fabrics. 1. Fire danger - synthetic fabrics will melt and stick when they catch fire. I regularly test fabric content with flame, and have given myself some painful burns by touching the melted bead that forms when synthetics are set aflame. This melted plastic takes longer to cool down and sticks to the skin and has to be scraped away. ON the other hand, wool mostly will self extinguish and cotton, while it burns quickly can be tamped out fast with a fingertip. (cotton dress catches flames- stop, drop and roll just like they taught you in grade school!) 2. Synthetics do not "breathe" well. This means in the summer they trap body heat and persperation does not evaporate well. In the winter they offer no real insulation from the cold from their lack of ability to trap air particles. Sometimes synthetics seem cheaper, but with a bit of shopping around you can find good deals on natural fabrics. Bag Linings are Out, Flat linings are In- For the biggest part women lined their bodices. You can find a FEW extant dresses and bodices without lining previous to mid 1890s (when shirtwaists were coming in strong) BUT because of the close fit, a lining was needed to take the stress from the seams. A bodice with no lining would be fit for the rag bag at the end of a season, while you would be able to repair and keep a lined bodice wearable much longer. These linings are not what we know as bag linings now, but instead sewn as one piece with the bodice piece itself. Front facings for button closures were usually extensions of the front (most often place on selvedge edge) and folded to the inside of the bodice. Using flat linings like this made each seam go through 4 layers of fabric giving the garment more strength. SOME ladies would use linen as a lining for summer dresses (I do this myself after seeing it done on several extant pieces), and leave the sleeves unlined. For everyday dresses I have seen linings made from feed and flour sacks (plain white sometimes with printing), scraps from other dresses, and basic muslin. Nicer dresses may be lined with a glazed cotton, or a fine weight twill most often found in brown, but sometimes in black or white.
Loads of Lace is Out, Small accents of lace at Neckline is in A dress does NOT need a large amount of lace to be feminine, nor could many women afford to have lace on their gowns. A small piece at the neckline is appropriate. I have seen several dresses with hand knit lace on the collar. Use actual photos from the timeframe as your guide to applying lace, along with purchasing proper lace which is on the pricer side(not cotton cluny or polyester) and you won't go wrong. By all means avoid putting delicate lace around skirt bottoms, and save large amounts of lace for when you are portraying one of the Four Hundred
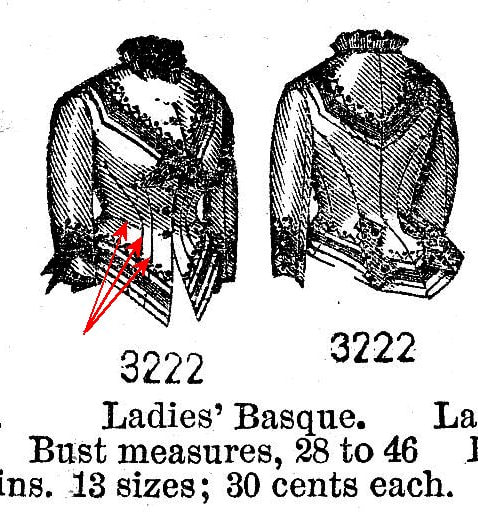
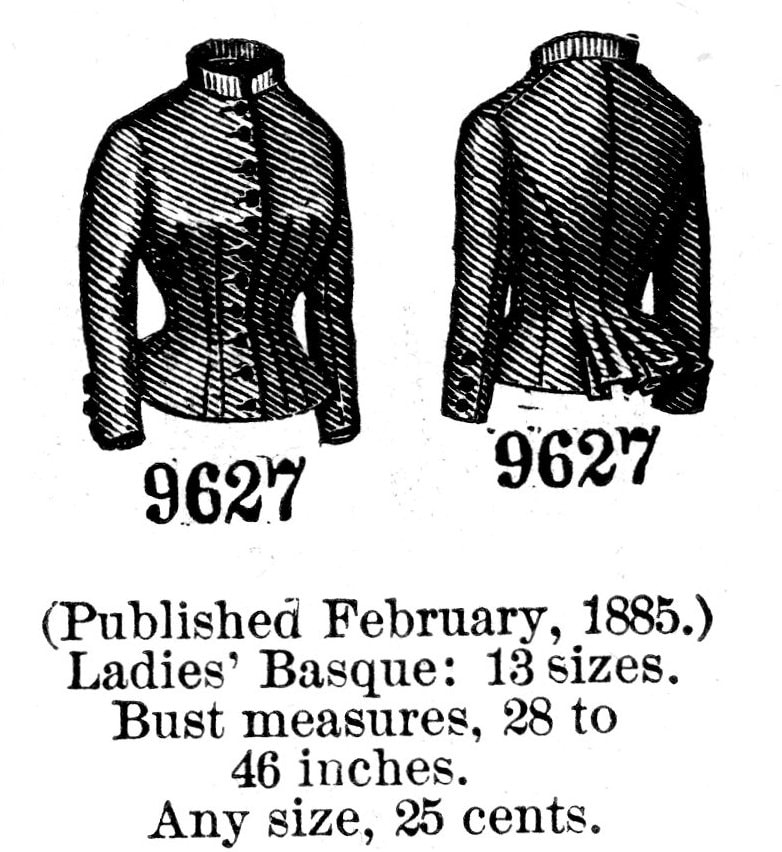
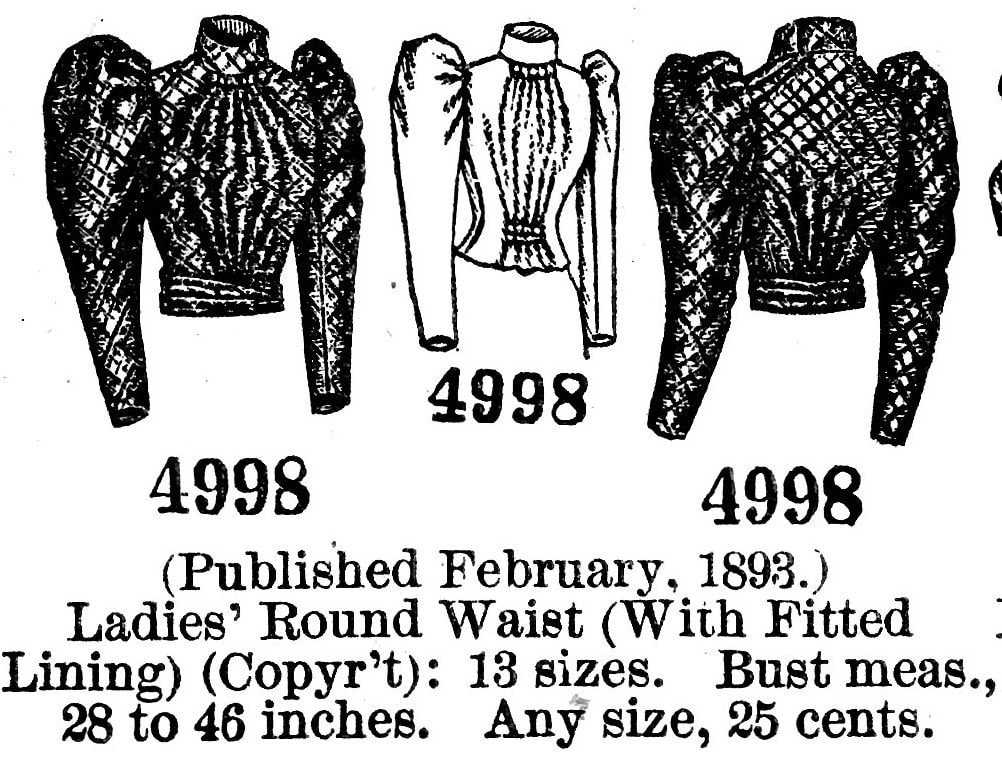
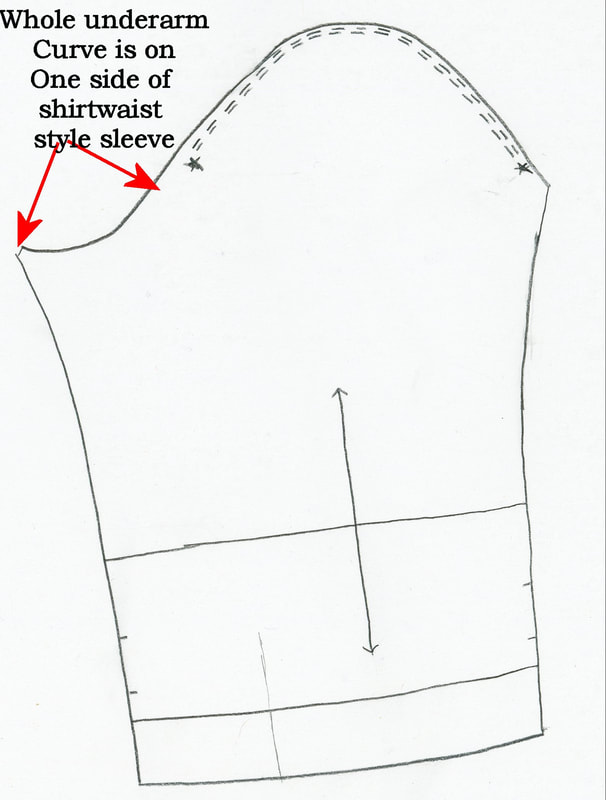
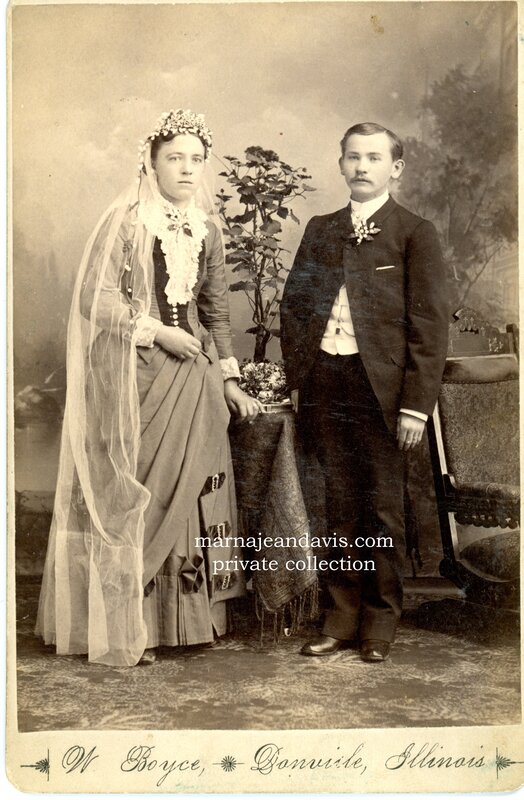
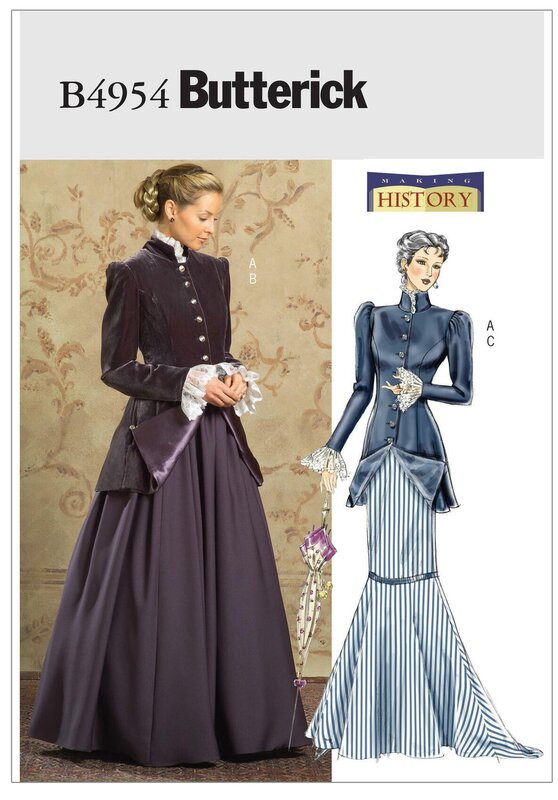
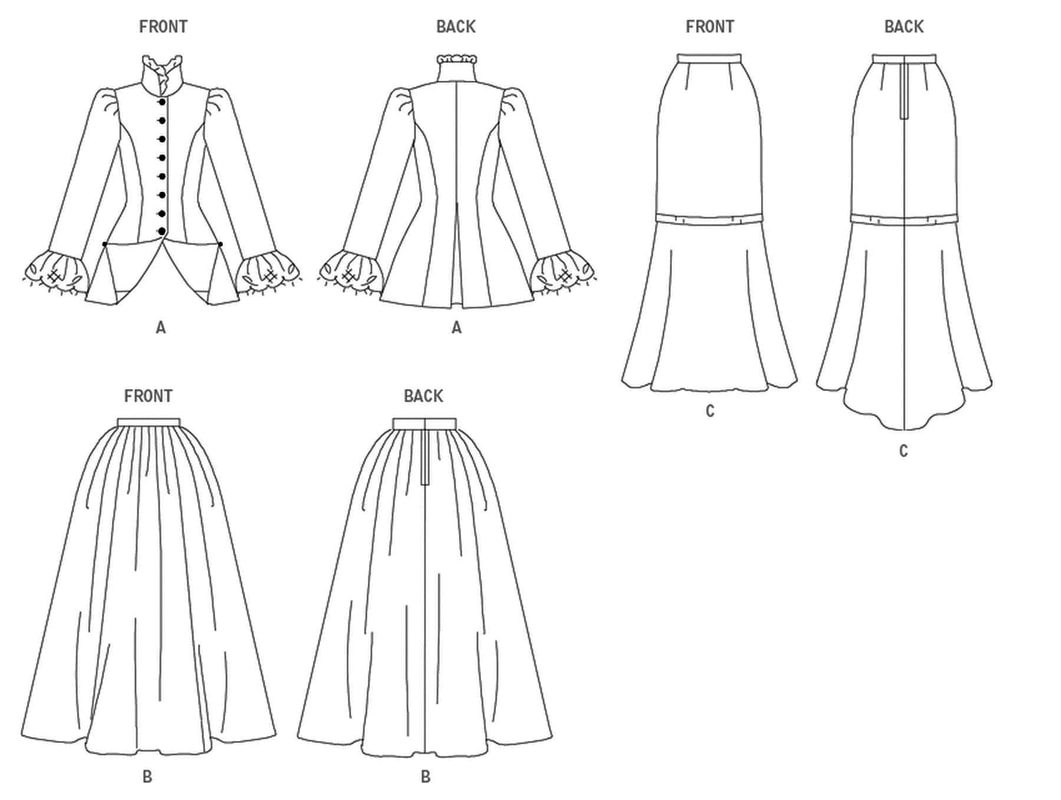
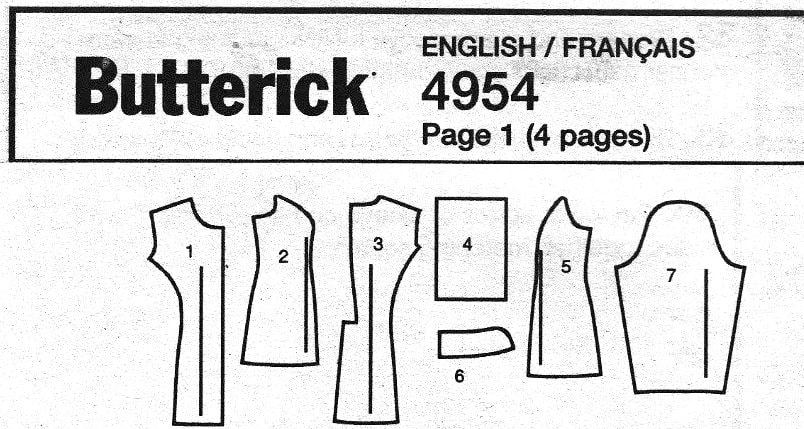
Why you should watch the length of your shoulder seam As fashion progressed from the 1860s into the 1890s the length of the shoulder seam would get progressively shorter. As it did so, the shape of the top of the sleeve head changed as well. Early 1870s dresses should have a long shoulder length, with the armscye resting just off the shoulder and above the bicep area. By the mid/late 1870s the shoulder length would be just off the shoulder line, and by the early 1880s right about the join of the arm to shoulder. By the late 1880s and early 1890s the shoulder line was growing even shorter, and by the time the sleeves were at their fullest, the armscye was now on top of the shoulder line about even if you come straight up from the armpit, so that the fullness of the arm will help hold up the leg o mutton sleeves. This is a definate change from the first time we see the leg of mutton sleeves in the 1830s when the armscye is off the shoulder line entirely. Matching correct sleeve shape/sleeve heads to correct height of armscye is really important to get a historic look and not a "costume" effect. Review of a "Big 3" pattern What is not "Historic"about it and why it is a problem if you want a historic dress This pattern is obviously just a "costume" pattern and not a historic shape. Sleeve shape- The sleeve shape is cut for a center bottom seam. This forms a tube that is most comfortable with your arms straight down, when closely fitted. On a historic sleeve the arm is naturally curved to the front in a "occupational" shape, whether it be for sewing, cooking or even shooting. Think about where your arms are positioned most of the time. Shoulder length compared to sleeve head height- The shoulder is cut too long for the height of the sleeve head. Notice on the pattern image how the sleeve head crushes in at the shouder point? IN the 1890s (and late, late 1880s) the shoulder length becomes shorter, allowing the shoulder to fill in the fullness and help support the sleeve shape. Bodice Seams There are too few seams in the back, and too many in the front. Usually the only time you see a princess seam in the front is on a wrapper in the 1870s and then it is the exception rather than the rule. A more historic fit would be achieved with 4 front darts, one on each side of the bust point on each side of the body. If this dress were attempting to be an 1880s or 1890s dress, then the likely bodice pattern pieces would give you a front with two darts, an underarm piece, a side back piece curving to the armscye and a back piece with a center seam. The lack of "extension" in the back seams will make an awkward fit over the skirt over appropriate petticoats and dress support. Skirts: Sorry these are just pretty much cut on modern shapes, and use zipper closures
2 Comments
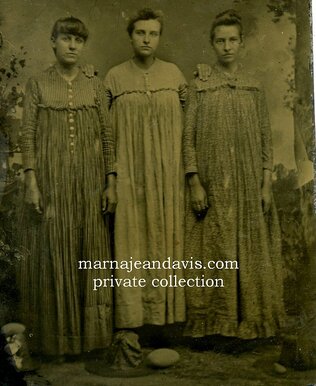
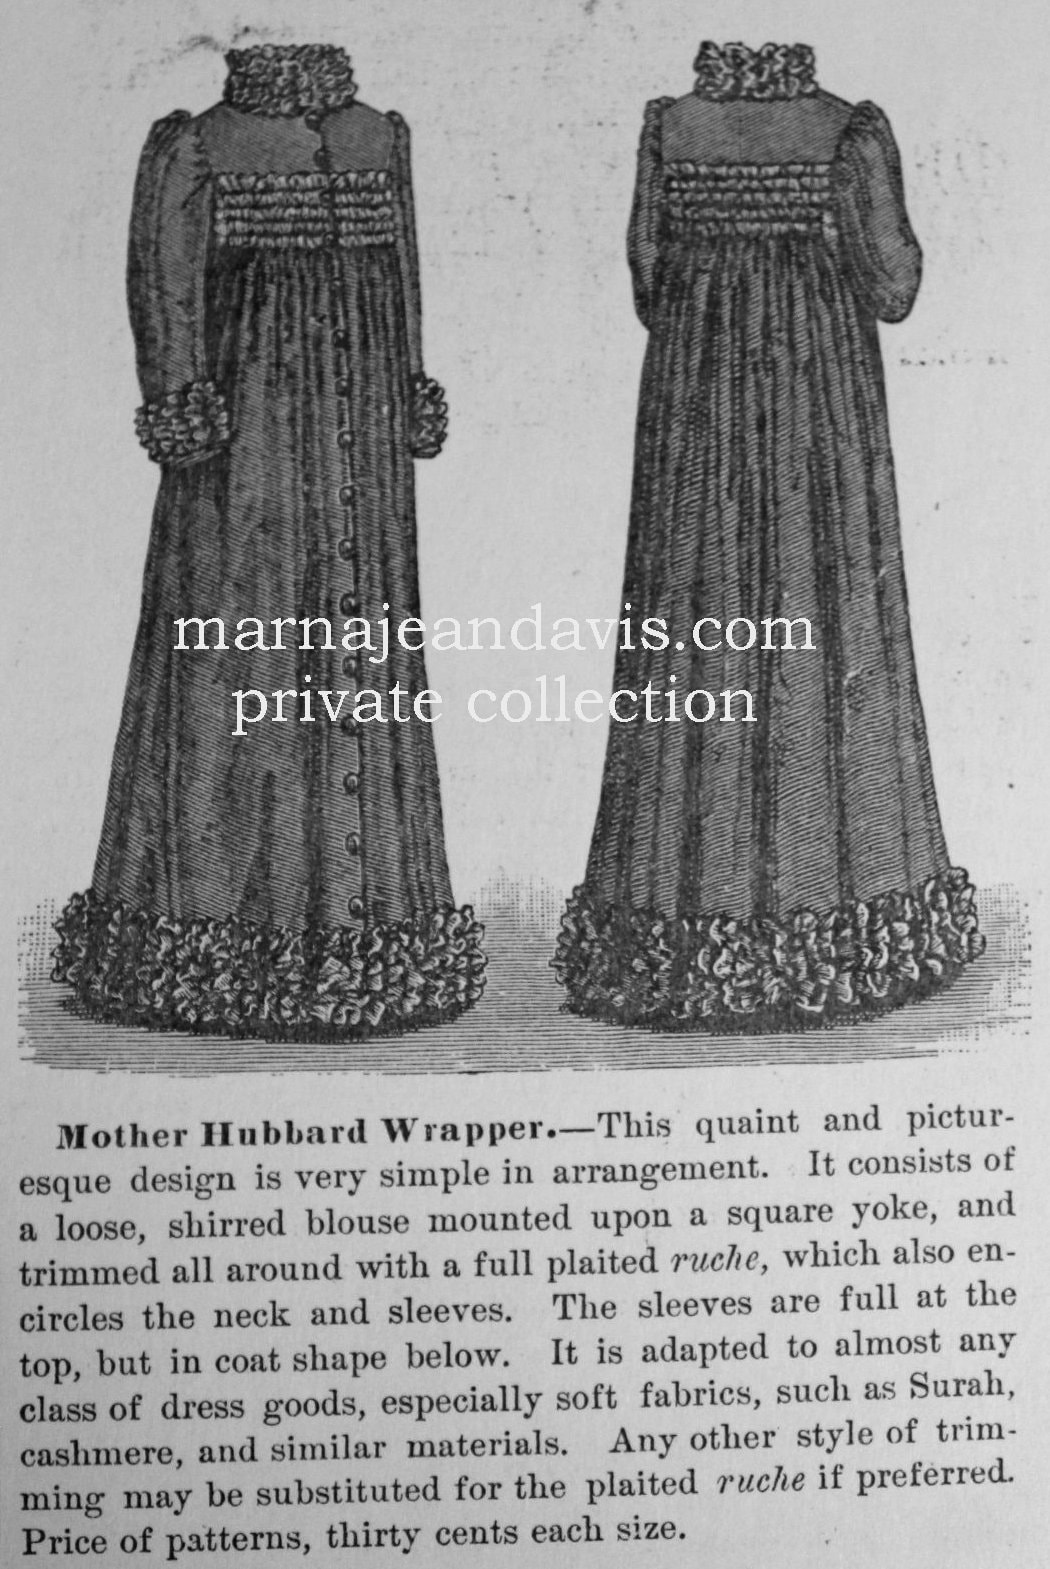
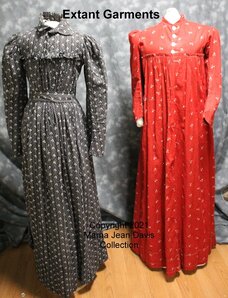
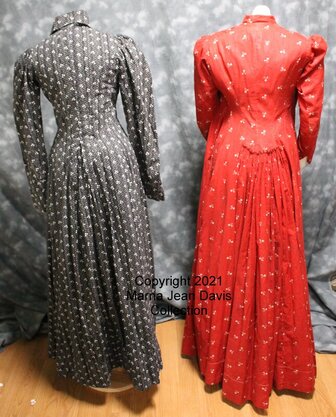
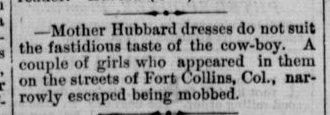
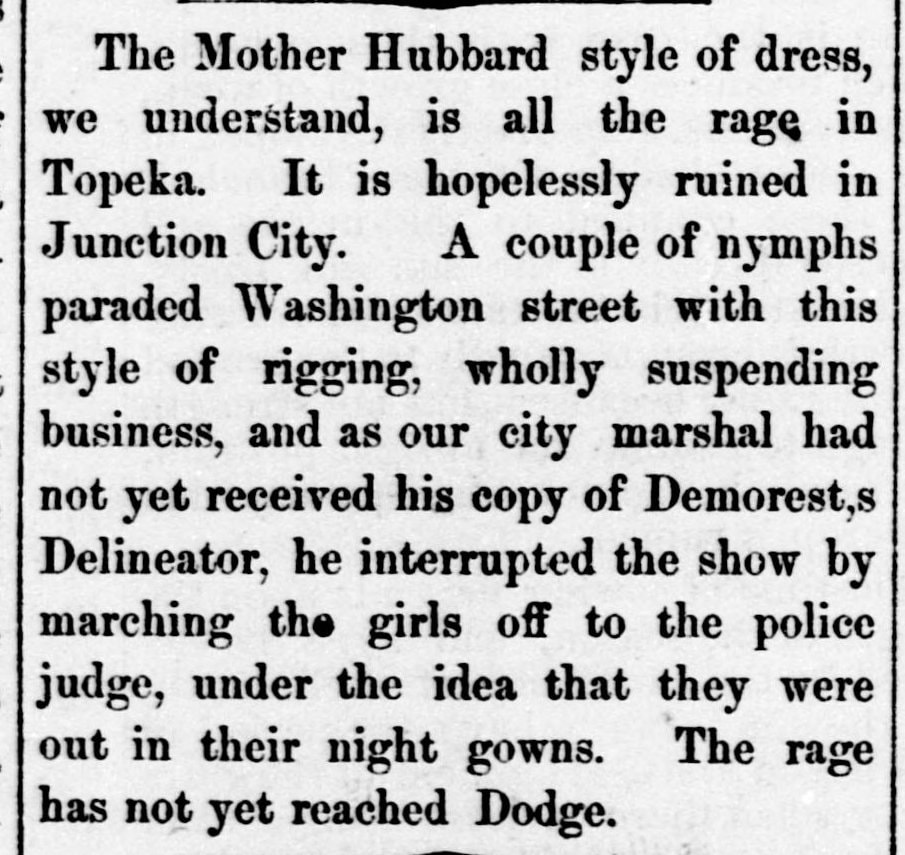
 Mother Hubbard garments were NOT only worn as maternity wear, they were actually worn as fashion forward or artistic garments, or even just a comfortable gown for a hot sumnmer day. Newpaper article from Semi-weekly interior journal., July 20, 1883, Stanford,KY
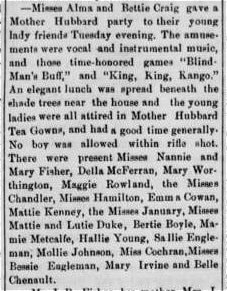
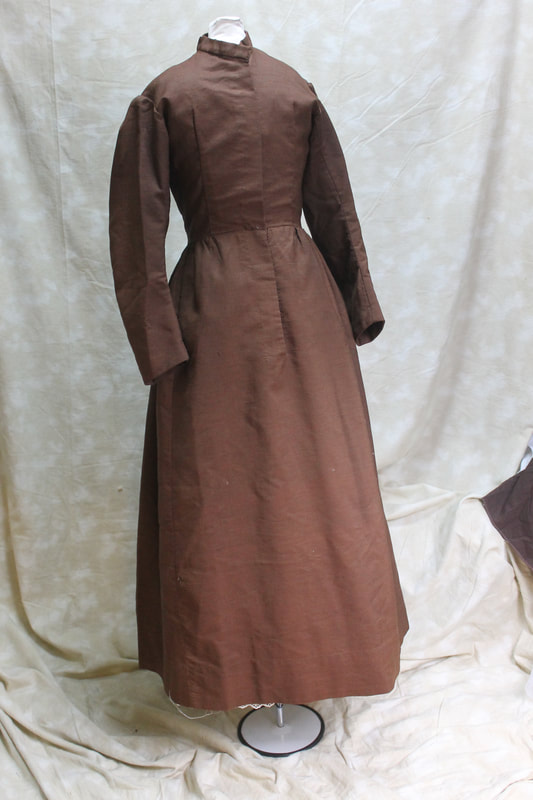
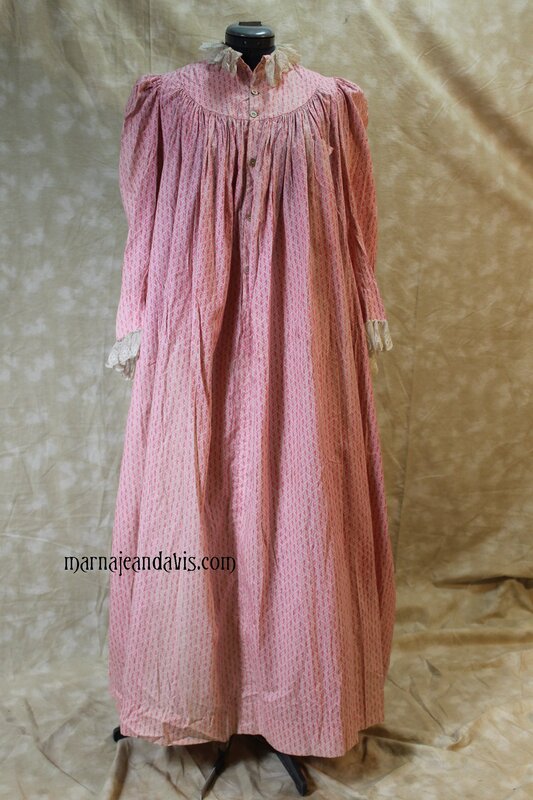
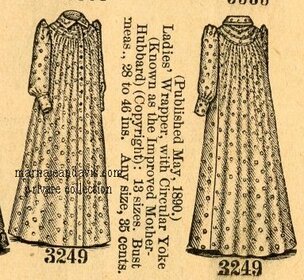
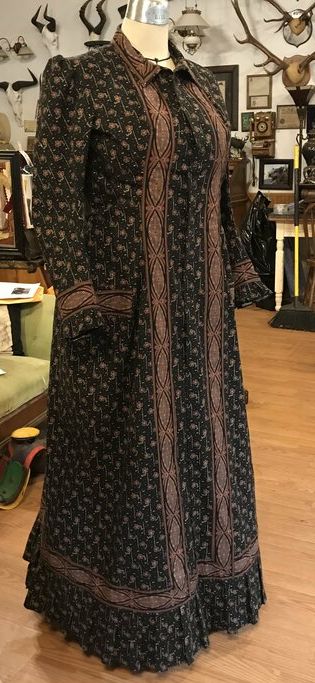
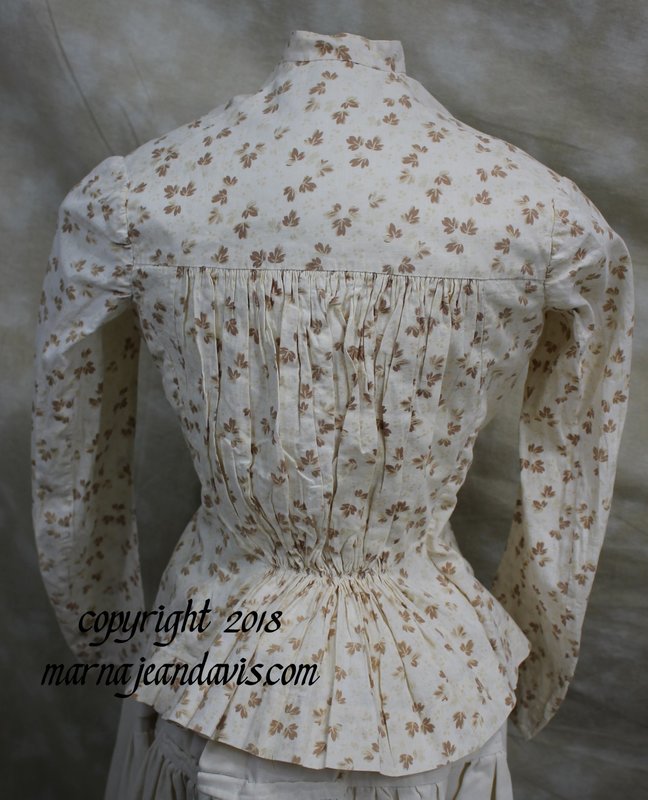
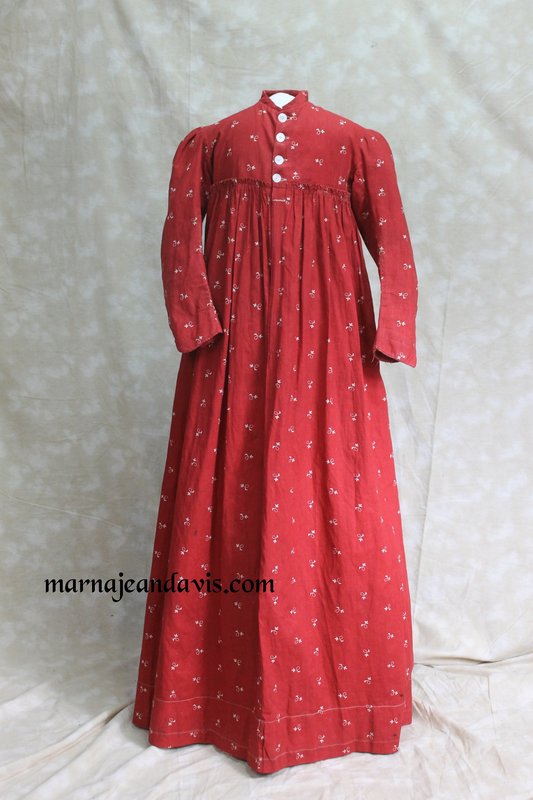
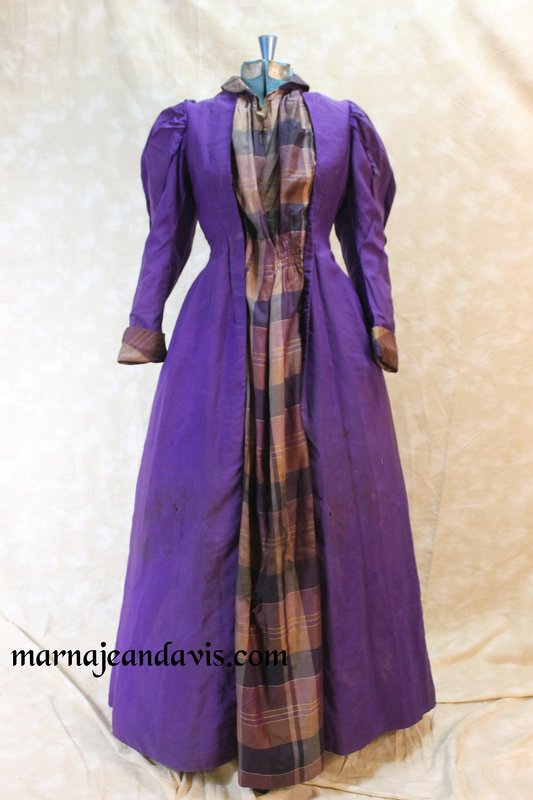
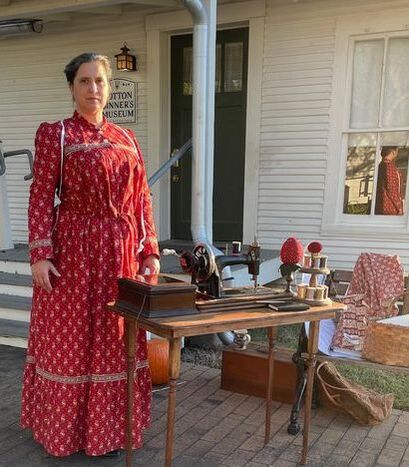 One of my favorite Mother Hubbard styles is the "Princess Back" Mother Hubbard which has a fitted back and a front yoke with gathered bottom. These are usually fitted with a inner lining or at least an inner tie to hold the back against the body while allowing the front to flow gracefully. Both the extant pieces shown here, as well as my reproduction have fitted half-linings (they are lined to about the hip level).Sometimes they will also have a tie sewn into the side seam. These appear mid 1880s and are seen through the 1890s. I recently released a front Mother Hubbard option as an add on for my Kay's Housekeeping dress pattern. 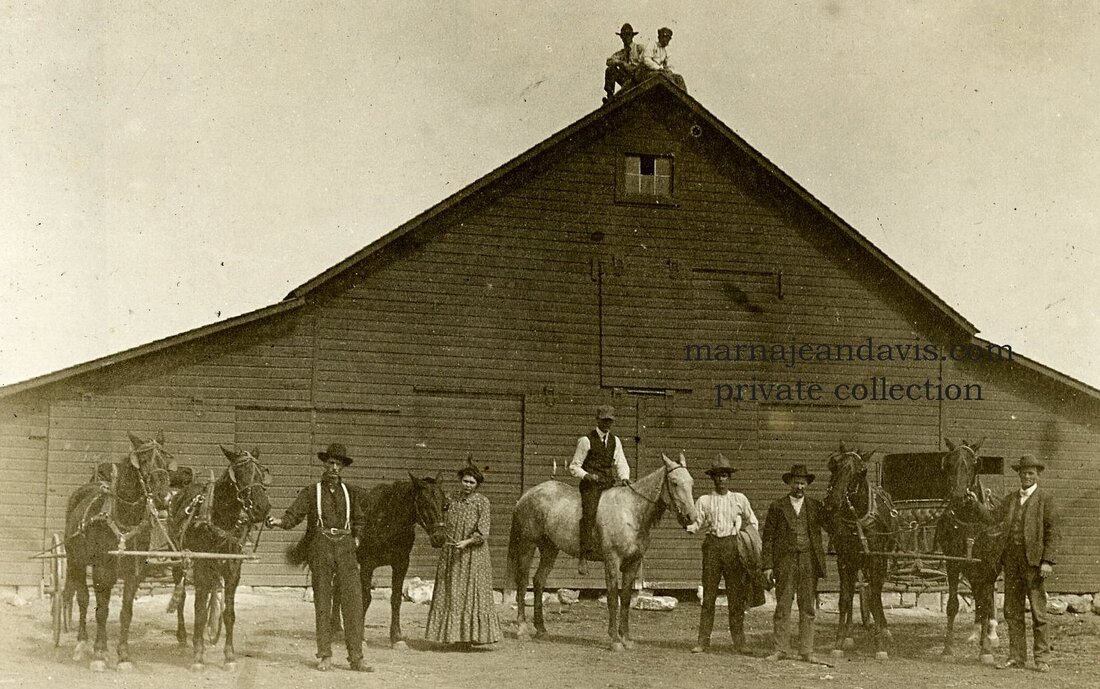 Marna Jean Davis Collection approx. 1900-1907 Marna Jean Davis Collection approx. 1900-1907 Horses do not appear to be scared of the Mother Hubbard dress And Finally, the most likely real reason men didn't like women wearing the Mother Hubbard style? The only time they had seen it before on the streets was on women of "questionable virtue" and they may have been getting themselves in trouble by accosting upright ladies. Despite the pushback, women found it a comfortable gown for summer wear, and it would grow increasingly popular from the 1883 through the early 1900s. They would NOT cave in to the objection of the men, and by the 1890's the increasing popularity of bicycles would make divided skirts and bloomer costumes the "new fad" to be horrified of and complained about.  Hovey's Dance Hall, 1884 Arizona
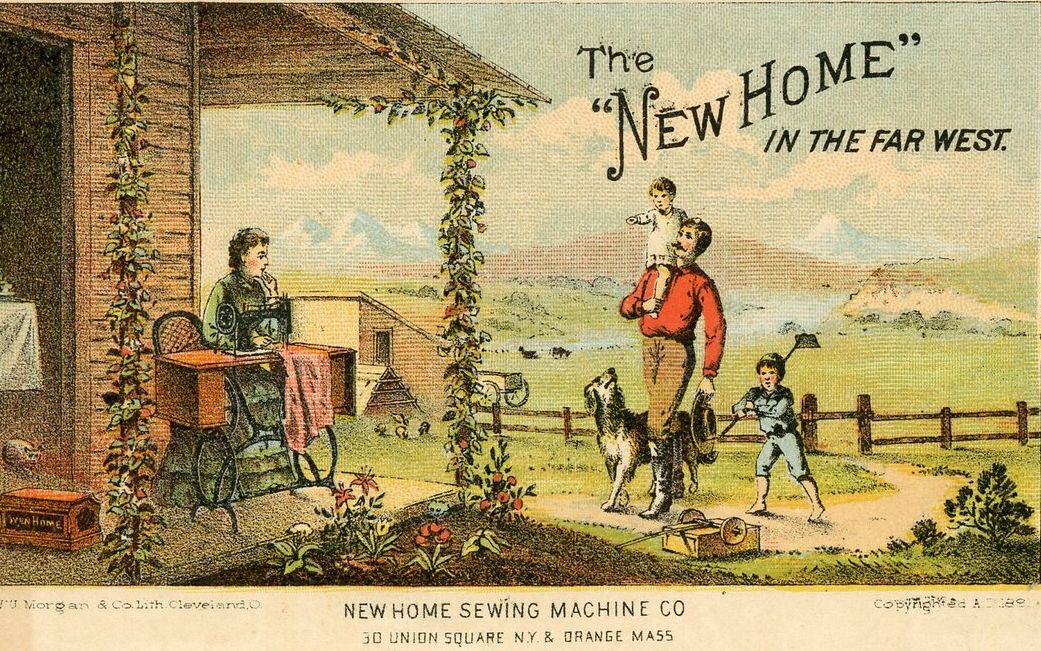
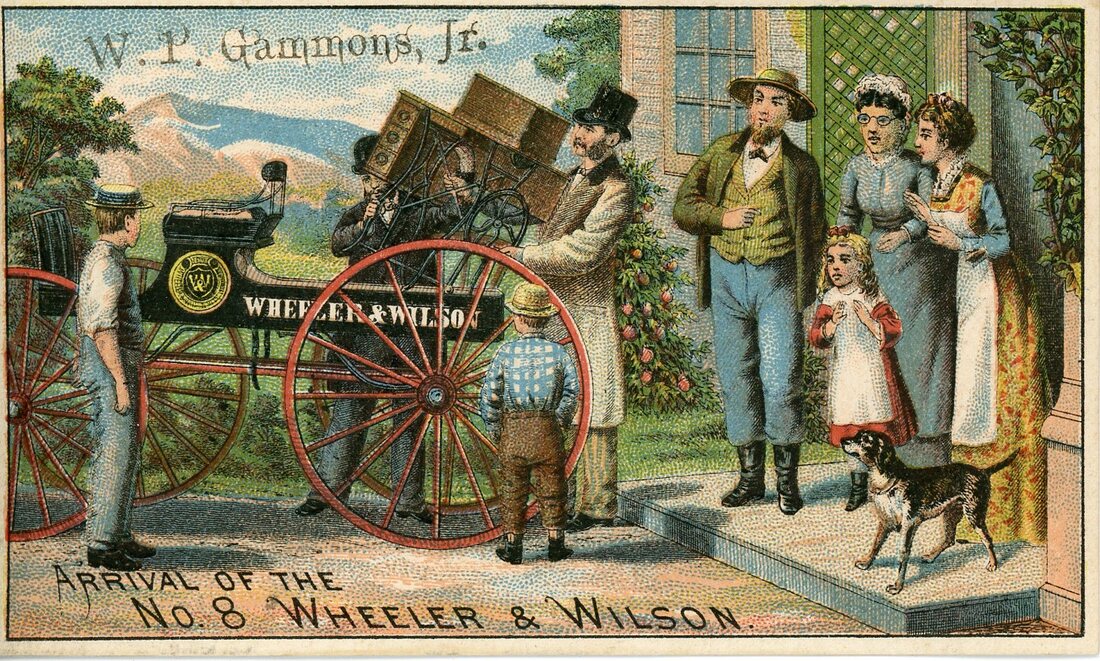
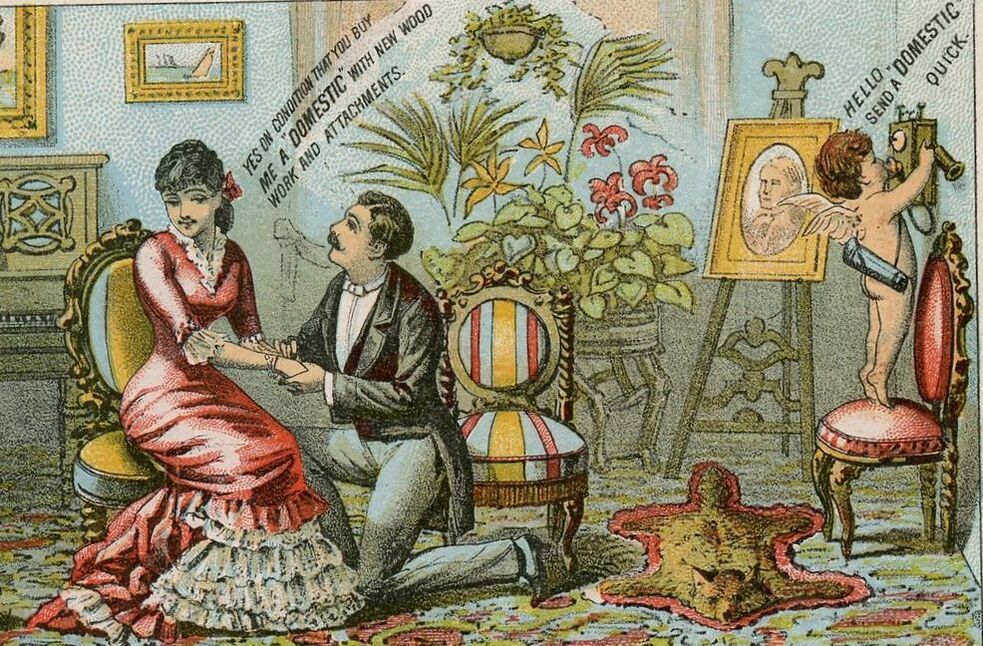
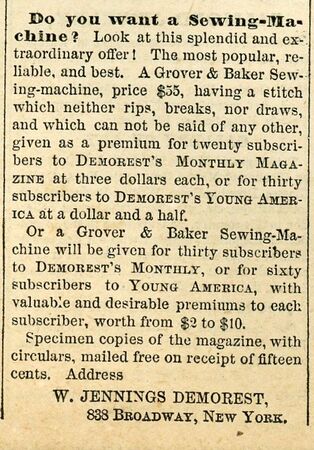
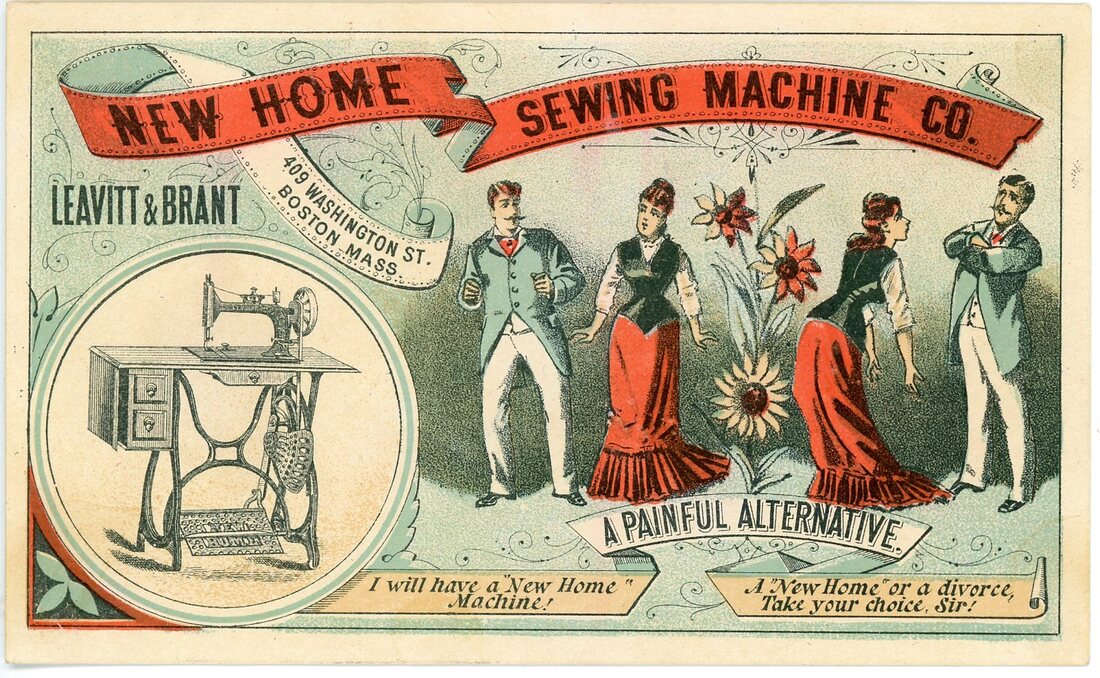
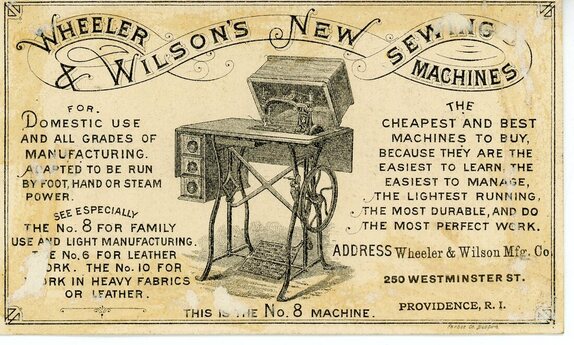
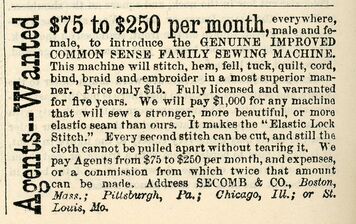 1873 Petersons Sewing machine Advertisement 1873 Petersons Sewing machine Advertisement Elias Howe's workable invention of 1846 would not catch on until Isaac Singer would seize upon the marketing idea of buying "on time. " This meant the costly, but time saving, machine could be purchased one small payment at a time of only $3- 5 a month in 1856. The sales of sewing machines would triple that year from the previous year. The sewing machine would be a treasured possession for many women, but the start of the Civil War would prevent the sewing machine from becoming truly widespread until about 1870. Prices ranged from $3 for a simple chain stitch machine to $70 for most elaborate models. In 1870 Demorest offered as a premium for selling 50 subscriptions to their magazine a Grover and Baker sewing machine worth $55. In 1873 the Common Sense Family Sewing Machine priced at $15 was offered in Peterson's magazine. By the 1890's a very nice model could be purchased for $13.25
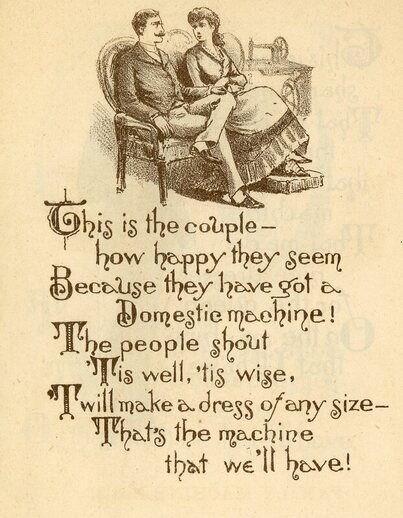
 “A good hand-sewer makes an average of thirty-five stitches per minute; the fastest machines on some kinds of work perform three thousand per minute. There are in a good shirt twenty thousand six hundred and twenty stitches; what a saving to do them at machine speed!... ...As soon as lovely woman discovers that she can make ten stitches in the time one used to require, a desire seizes her to put ten times as many stitches as she formerly did."- A Lady's Friend, January 1868
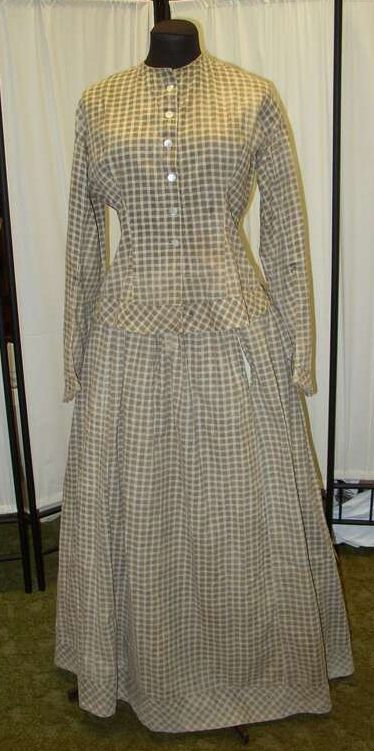
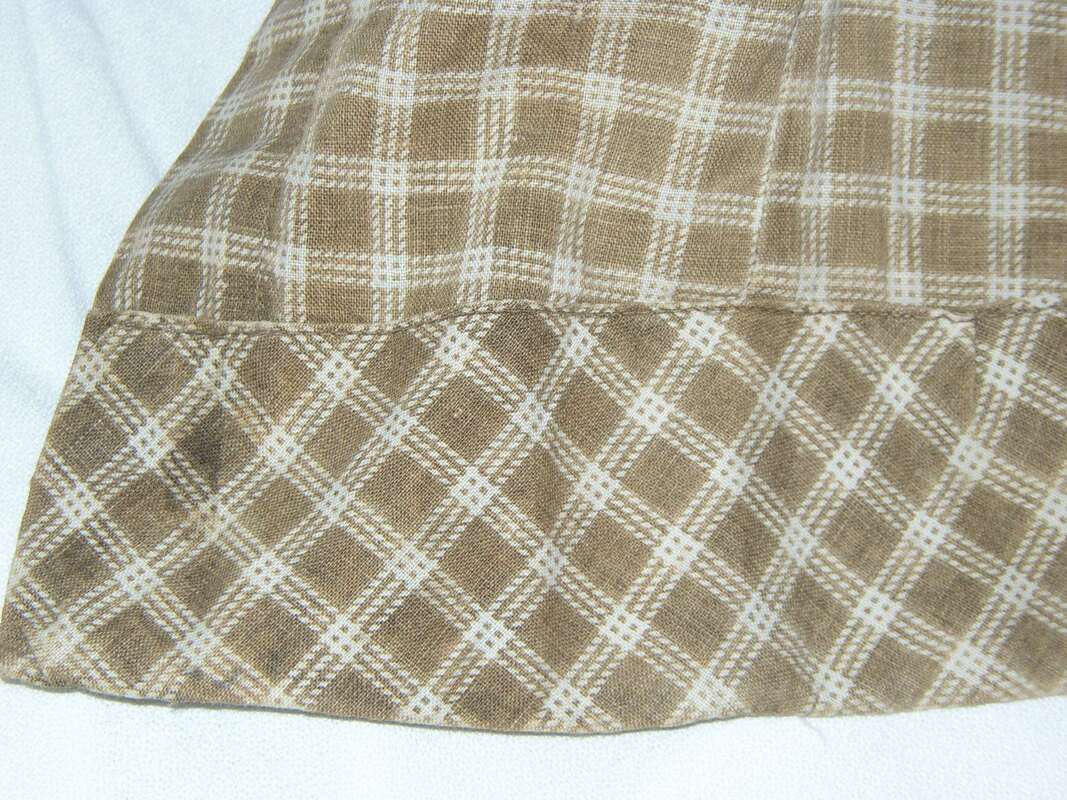
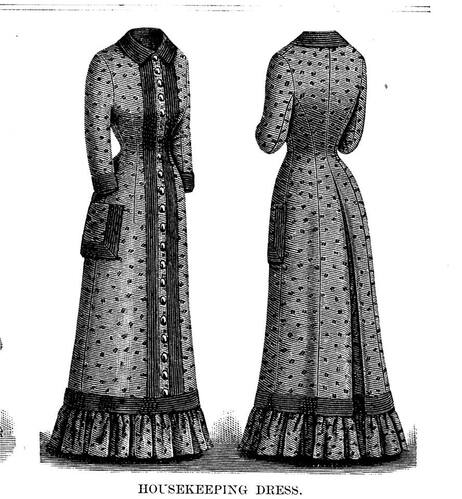
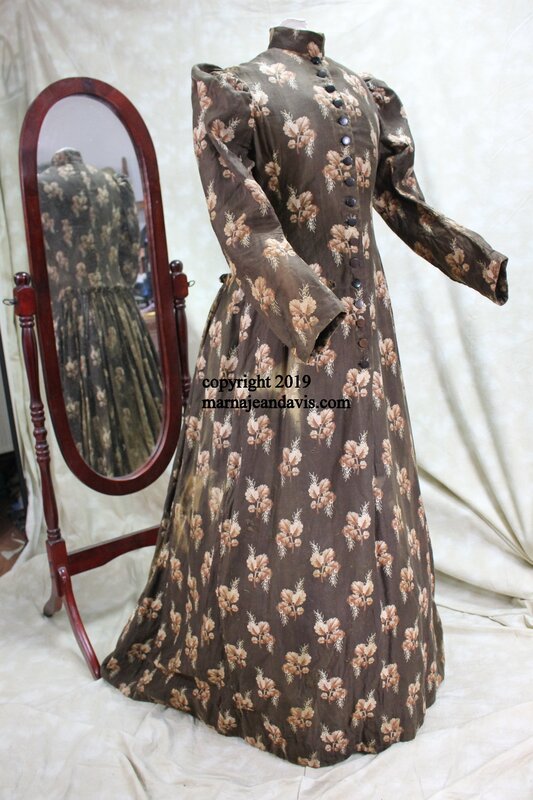
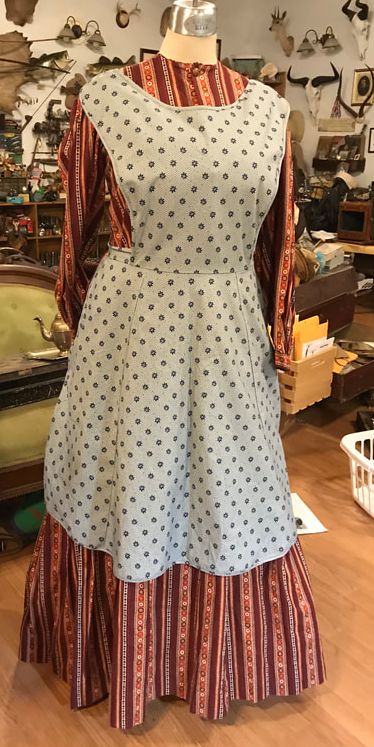
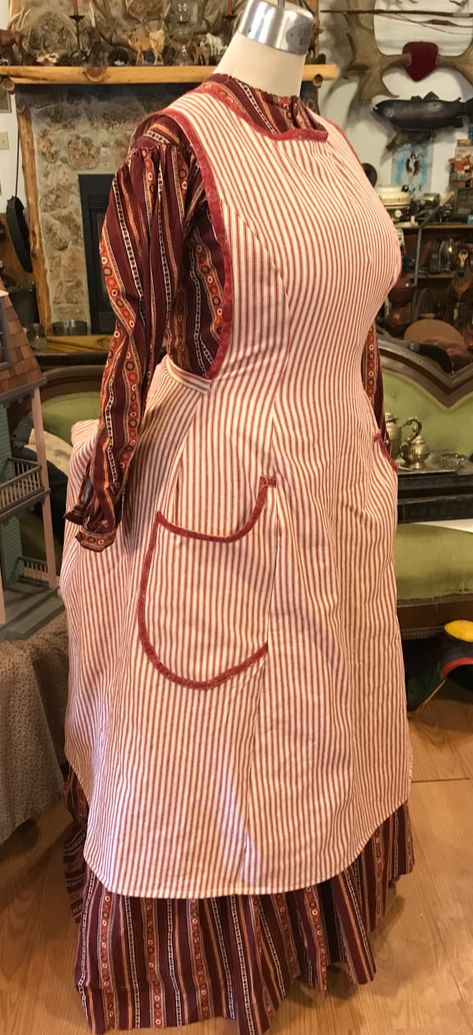
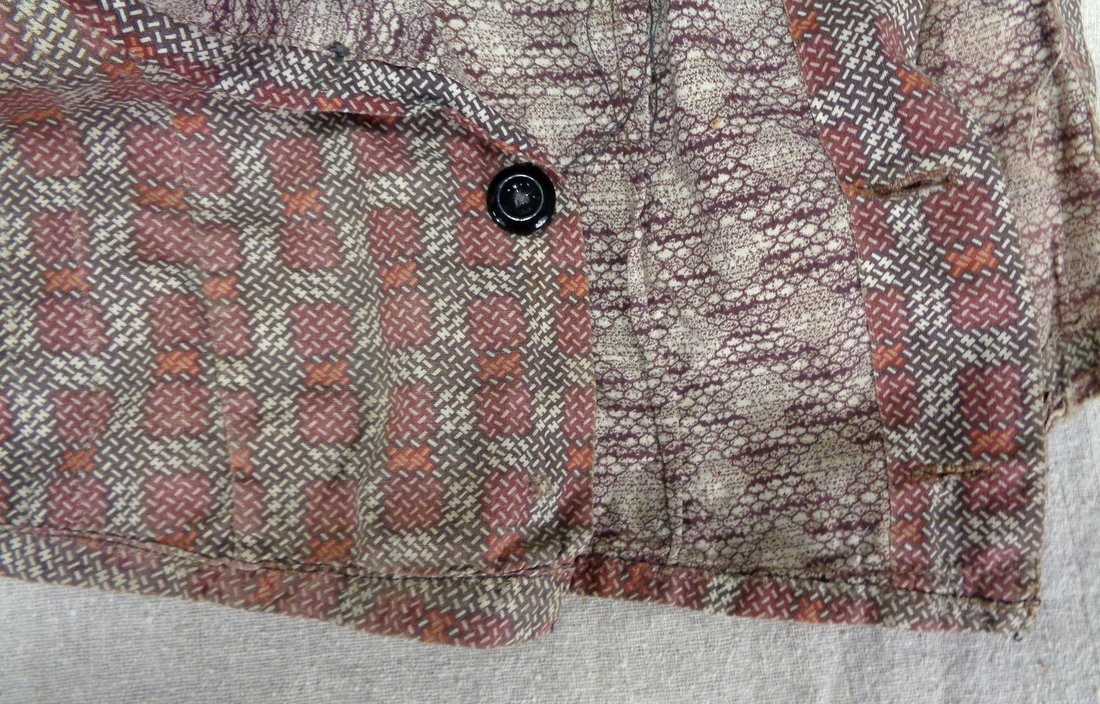
I have found antique sewing machines very basic machines that are easy to learn to run and self repair. A good source for all things antique sewing machine is http://ismacs.net/ Identify your antique singer sewing machine by going to http://www.sandman-collectibles.com/id-singer-machines.htm Images are from my personal collection all rights reserved For more reading The Encyclopedia of Early American Sewing Machines by Carter Bays The Invention of the Sewing Machine by Grace Rogers Cooper https://archive.org/details/geniusrewardedor00newyuoft https://archive.org/details/singerinfamily00sing_0/ INTRODUCING 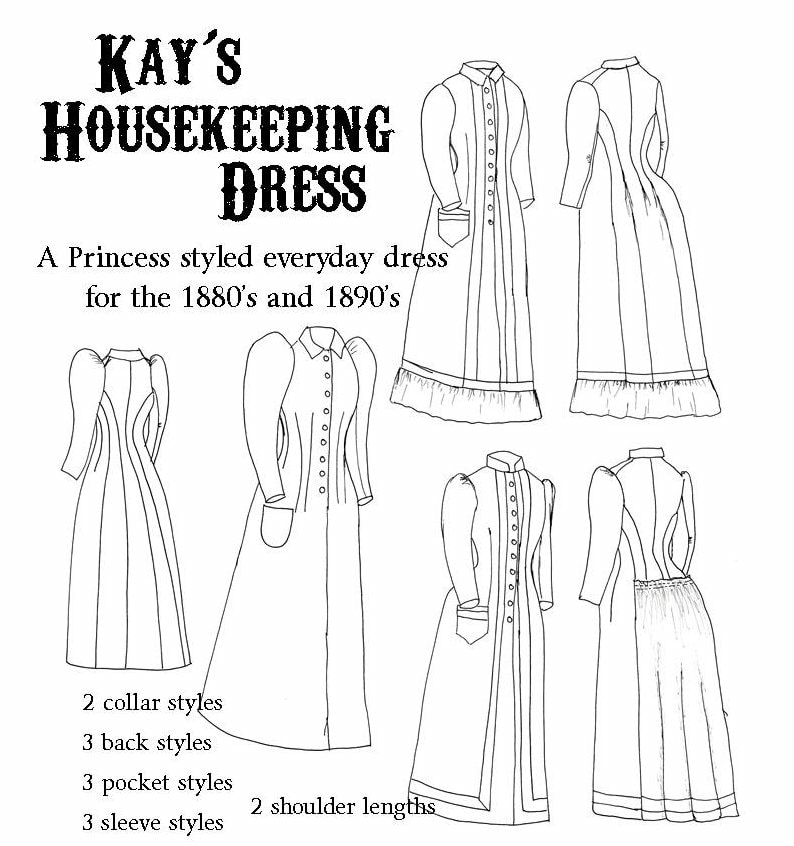 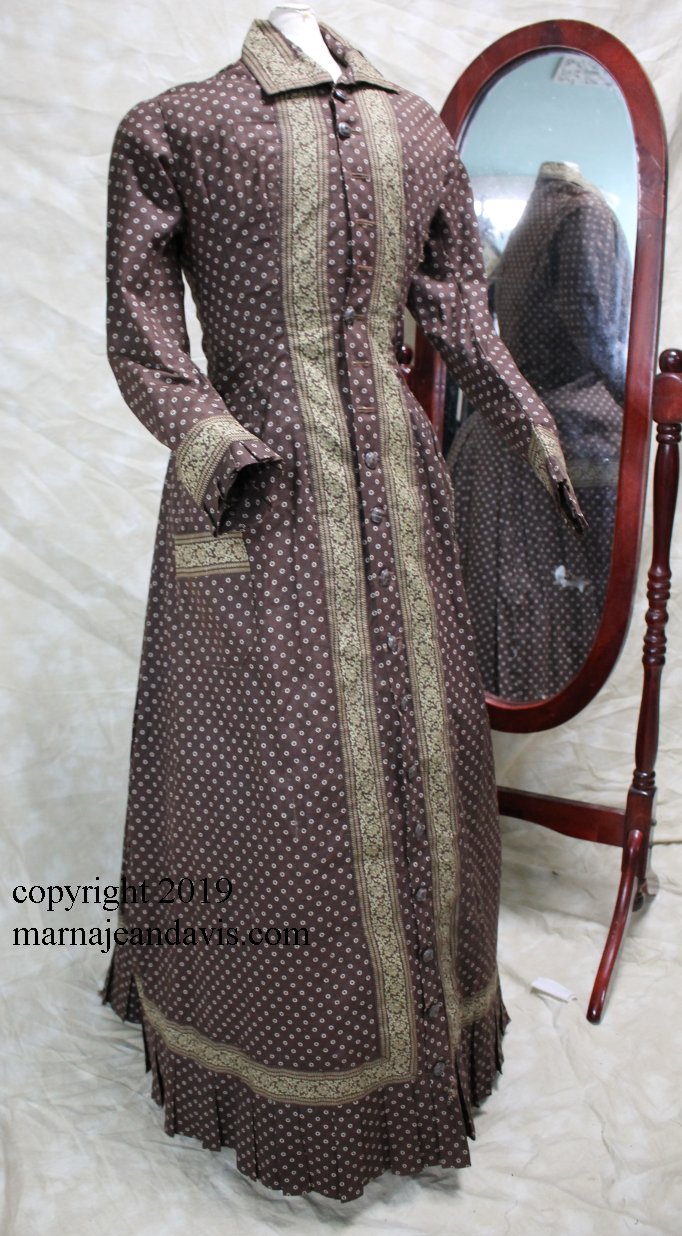 When I began drafting this pattern my goal was a good basic pattern that was useful for ladies doing impressions of middle and working class ladies. Something that they could do their housekeeping chores in or be at ease on a summer day. The pattern can be found on my Etsy site https://www.etsy.com/shop/WickedStepmothers The first dress I looked at in my collection was one that matches patterns from the 1880's in both Butterick and Demorest fairly closely. It was well made, but definitely created by the home seamstress- using scraps from another dress to create the half lining in the bodice, and the hem at the skirt. One of the key things about this dress is its extensive use of machine sewing. There is very minimal hand sewing on it. Another point making it a good dress for household chores is the fact all trim is "sturdy." The trim on the dress is a printed fabric rather than a braid or lace that has been applied flat by machine to the dress. This is an easy replication done by choosing a historic reprint with a striped pattern and cutting it up into strips for the same look.
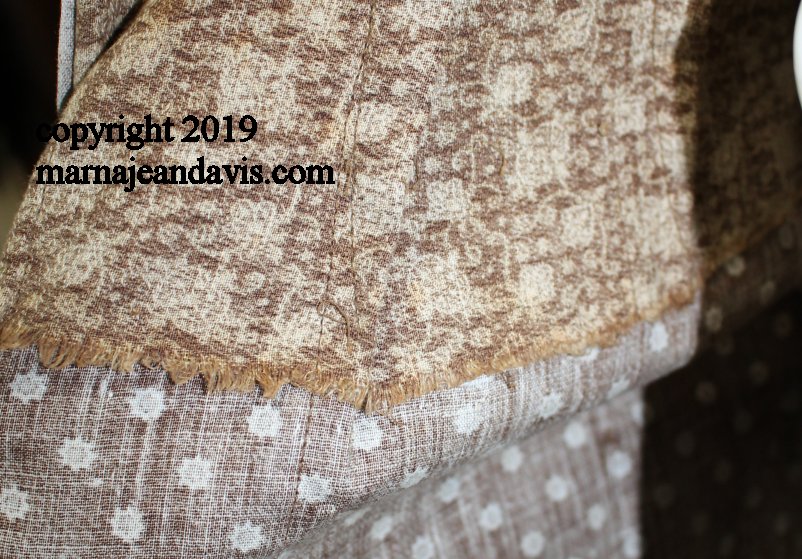
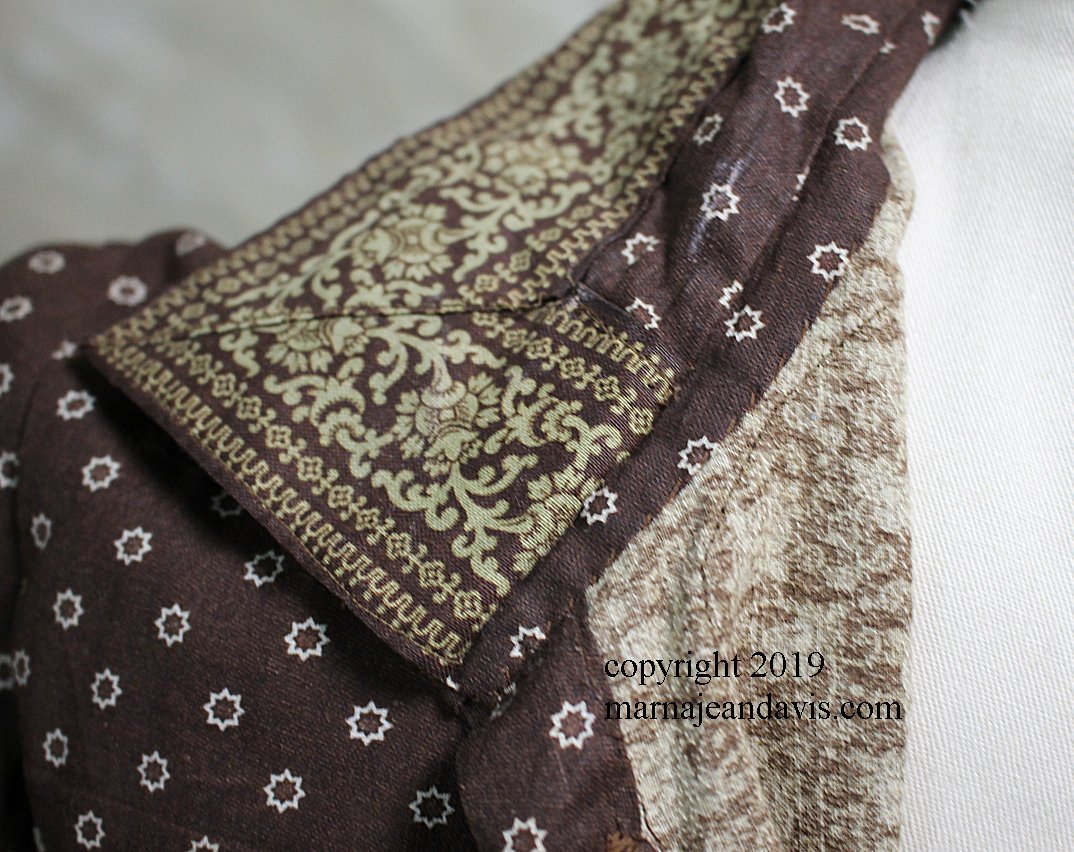 Collar attachment on the extant dress from my collection. 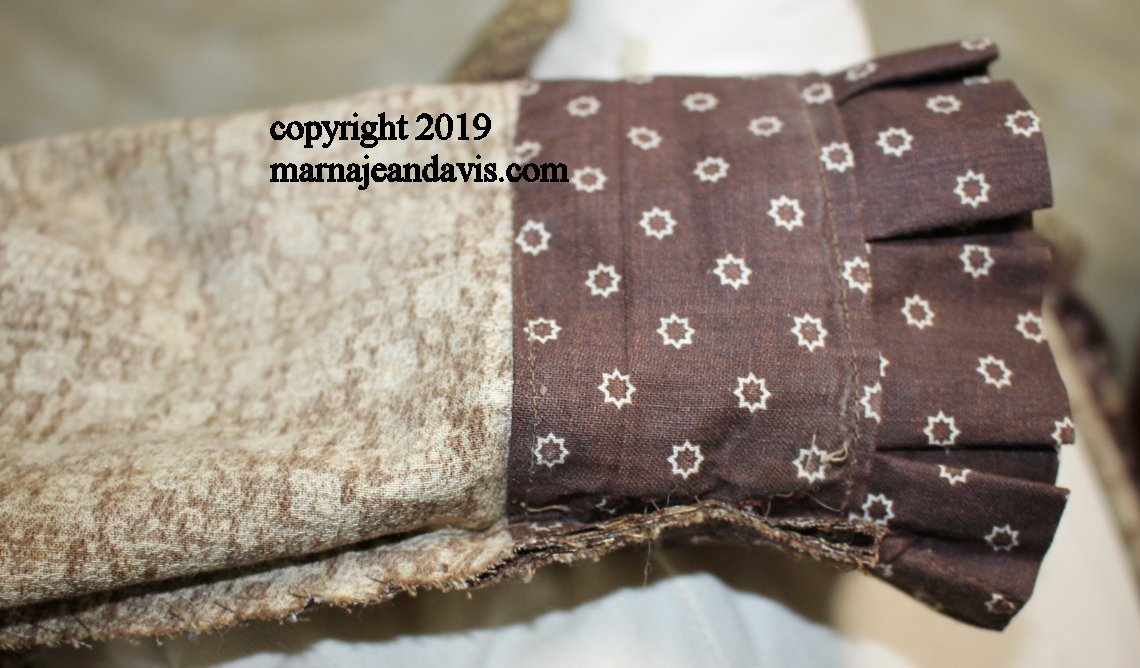 Machine stitched hem from extant dress. One side of the sleeve is sewn together, the separate hem piece is sewn on and sewn down by machine, as is the trim and ruffle. ONLY then is the second of the sleeve seams sewn. 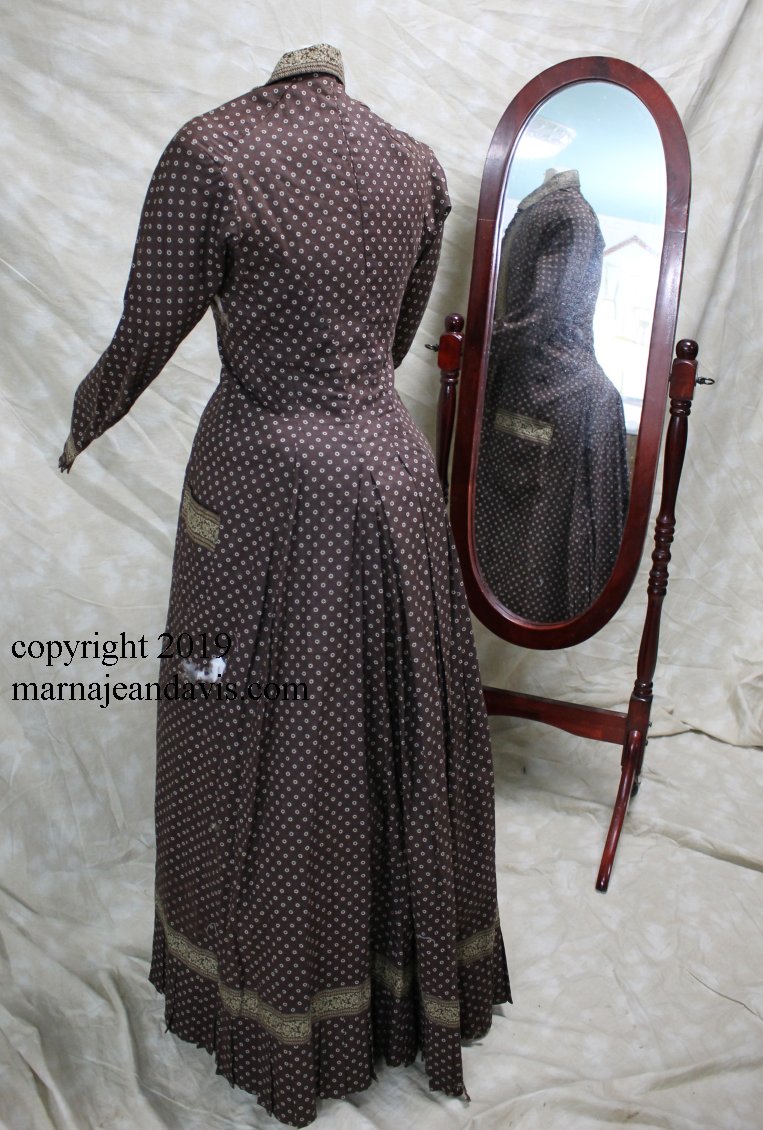 Back view of extant dress in my collection. There are 3 sets of box pleats in this particular dress, at center back seam and the side back seams. Dresses from this timeframe usually had at least one center back pleat, but the side back ones were somewhat optional. It allowed the skirt to fall over a small bustle and give you movement room.
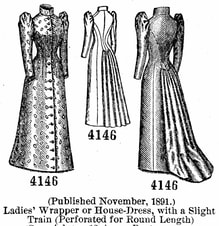
 )Back of Sateen dress The seamlines and skirt width on the dresses were actually quite similar and it was easy to be able to turn one master pattern into several options using primary sources in my possession. My final pattern ended up with an early 1880's style sleeve, a late 1880's style sleeve, and a practically full 1890's sleeve (full enough to be fashionable, not so full to be in the way). Cutting guides are included to shorten the shoulders to a more appropriate 1890's length, and for a gathered back, a pleated back and a gored back skirt. We gave the pattern a test run with a class of 13 people at the Texas living history conference the end of January 2019 and it was a rousing success. I came home and made minor pattern notes (mostly labeling cutting lines or stitch lines more clearly and started the final editing of pattern directions and the compiling of good historical notes.
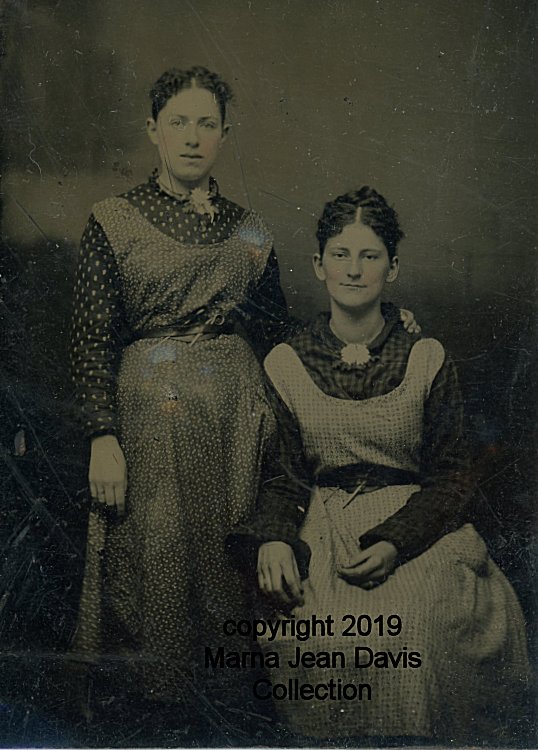
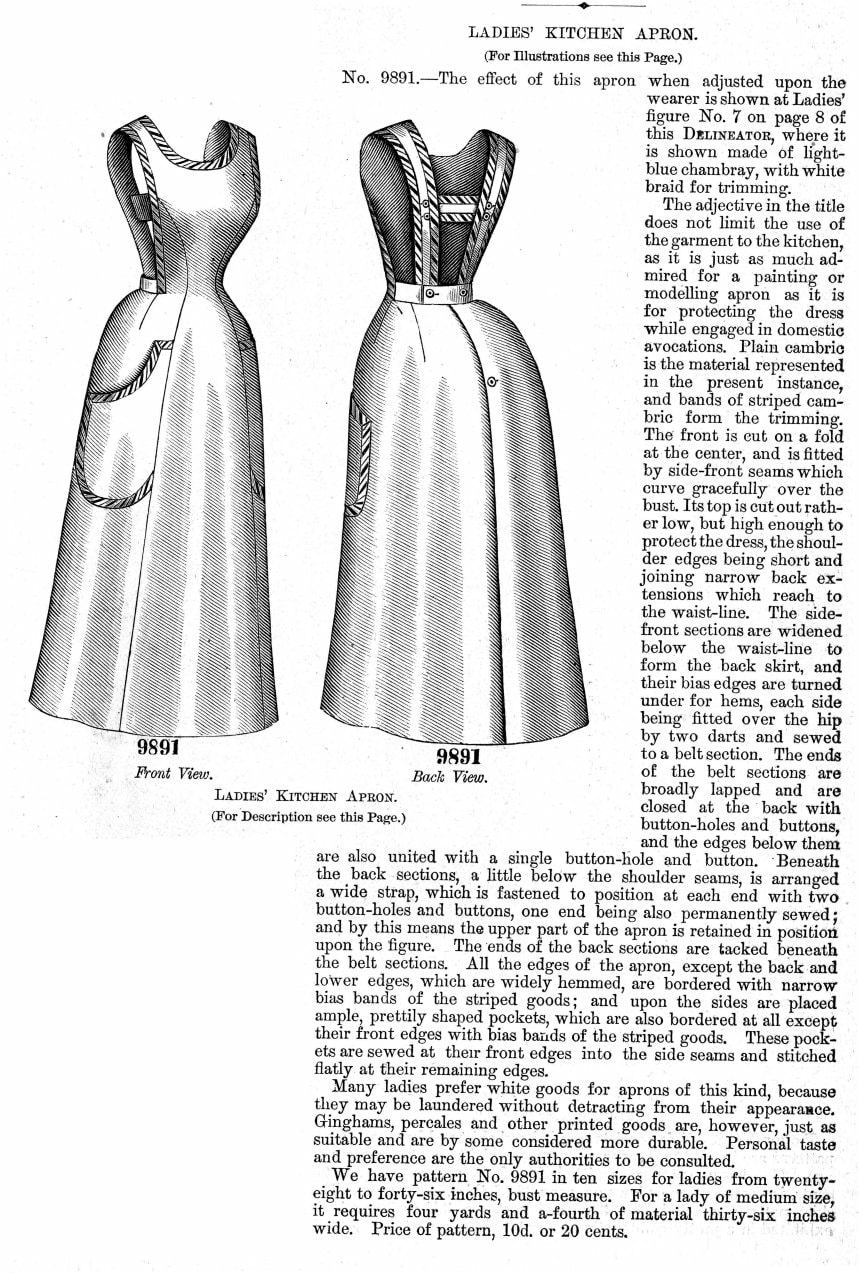
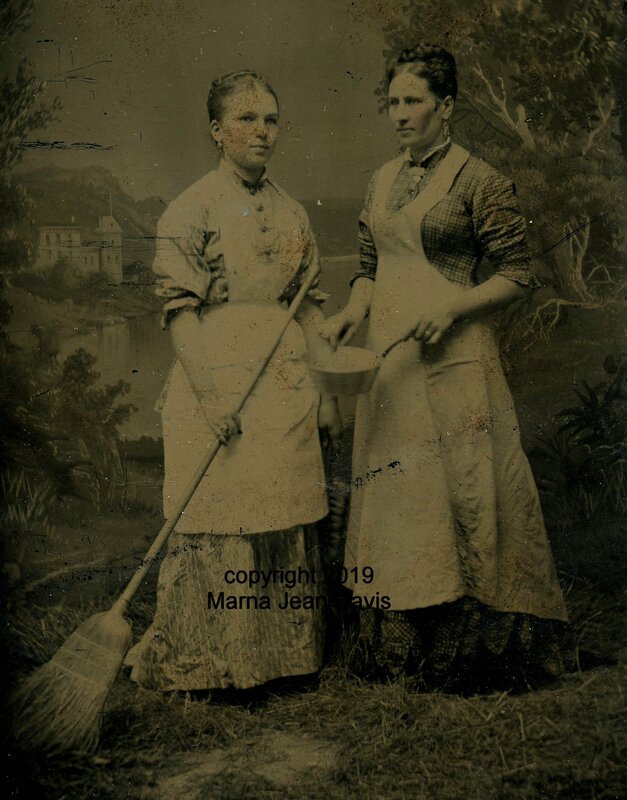
One of the challenges of putting together copy and research for an exhibition is, you can't turn it into a book, it is meant to be a quick learning experience to inspire you to find out more. I decided for those who want a "bit more" I would blog about some of the reproduction aprons we used (the light level is too high in the area for originals) and a bit more about the dating and history of some of the images. 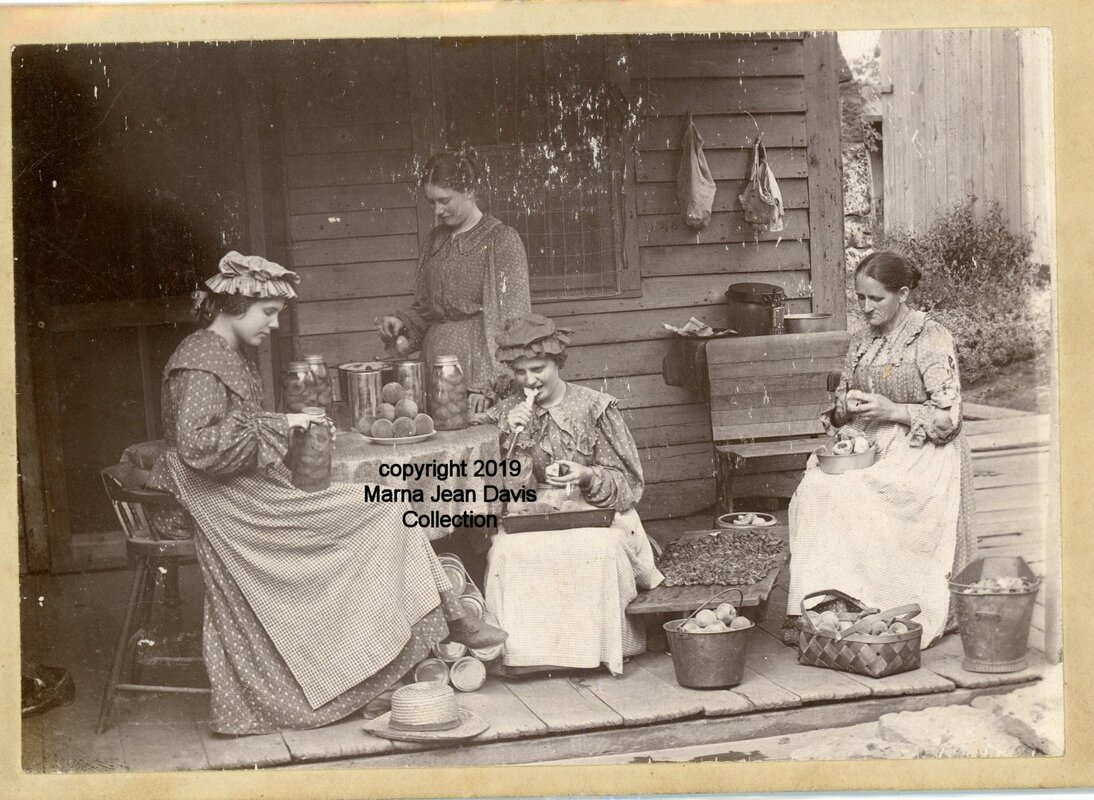 As you enter the exhibit this image is featured. This is 1890's and seems to be ladies canning peaches. The aprons here are pretty typical of late Victorian everyday wear aprons. A simple long rectangle gathered to a waistband that covered most of the skirt. I could imagine this happening on the porches at Nash Farm when I acquired this image for my collection. Many of the original aprons like this I have seen make use of selvage edges as the sides of the apron, leaving two less hems required when making an apron.
 1895 Diamond Garment Cutter
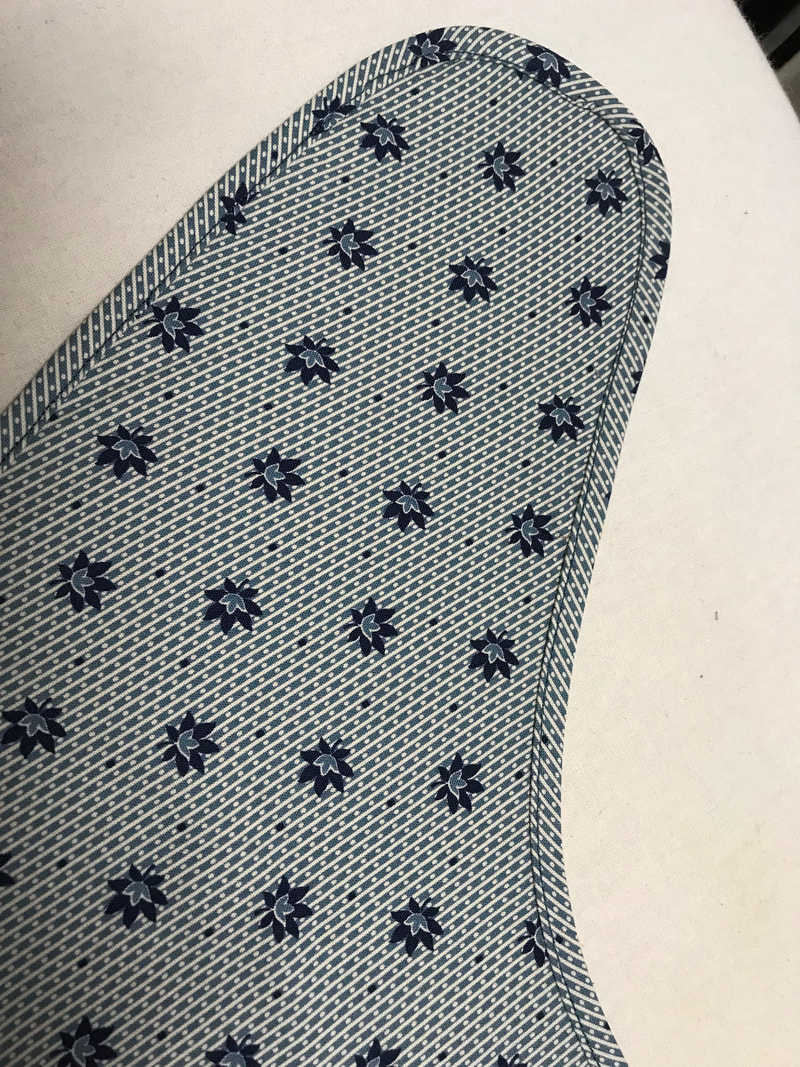
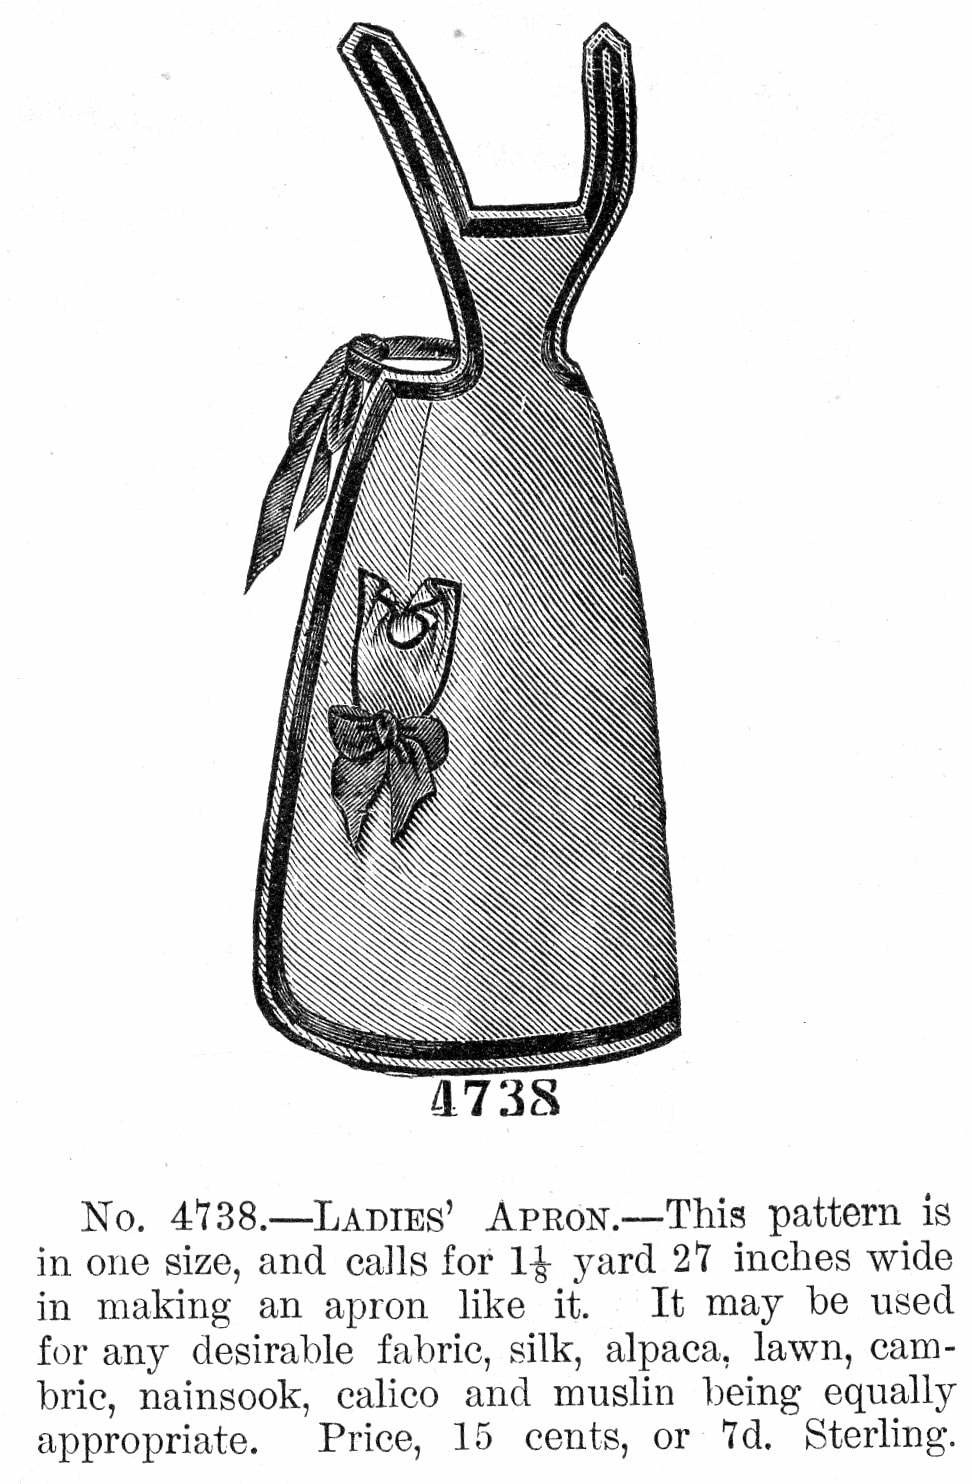
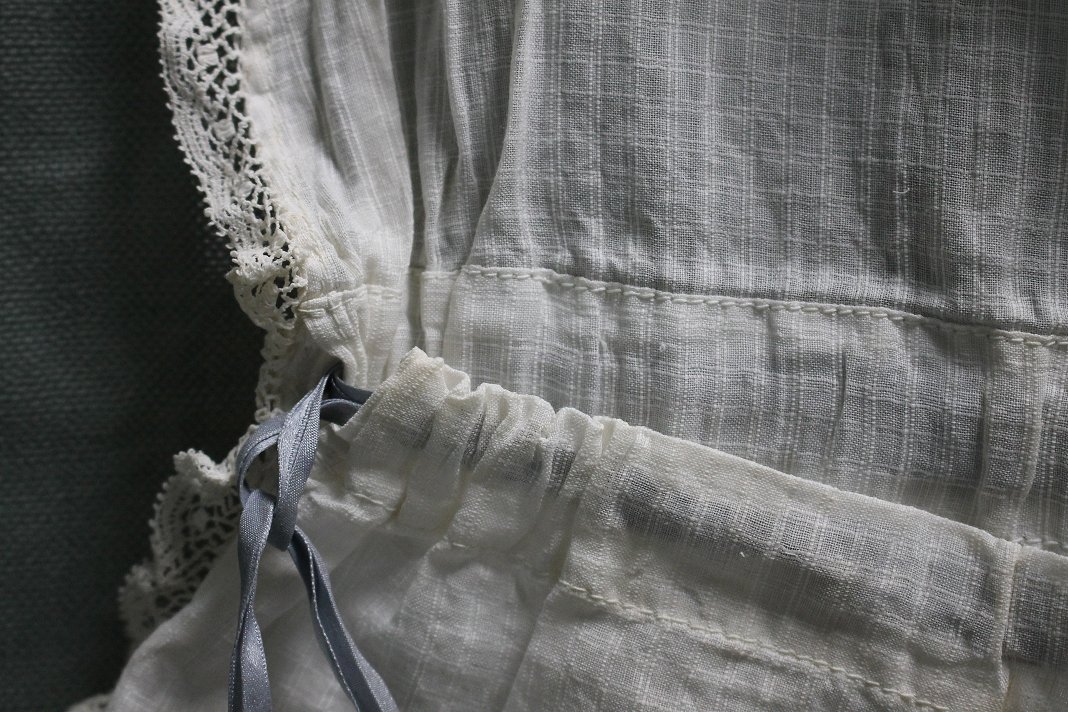
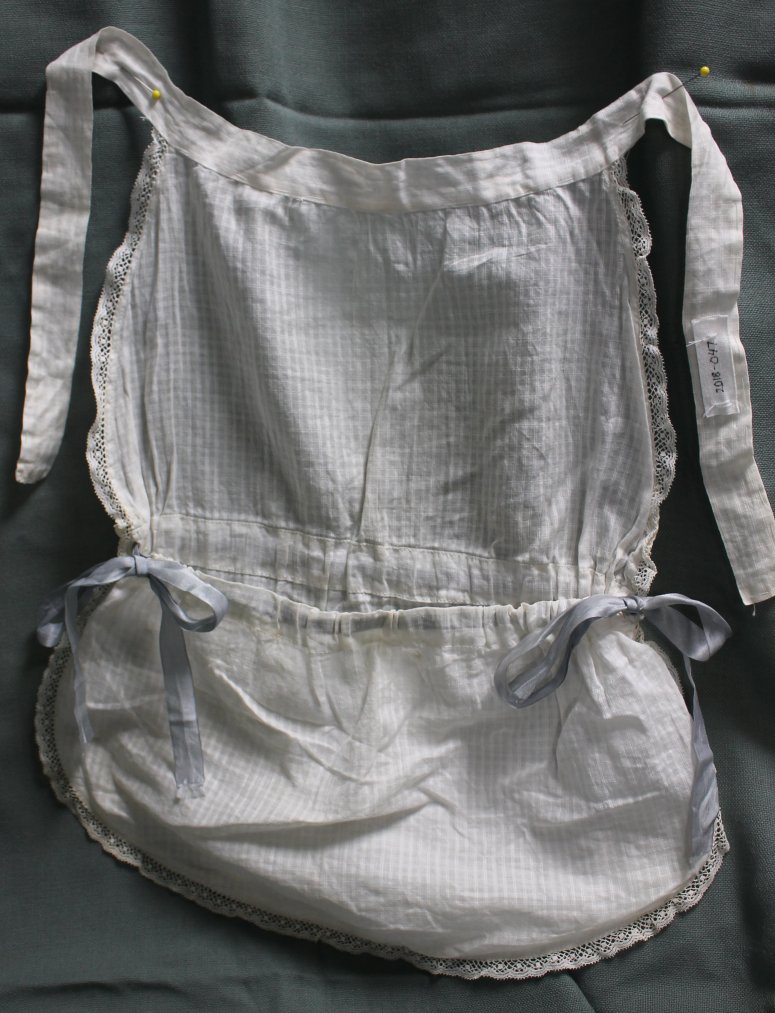
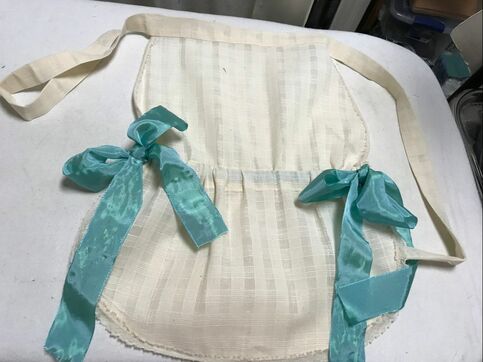 By the needlework panel you will find a knitting apron. This was modeled after an original in my collection. It is meant to be a portable "pocket" that holds your needlework or knitting. If you have to put it aside to tend to another chore, simply remove the apron and it is all neat and tidy for the next spare minutes. The original apron is a white barred cotton. The strings are not made long enough to tie, but instead would pin together. I chose slightly wider ribbon on my reproduction and a sheer ivory barred fabric.
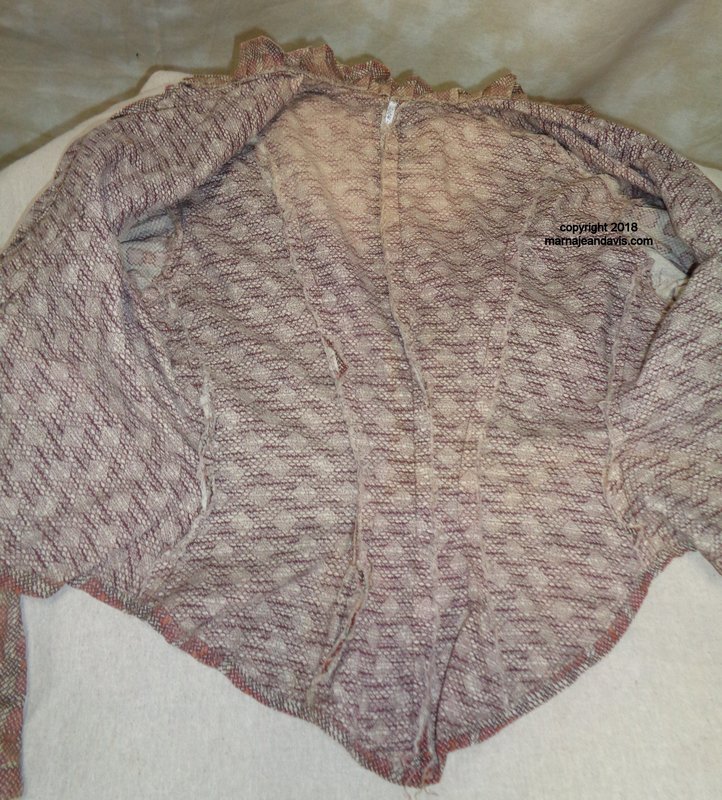
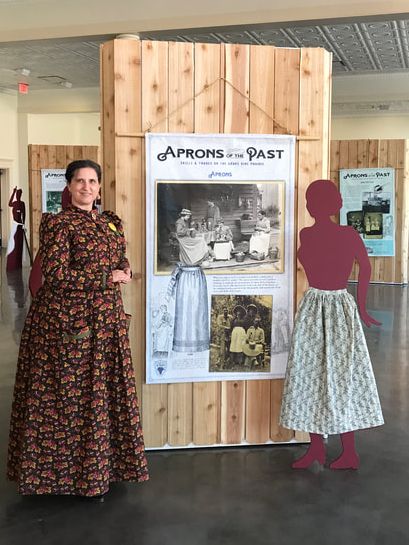
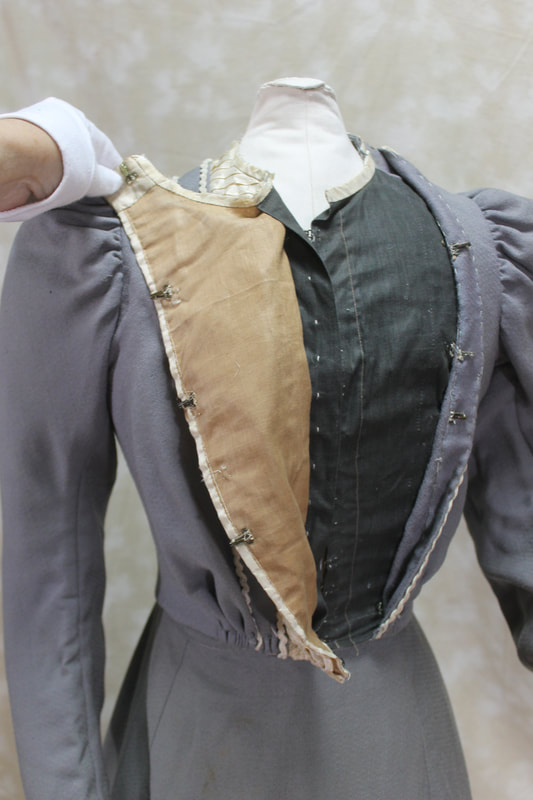
I hope you get a chance to visit Grapevine and see the exhibit and stop by Nash Farm and say Hello! below are a few images of me and my visit to the finished exhibit. Views from Grapevine, TX- Aprons of the PastTrying to replicate a Late Victorian Bodice can seem daunting. Patterns are available, but some are more correct than others, and some companies take modern shortcuts that can make fitting harder later on. They seem complicated in construction, and endlessly varied. In reality if we follow the sewing techniques that the ladies of the time used, we are more likely to get a better end result, that is closer to how the originals would look. One of the main differences you will immediately see between modern pattern instructions and extant garments is that bag lining was not used. The most common method was flat lining with bias hems applied to bodice bottoms. How did they get the lining and outer layers to match? What kind of linings did they use? Do you have to use linings? How was the interior finished? How do you finish the bottom edge? Today's post is some views of bodices from my personal collection that are good representations of general guidelines for construction of a reproduction bodice or waist. Click on images to see larger views.
 Inside look at the above bodice. Things to note:
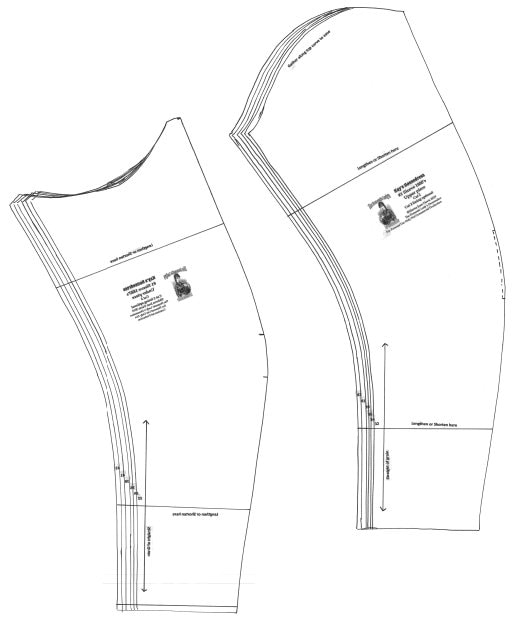
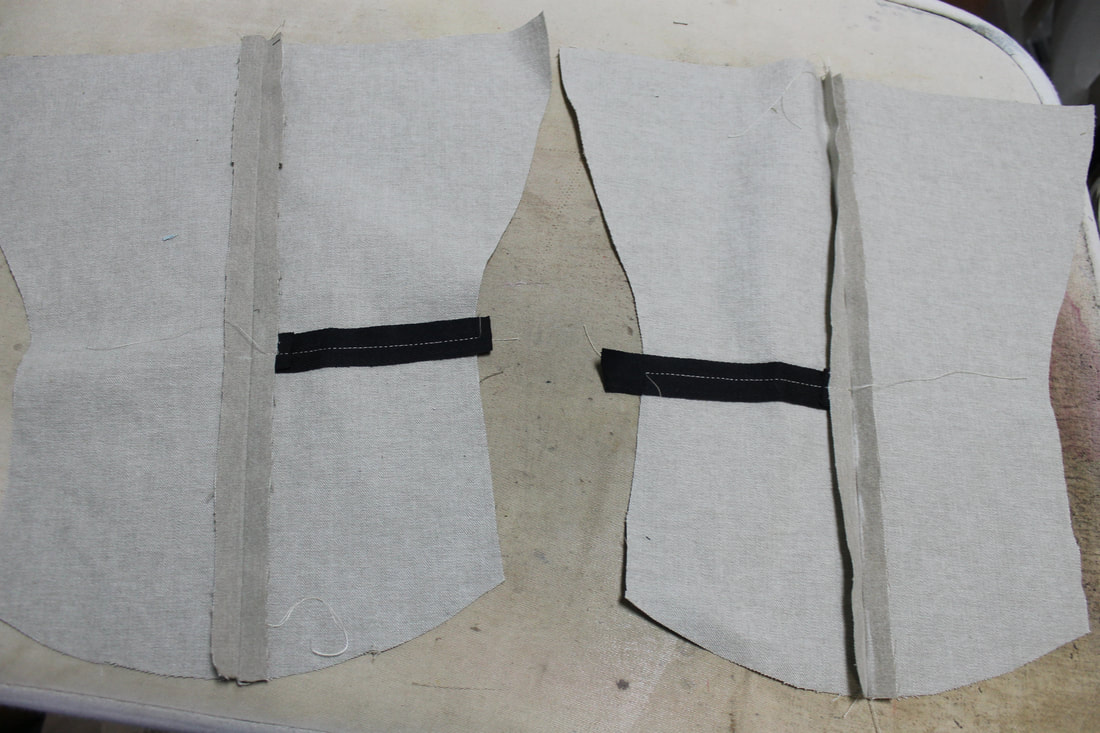
 Basic bodice pattern pieces for 1880-1890's 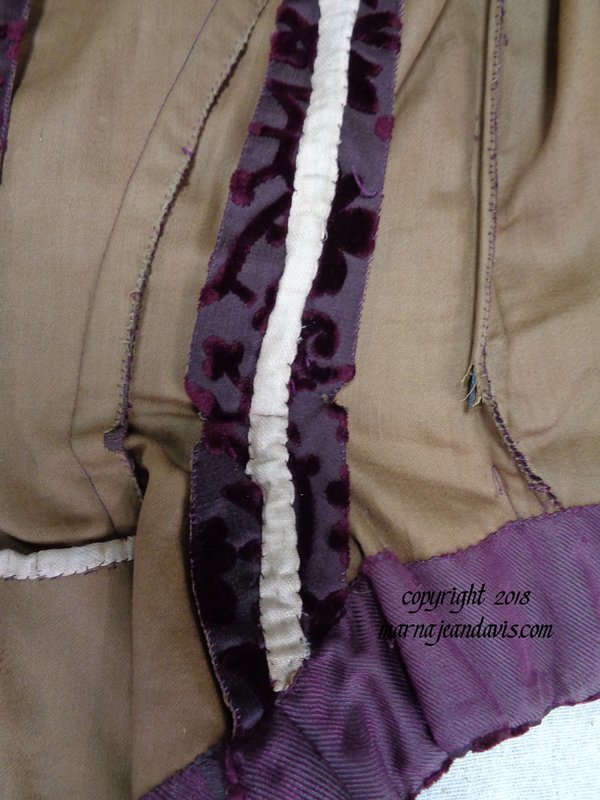 A bit closer look at the side back and underam seams. The wide seam that is pressed open is the side back to underarm piece seam. Notice that it is notched slightly at the waistline to allow for the flare of the hip. The casing for the boning is whip stitched on, you also will see it feather stitched on at times. The seam to the right is the undearm to front seam, the edges are whipped together and boning is inserted into this channel. you can barely see it peaking out. On the bottom edge is a silk twill used for the bottom facing of the bodice. Most bodices do not have shaped facings (the exception being sometimes the back panel for pleats) Usually a simple bias cut about 2-3 inches wide is used to finish the bottom edge. This makes it easier to adjust your bodice for good fit. If you cut a shaped facing, then to get a good fit you must cut your facing after the bodice has been fitted, which is much more complicated. Using bias lets you adjust for curves of the bottom and be flexible after final fitting. 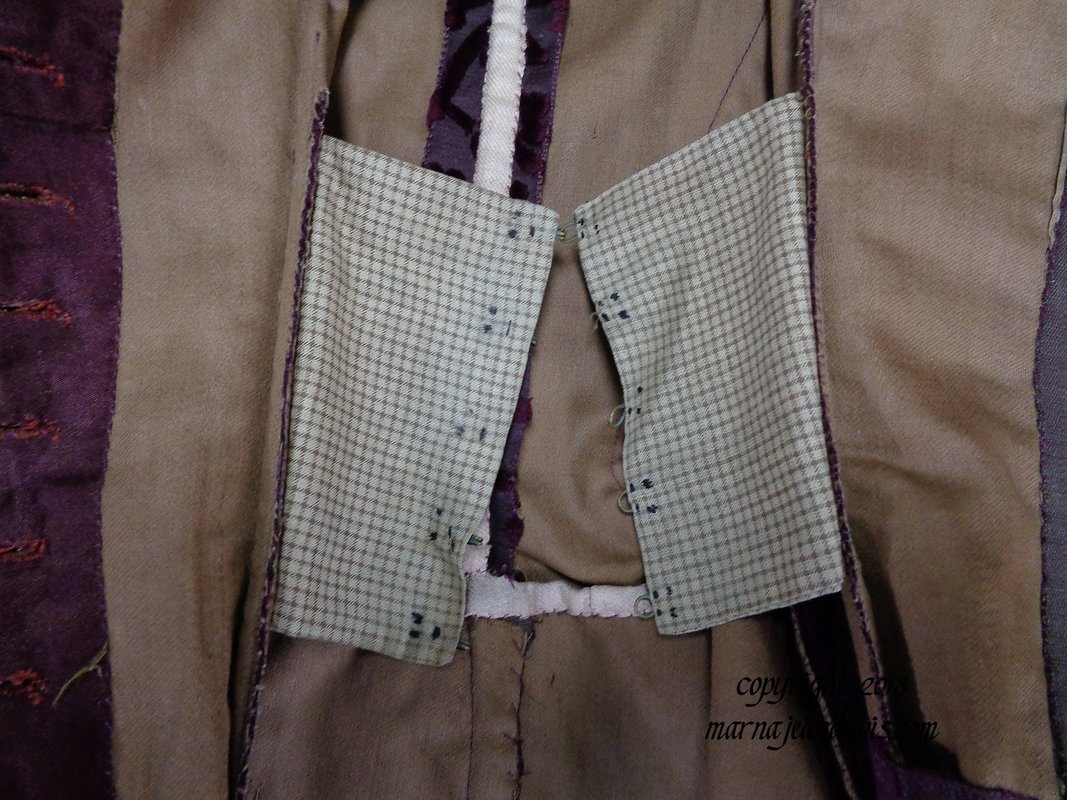 Inner "belt" attached at darts, to take strain from waistline buttons. Notice that the excess dart fabric has been trimmed away.  Button facings. To reduce bulk in heavier fabric, the extension behind the buttonholes, and the facing for the overlap are both cut from a matching silk fabric. Thinner fabrics and cotton fabrics usually just have the edge extended and folded back.
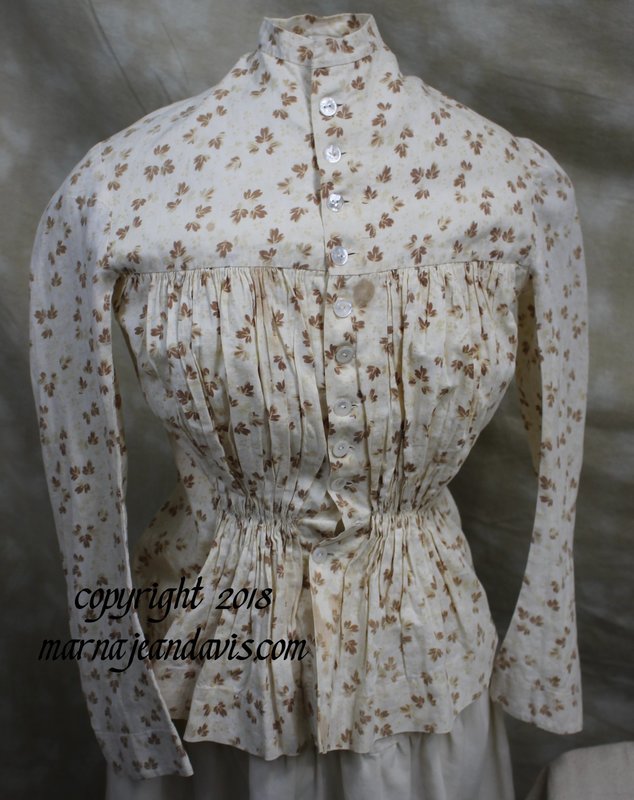
This is blouse or waist made to be easily washable. From the outside you would expect it to be unlined, but the bodice portion is actually lined. This helps reinforce seams, and gives you a longer wearing garment by absorbing body dirt and giving strength to the outer fabric. 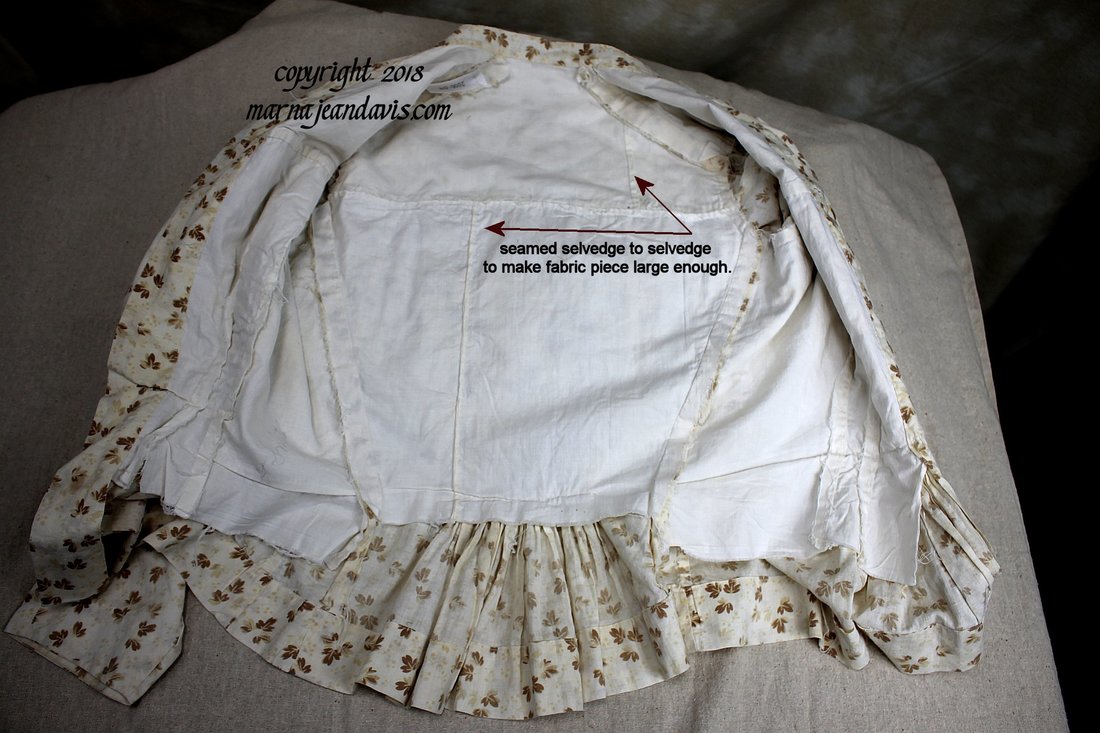 The waist is only lined to just below the waistline level, and is fitted. both the back yoke and the back bodice have linings that have been pieced to make them big enough to cut the lining pieces out. The piecing is sewn together selvedge to selvedge. The bottom of the lining is not hemmed, ad the seams are not overcast. This is fairly typical in wash dresses. Washing by hand and the fact the fabric is of a good tight weave keeps them from unraveling in the wash. Pinking would not be used to prevent raveling on inner seams until the 1890's. The hem of the waist is done by machine stitching. Lining is darted with standard two darts on each side. Front facing for buttonholes and buttons is simple an extension of the front line that is folded to the back. They are most often cut on the selvedge edge of fabric so that the edge does not require finishing that would add extra bulk.  Above I mentioned that bodices from the 1880's and 1890's generally had the same standard 4 pieces. In a less fitted washable waist like this pieces may be combined. IN this one the back and side back pieces are cut as one, and the underarm and front pieces are cut as one. The outer gathering of fabric to yokes allows for the needed hip room instead of the extra seams flaring out at that point. The sleeves are not lined in this garment. Also notice as this is not as tight a fit, it has no inner belt.
 This is a great example of an everyday type garment. The basque (a basque is a fitted bodice that extends below the hips) is lined with what seems to be the leftovers of another garment. Both bodice and sleeves are lined. The body of the garment wrong sides of fabric are placed together and then treated as one fabric piece. The sleeves the right sides of the lining is placed toward the wrong side of the outer fabric. I suspect this was done on purpose, as one sleeve has been mended several times with patches but the other sleeve the worn through outer fabric was enough damage it has been cut away and the edges neatly folded under and stitched to the lining fabric as a mend. The bottom edge of the bodice is bound by machine with self fabric binding. The width on the inside is about 3/8" of an inch and turned to the outside of the bodice and stitched down at about a half inch width. Sleeve hems are 3/4 inch bias turned to the outside and stitched down by machine.
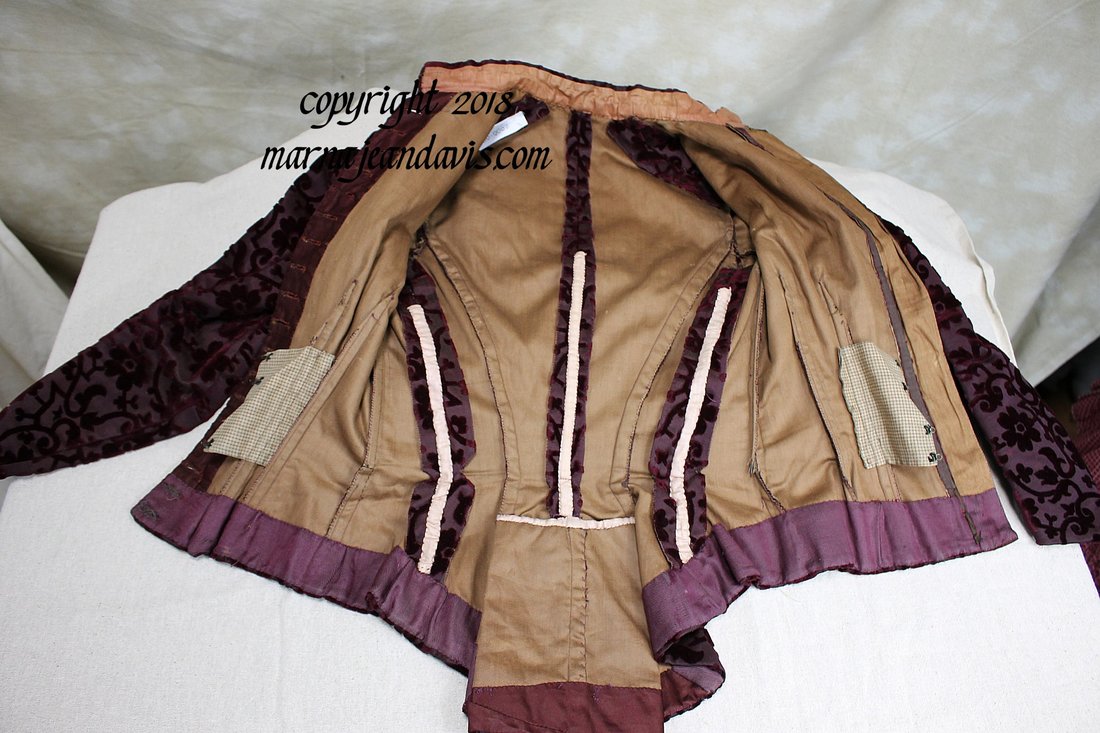
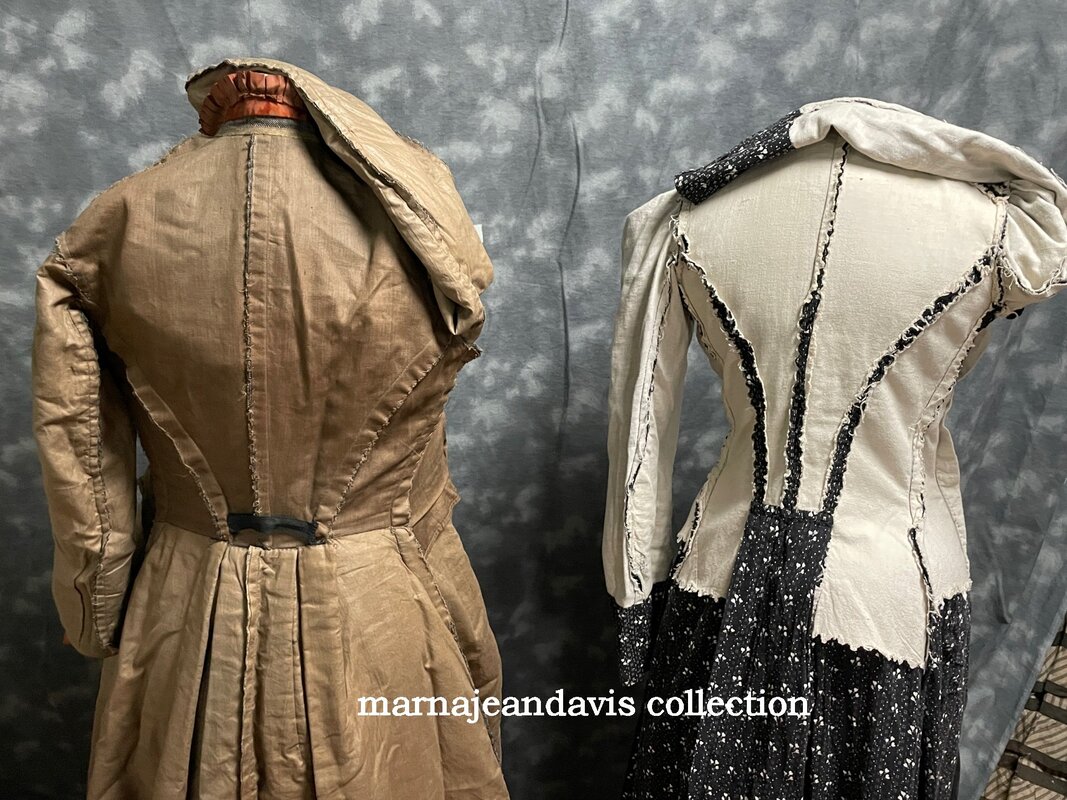
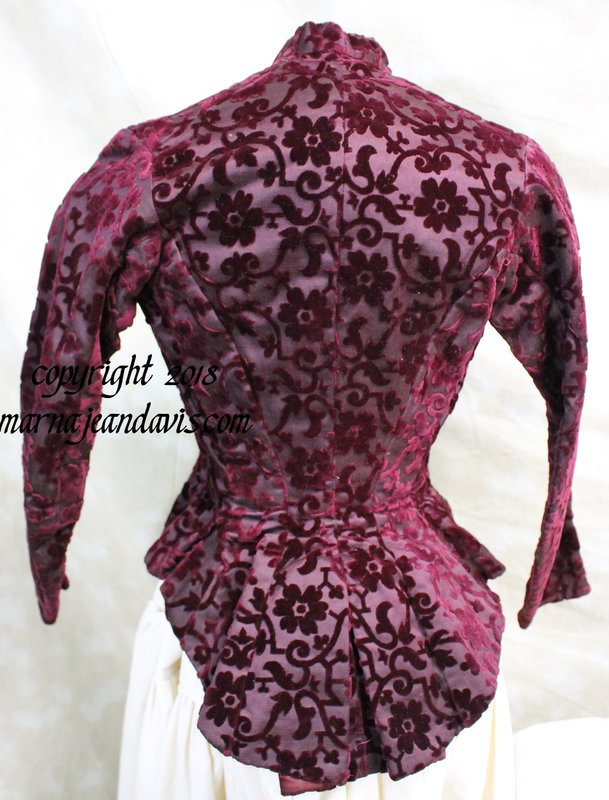
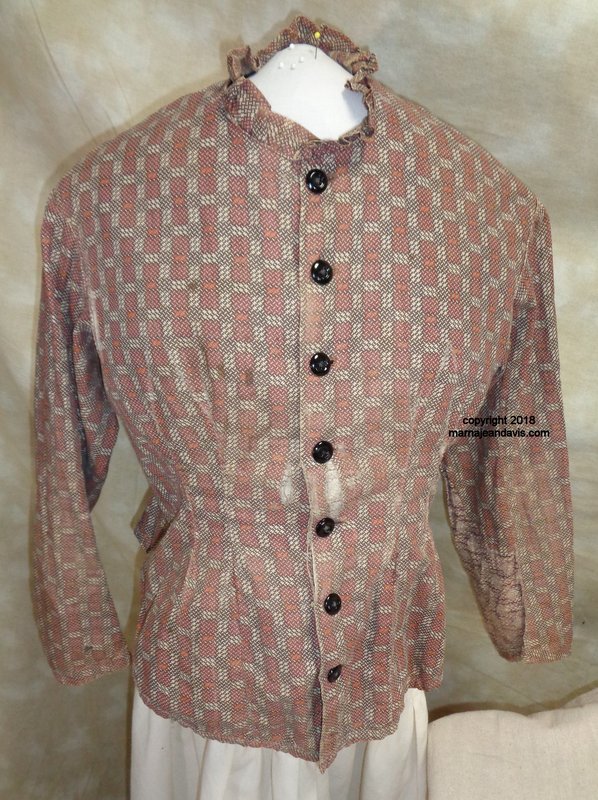
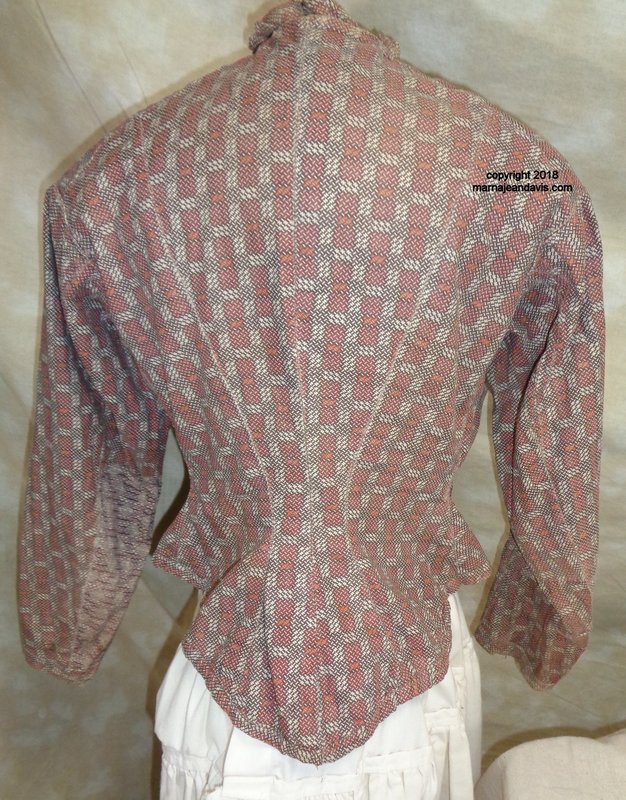
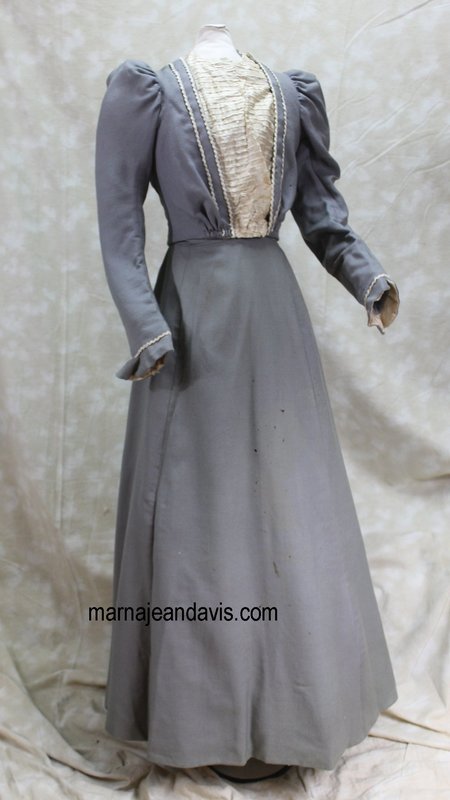
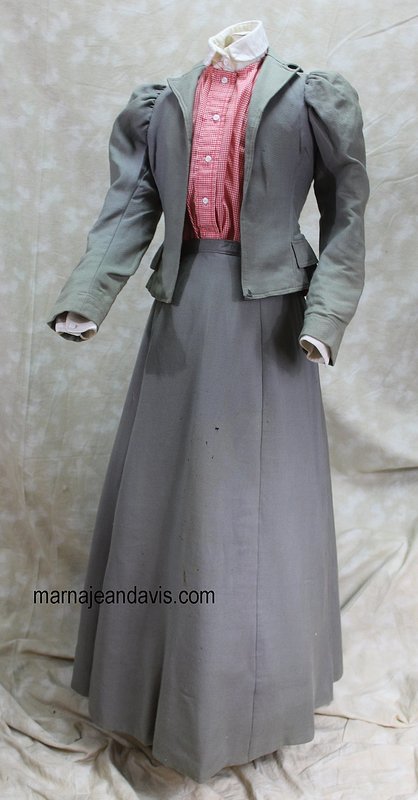
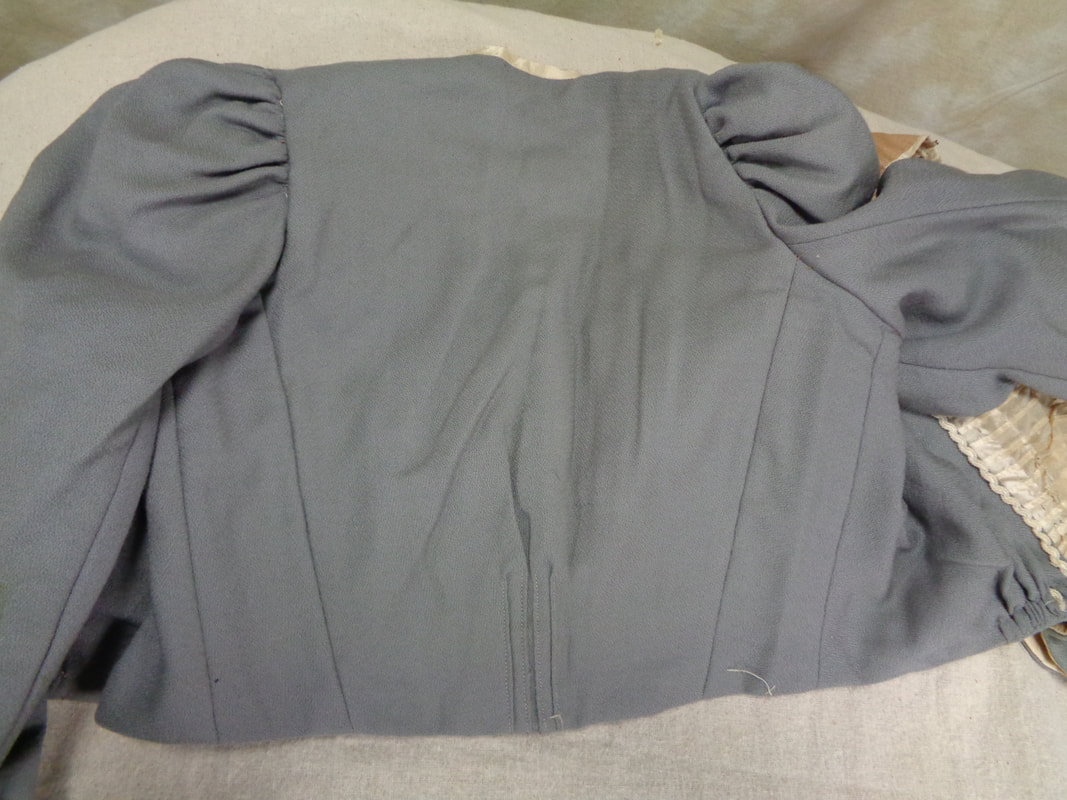
This set in my collection came with both a bodice, and a jacket meant to be worn over a shirtwaist. The jacket has been worn for a longer period or in more sun as it has some distinct fading, but it is definitely from the same outfit.
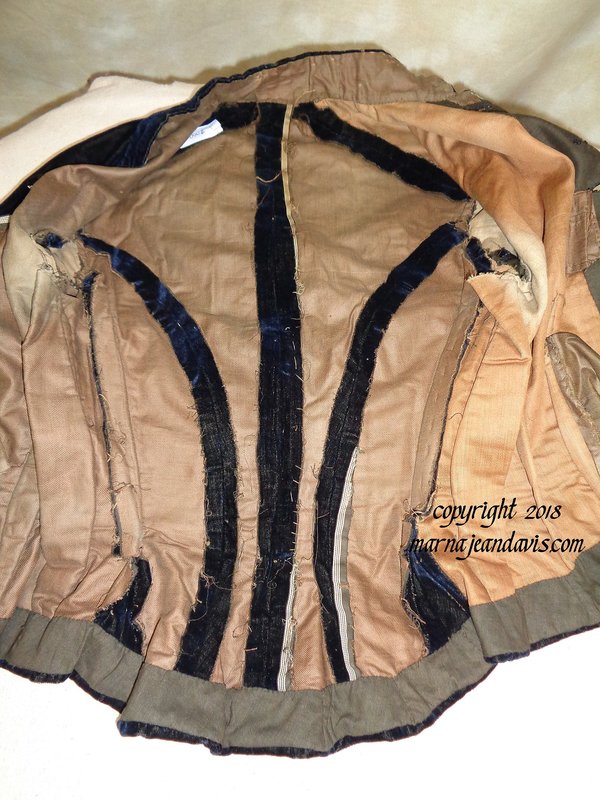
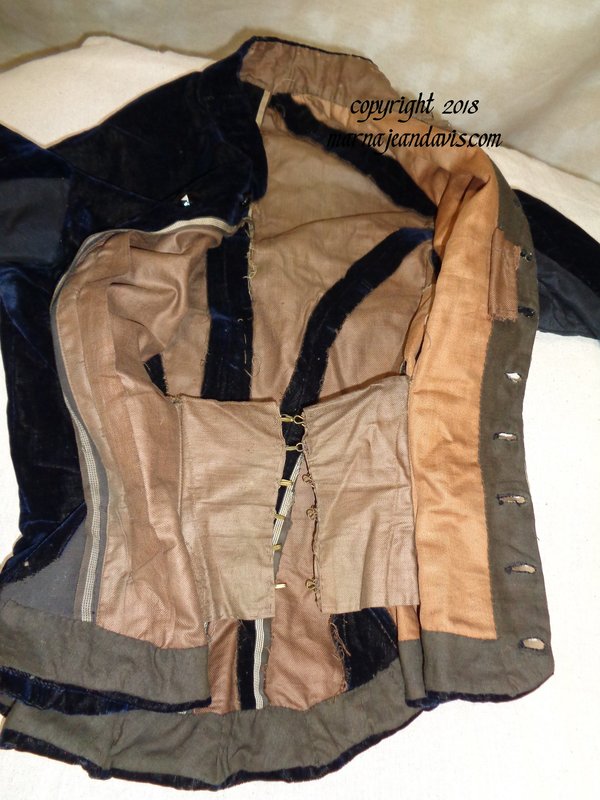
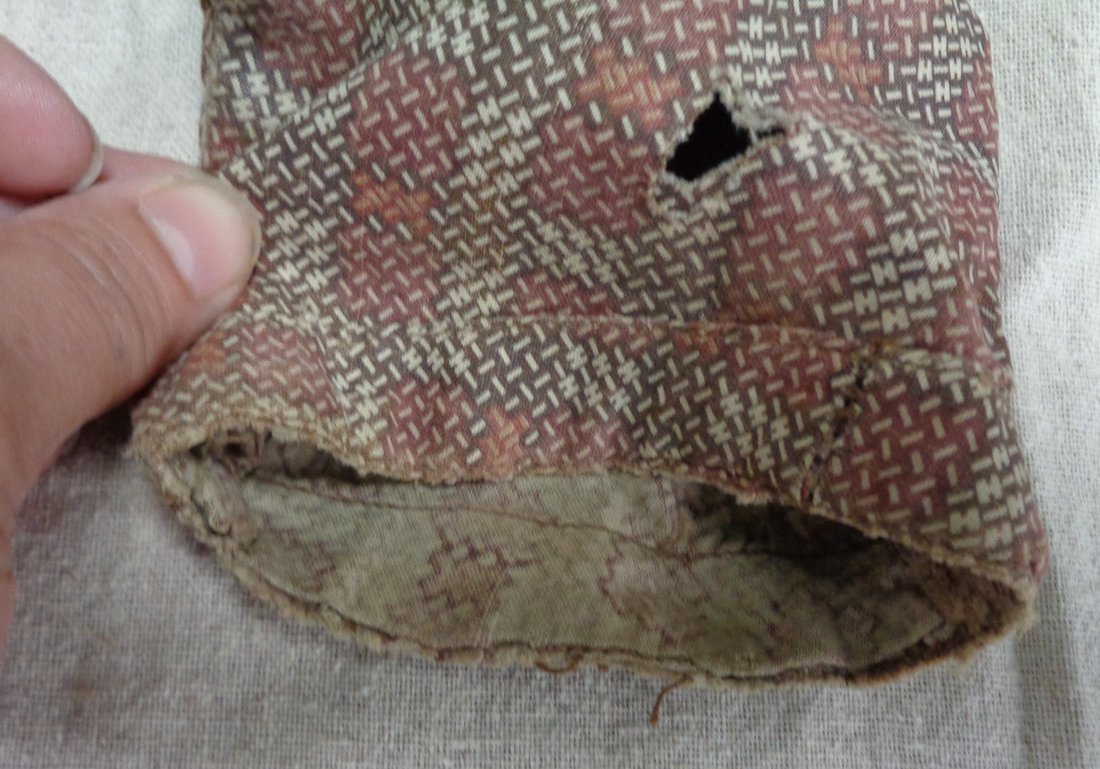
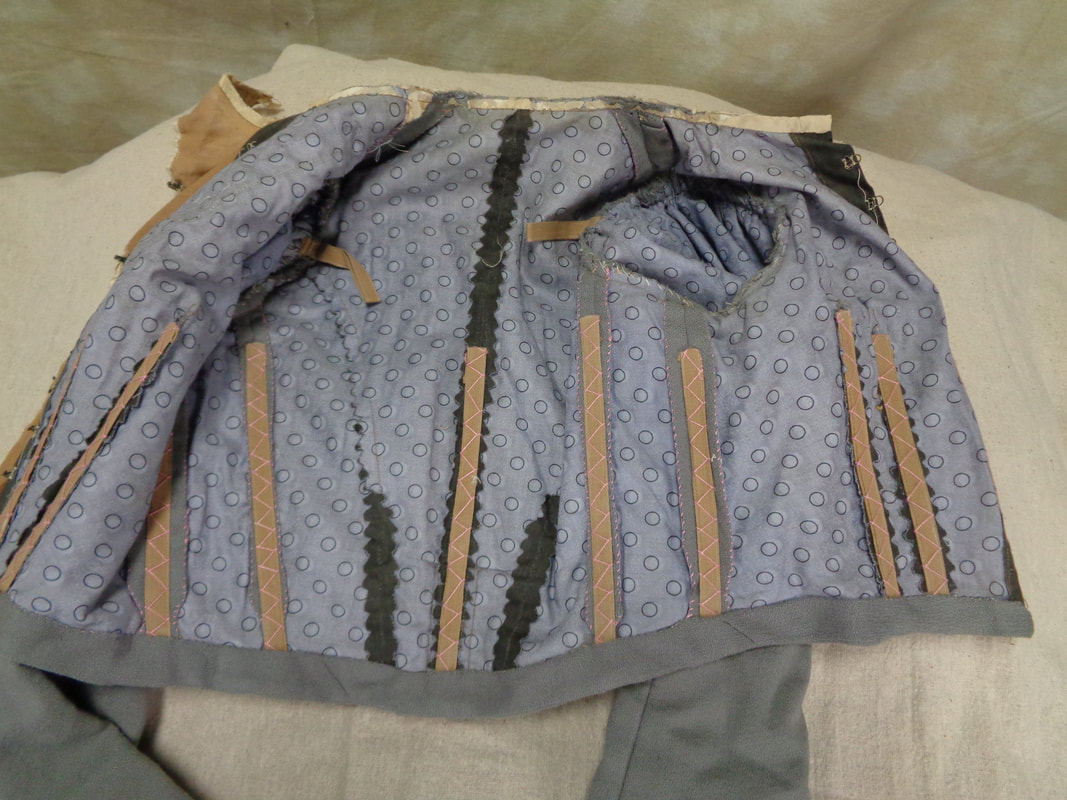
 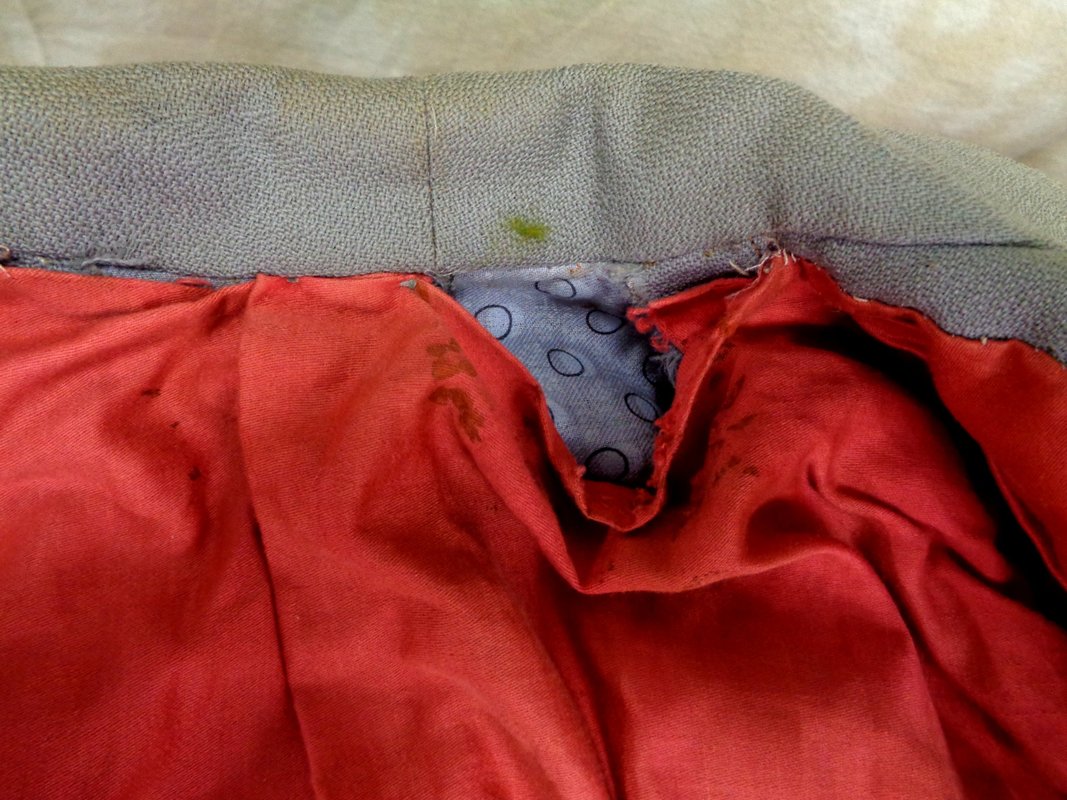 The matching jacket is constructed without boning. Has a flat lining similar to the bodice, but then is lined like a normal man's coat. The red lining is cotton sateen or farmer's satin. I have seen coats for women both treated in this manner AND I have seen them flat lined- usually with bound seam edges. This photo shows near the collar where the hand stitching has come loose and you can see the flat lining. So there you have a peek at the "innards" of a few of the pieces in my collection.
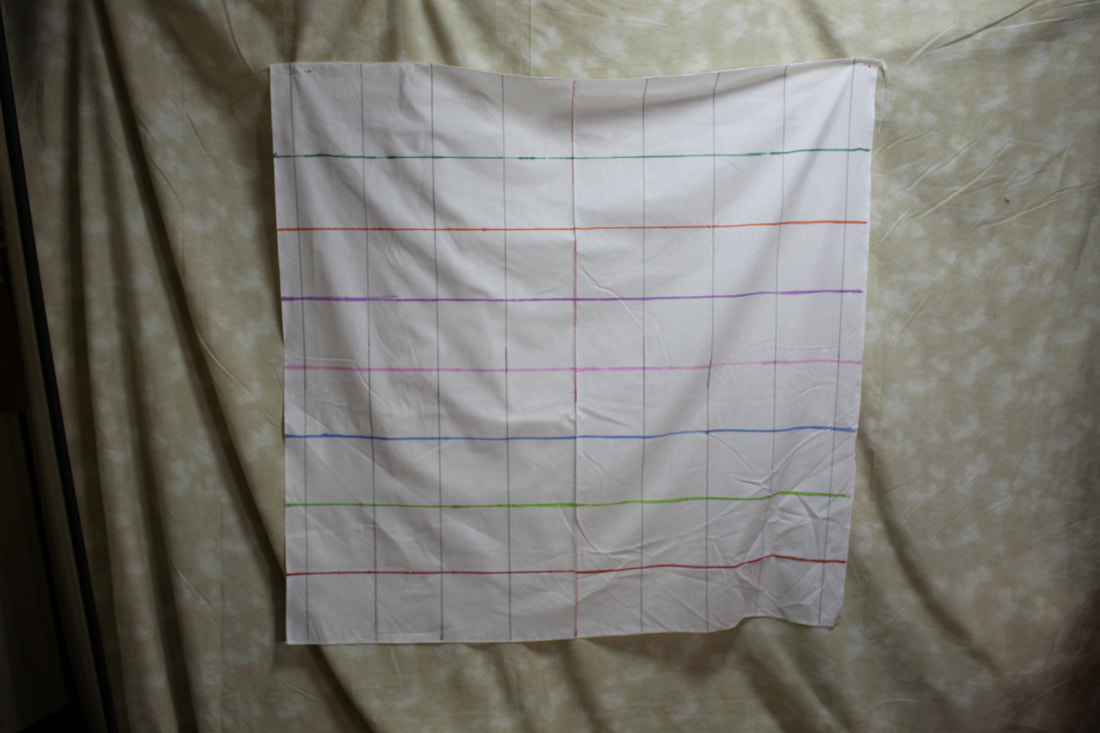
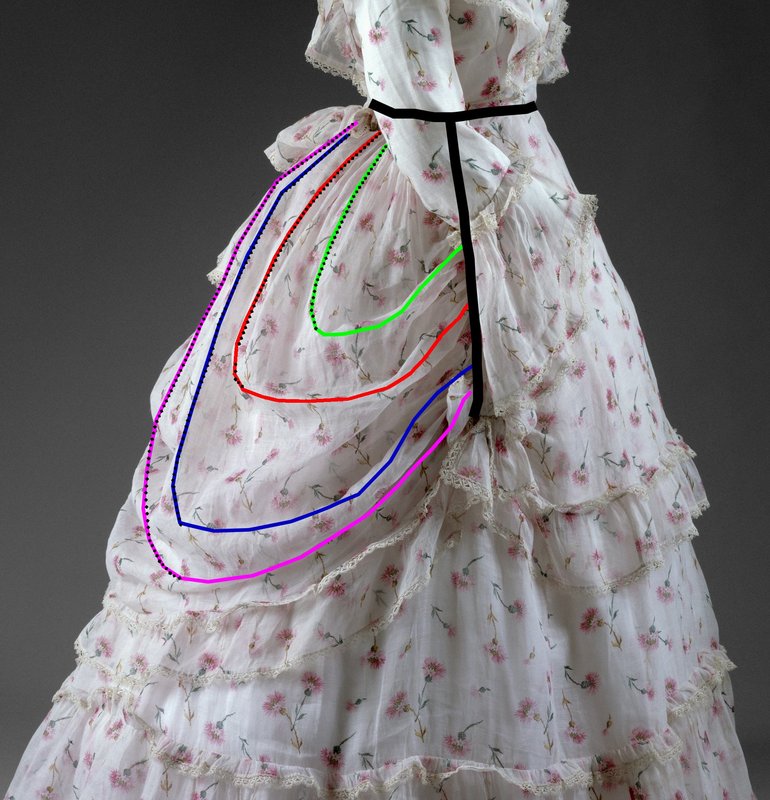
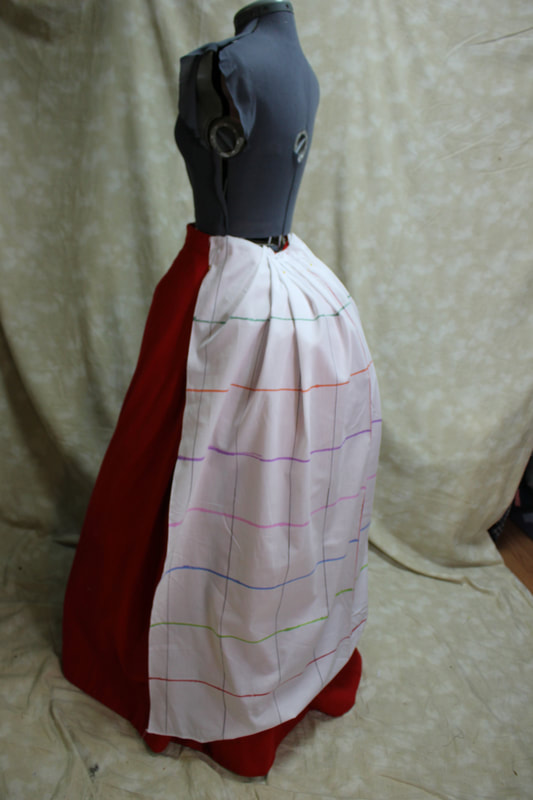
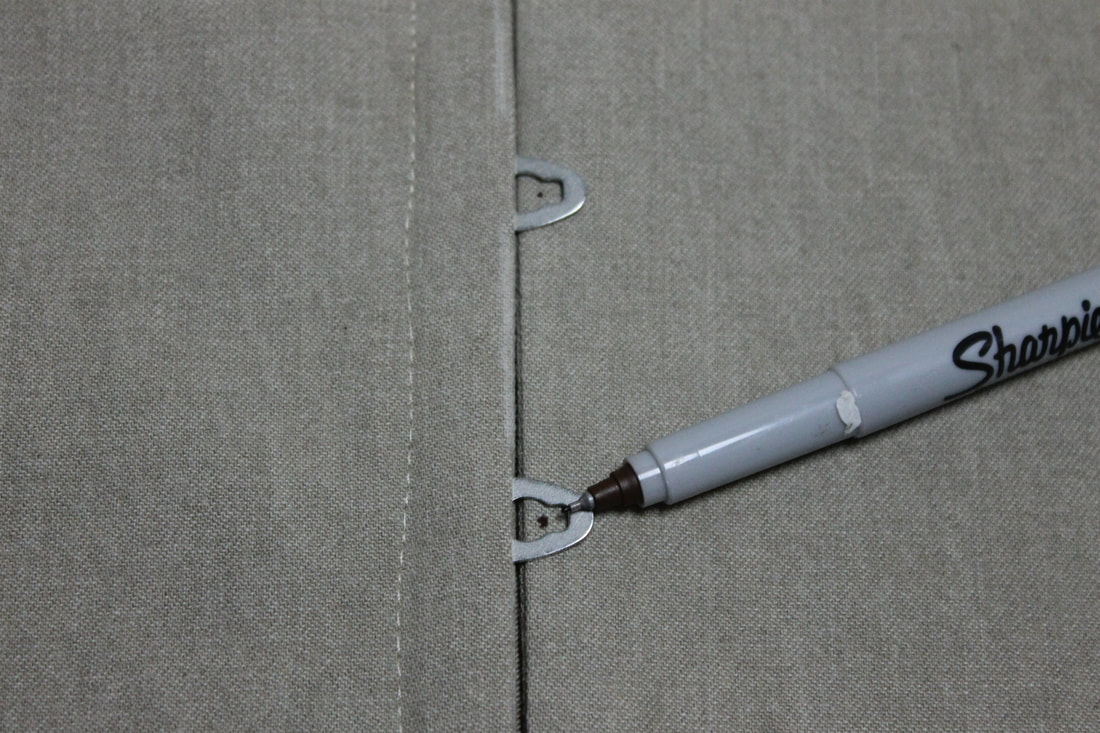
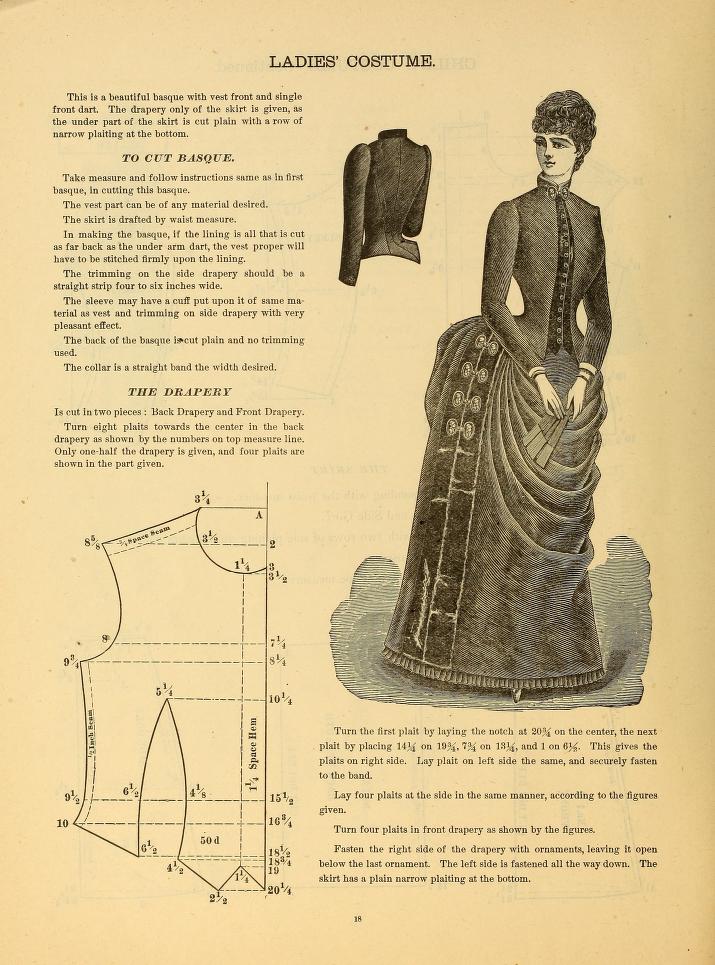
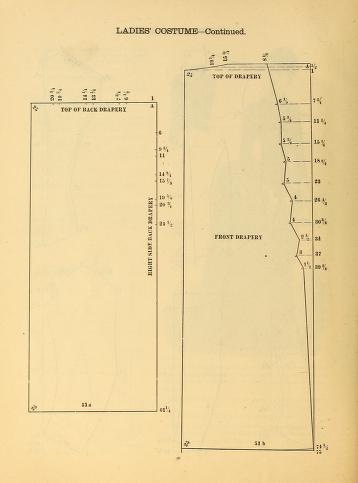
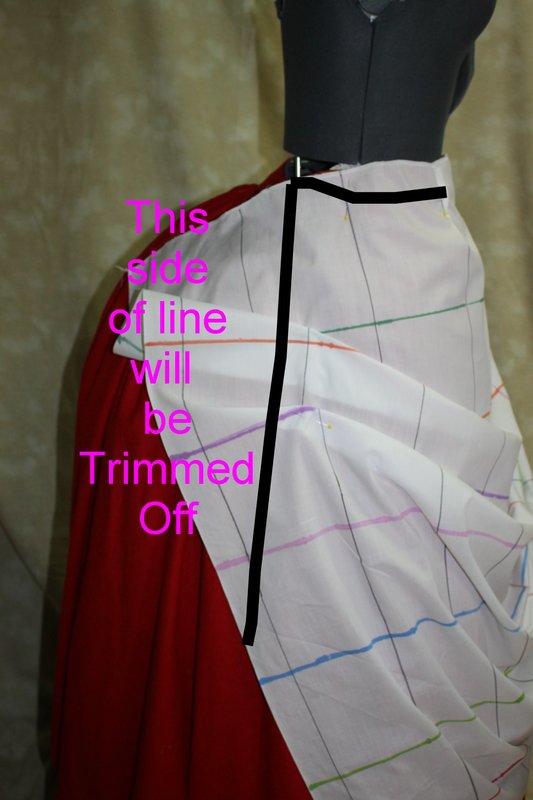
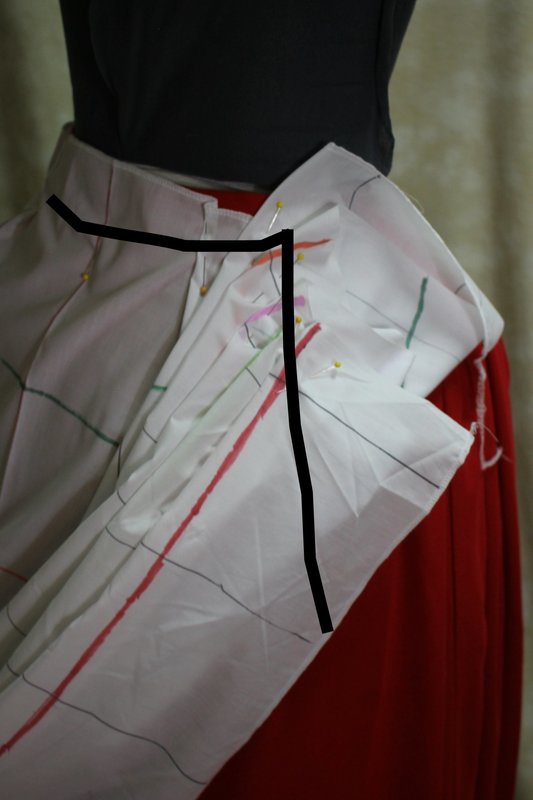
There are some great online resources for Victorian/Edwardian Dress construction some I recommend are: Instruction book for the French and English Systems of Cutting Fitting and Basting- 1881 J. McCall Keystone - a Textbook of Cutting and Designing Ladies Garments The Dressmaker Have you ever seen a dress you wanted to reproduce, but did not have access to it in person? This post is going to help you try to read the lines of a draped overskirt to bring a bit of understanding to how draping works, and how to read a photograph to give you some starter guidelines while you are draping. 1. You HAVE to have a mannequin to do this- Or a good friend who is willing to stand while you drape. Draping involves fussing and adjusting to make sure the lines are reading like you want them.
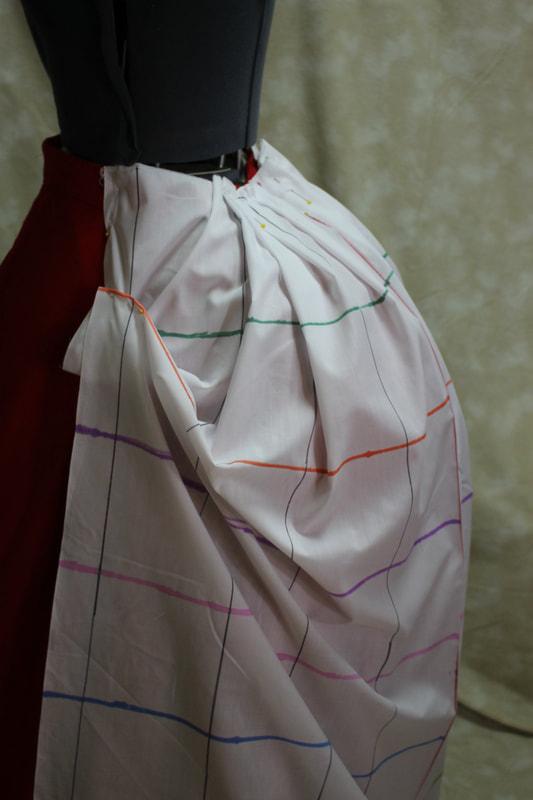
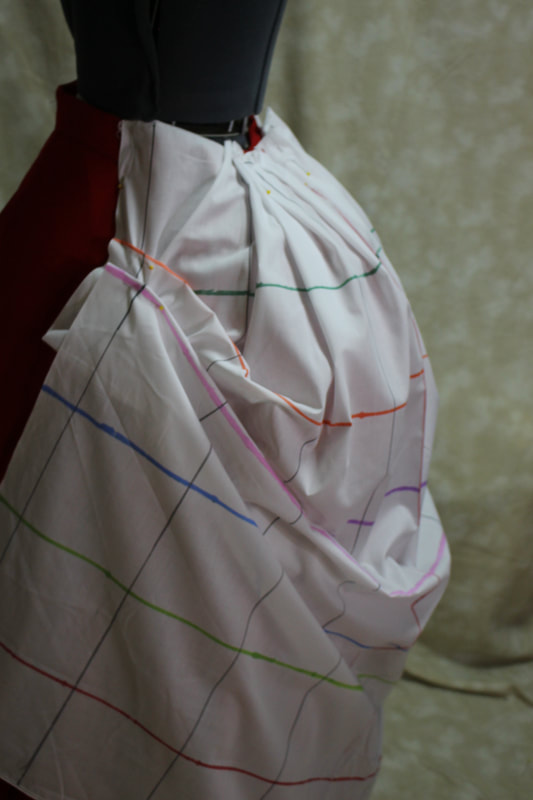
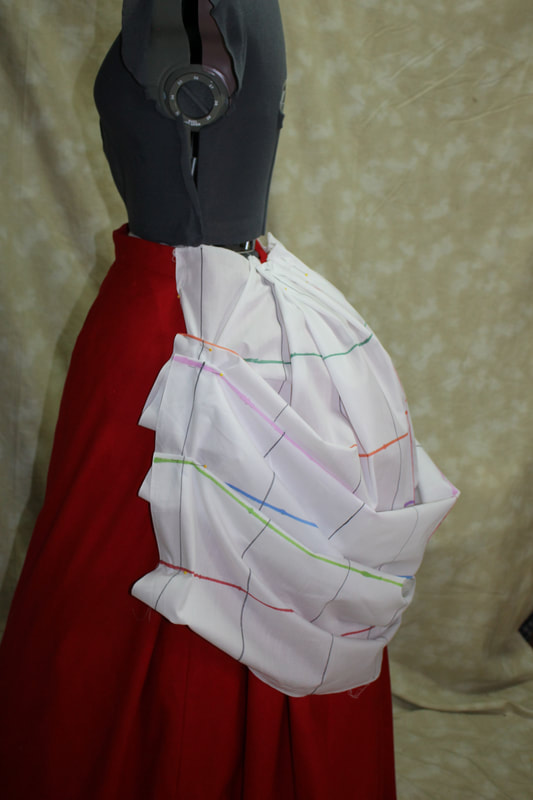
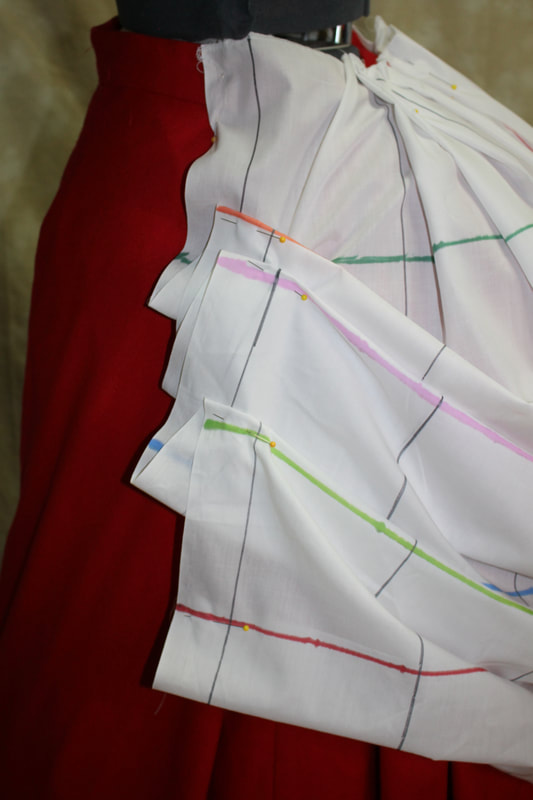
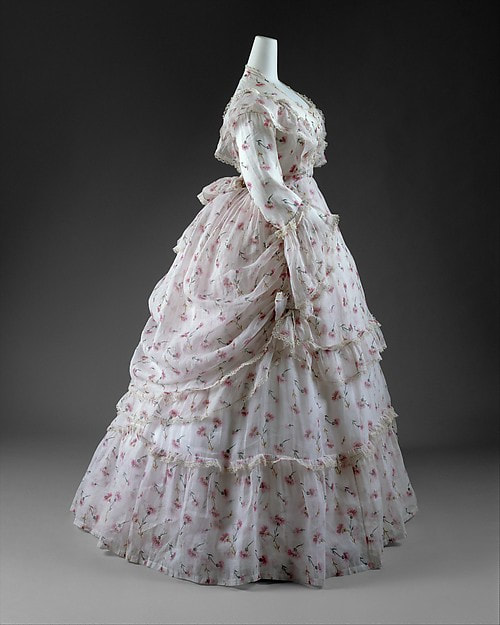 This is an early 1870's extant dress from the Met. The front overskirt is cut shaped narrower at the top, without gathers and is a flat "apron" shape. The back shape is soft and rounded and draped. Notice that it curves down and back up from side seam to side seam. It appears to be gathered along the side seam. We are going to focus on re-creating this back drape.
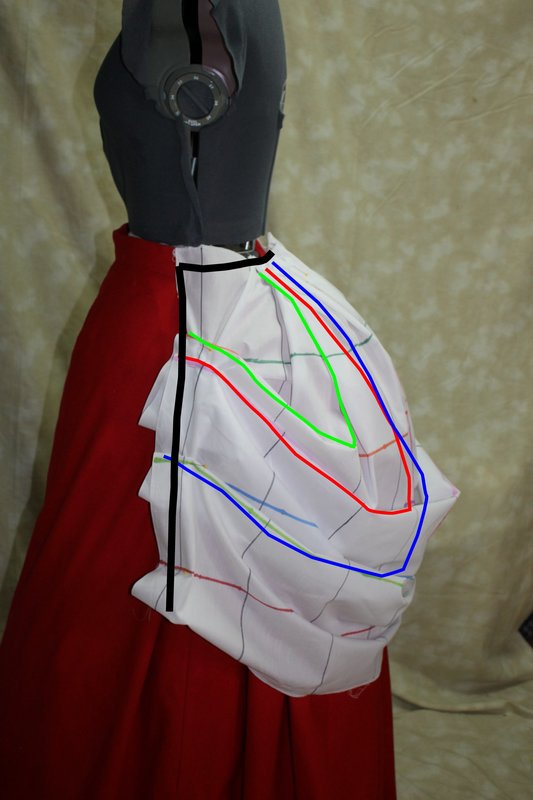
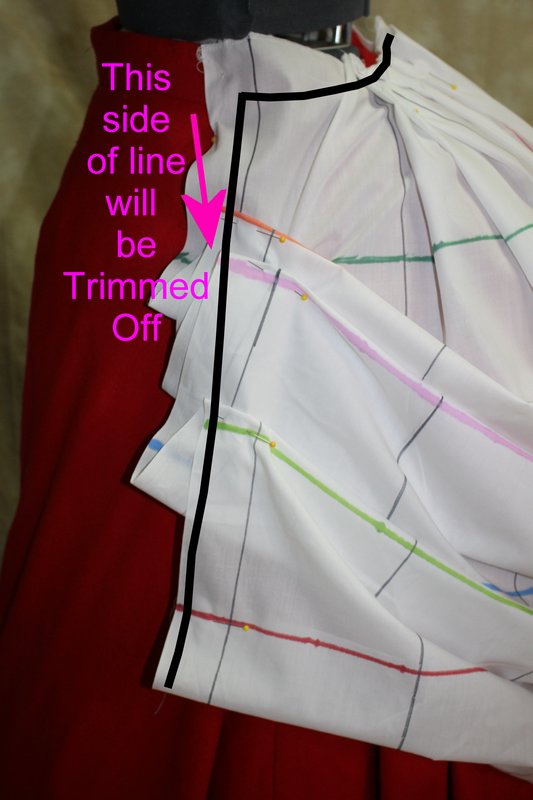
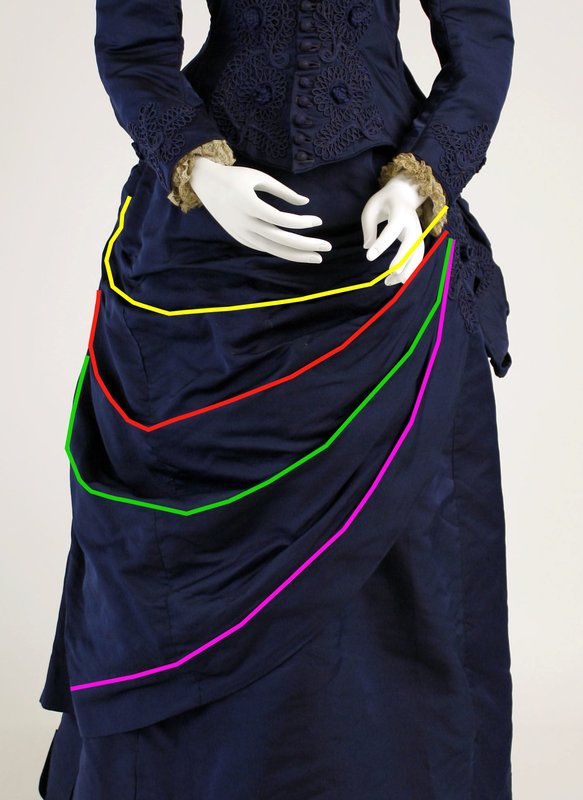
The heavy black lines on the two final photos show where the fabric is trimmed away after it is draped.
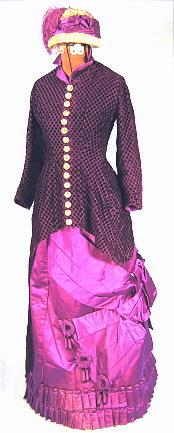
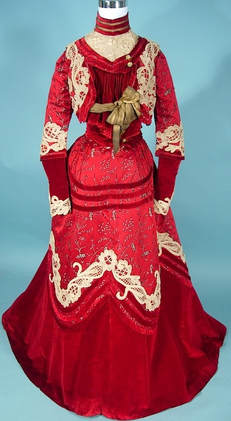
Many people think of the Victorian dress as dull and drab, and to be sure there were many browns and blacks chosen as best dresses, because they were appropriate for nearly any occasion one might require. Demorest Magazine reported in 1883, "In this country prettiness in prints has had to give way: to utility, to such samples as could be depended upon to stand the brutal kind of washing to which they were subject to; having no confidence in the permanence of pretty colors, the housekeeper took refuge in dingy neutrality, giving an impression, based on experience, that the uglier the pattern the more certainly it could be relied upon to 'wash'. " The more neutral the color the more confident the average woman felt it would last well throughout its wearing. All of this however did not mean there were not some VERY vivid colors available. In 1856 William Perkins, home on break from chemist school, was experimenting with a way to make a synthetic quinine, accidently discovered the first of the aniline dyestuffs- a bright pinky-purple that would become known as magenta or "aniline red". Initial experiments with this color showed that it would dye silk in a manner that would make it colorfast even in light- a severe problem with most natural purple dyestuffs. Other brilliant colors such as Fuchsine, Perkin's green, Britannia Violet and many more (Check out the Dreamstress's article on his dyes!)
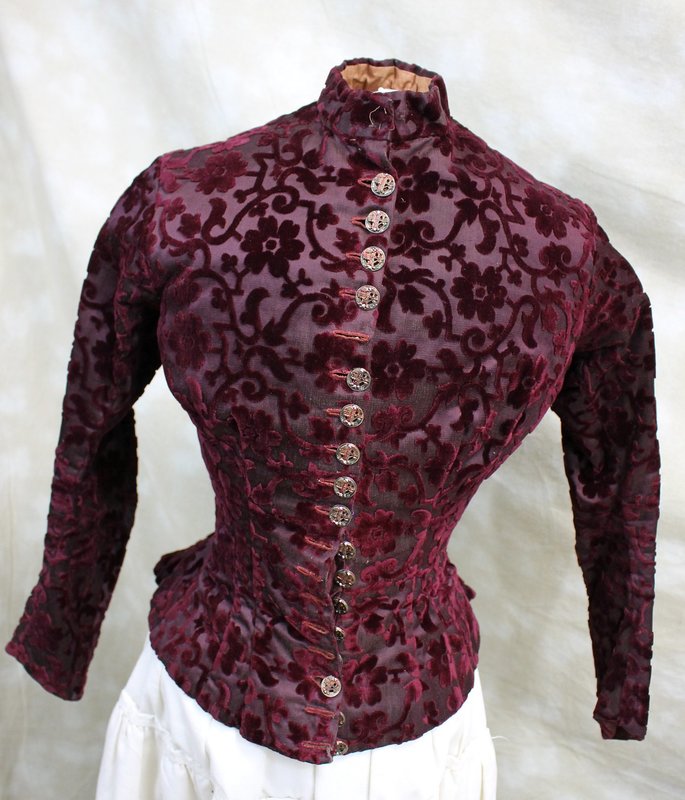
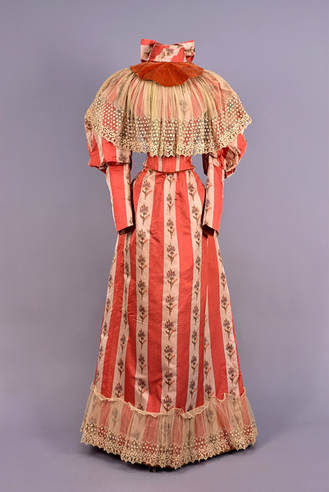
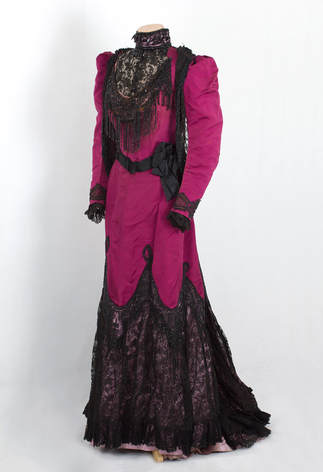
A few more of my brightly colored favorites in the nicer dress category!
 1902 cotton wrappers- chambrey- from Marna's collection 1902 cotton wrappers- chambrey- from Marna's collection So does this mean there are NO brightly colored cottons? Purple dye on cotton was notoriously fugitive until after the turn of the century. So while there are "some" brighter colors to be found in cotton fabrics you are going to see pinks and reds as your most common options for bright colors. The KEY is to do your research! English Women's Clothing in the 19th Century is a good place to start- each decade and year is listed with some popular colors during that time frame (note these are likely referring to silks and wools). Read the articles in the fashion magazines rather than just looking at the dress plates. Books like Manners Culture and Dress have chapters on dress colors and harmony of colors in dress. Check out original dresses on the Met and Whitaker's Auction SmugMug pages. Swatch books from the 19th century are another great resource like these from The Met. Don't rely on "but everyone knows" get out there and do your research and be prepared to name your sources- but be proud you can color your world beautiful!
Sources & Further Research English Women's Clothing in the Nineteenth Century by C. Willet Cunnington Wearable Prints 1760-1860 by Susan Greene Elephants Breath and London Smoke by Deb Salisbury Costume Language by Stephanie Davies A Dictionary of Costume and Fashion by Mary Brooks Picken Dating Fabrics - A Color Guide 1800-1960 by Eileen Trestain  Blevins buckles and a breast collar ? And you are supposed to be an 1860's man! Blevins buckles and a breast collar ? And you are supposed to be an 1860's man! I’ll admit it- the discussion that ensues during most late 19th century historic films in our home would drive most people to madness. Never mind the hero of the movie has been shot, is lost, out of ammo and the girl still hasn’t been rescued. NO we are exclaiming things like “WHY did they put a 1940’s saddle and gear on that horse, isn’t it supposed to be 1870’s?” And did you SEE the neckline on that dress for day? And in PUBLIC? That girl would have been shamed into propriety by the town ladies AGES ago.” OH we realize it’s just a movie, BUT THEN we go to the museum or reenactment events and see those folks who have done their research “via film” and are mis-representing the past, and the domino effect goes on… We HEAR the mom whisper to the child, “Look, this is just like they did it in the olden days!” It makes us sad. Film I can forgive as artistic license. However, when I walk into a museum that has not done a good job of research and representation of a time period, it makes serious shudders run up my spine and my stomach go all wobbly. As the keepers of our history, museums should be held to a higher standard of correctness. Simply by being in a museum display the item now carries “weight” as history. This is where the importance of being earnest comes in. Earnest is defined as a noun as “full seriousness, as of intention or purpose” and as an adjective as “serious in intention, purpose, or effort; sincerely zealous” or “seriously important; demanding or receiving serious attention.” History in a small museum can be HARD! Many of them were begun around the time of our nation’s bicentennial by enthusiastic citizens who only had their stories, and their parent and grandparent’s stories to guide them. While oral family histories are a good place to start, any competent detective will tell you memories are easily contaminated through discussion and re-telling. Good research needs to be a part of verifying artifacts, especially those used in displays. The world is becoming a more visual place all the time, and so the visual aspect of an exhibit bears serious consideration. 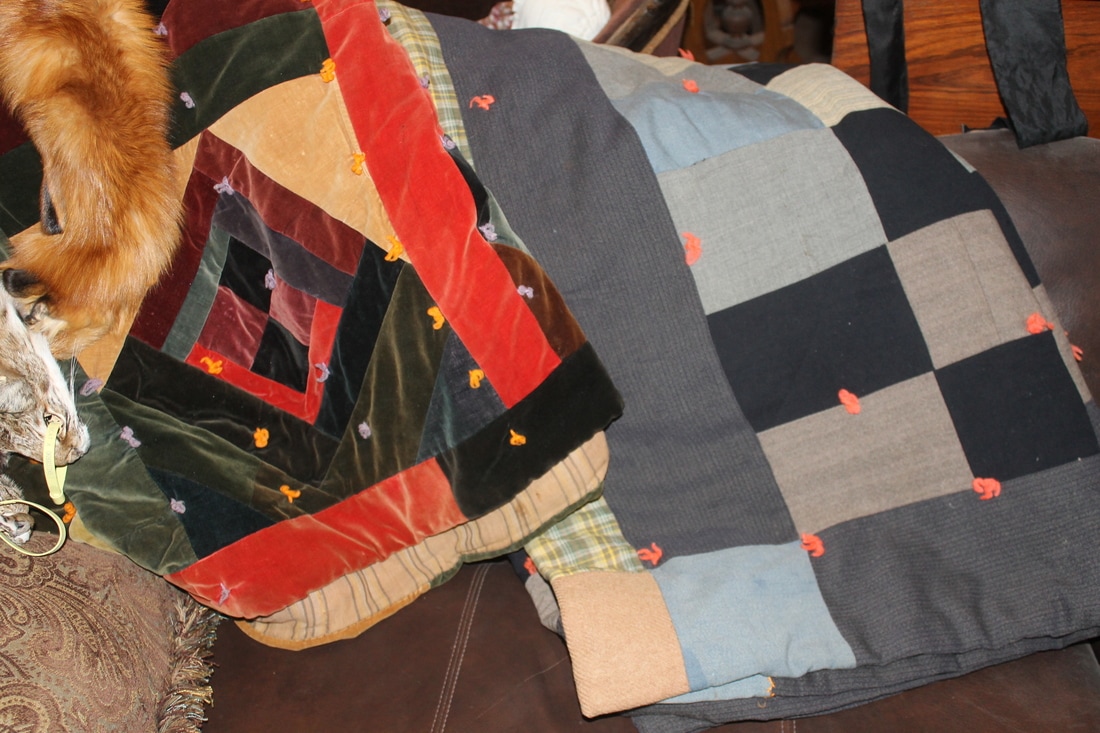 Some of my Grandma's 1940's quilts. Some of my Grandma's 1940's quilts. Grandma’s wool quilt she made in the 1940’s becomes the one that Great-Great Grandpa carried during the civil war. To a practiced eye this unintentional misinformation can be easily ferreted out, but convincing the family of it may be another thing altogether! Another issue in many small museums is that the accession records really have very little useful information to the historian. “Beaded moccasins donated by Mrs. B in honor of her son” might be 1880’s brain tanned Sioux, OR they might be 1940’s made for trade. Other than showing the donor, no other info is given. Until recently it has been hard to even start to properly label items, but with the internet, access to good research has become so much more available. Amazon can be used to not only look up identification books, but see other’s reviews of those books. As a professional, my personal library is massive and there are always new books on my “want to buy” list. Facebook offers many groups with specific areas of study that can often provide a good lead on where to research (ALWAYS ask for sources to read when dealing with facebook!). Networking of historians with specific interests can ease the burden of having one person having to “know it all”. Personally, I have a group of friends that I know to be well versed in areas that I am weak in. These are the people I can rely on to ask, “What is this item and where do I go to learn more about it?” I hope they feel they can do the same with me in my own specific concentration area of study. Many large museums with funding and better access to experts in specific study areas have put collections online and can be a great help for the local museum in doing beginning research for their collections. This does not mean they are necessarily infallible. I have seen mis-dated clothing items in online galleries as big as the Met, although those are few. So EVEN realizing the challenges presented to smaller museums for identification, I still expect earnestness. When putting together an exhibit centered in the 1870’s using a 1930’s candy store jar with its bowled base and aluminum lid is nothing less than lying to the public. Simply putting something in an exhibition because it looks “old fashioned” and “We already have it” is not good enough. By doing so we are, in fact with our own full knowledge, re-writing history. Our viewing public is generally innocent as to knowledge of artifacts. We must in “FULL SERIOUSNESS” attempt to present as accurate a picture of the past as we possibly can. This sometimes means admitting we do not know everything and asking for help, and it sometimes means removing an item from an exhibit that skews history. Sometimes it means relying on well done reproductions to fill in gaps in the museum’s collection to give the public a visual that they can relate to more concretely. This may mean weeding out the 1920’s graniteware from the 1880’s graniteware and putting each in the exhibit where the time frame makes more sense. Sometimes it is making a tough call knowing someone will be sad, hurt or angry because an artifact has been moved or removed from an exhibit, but our responsibility to our ancestors and our history remains above all lesser concerns. 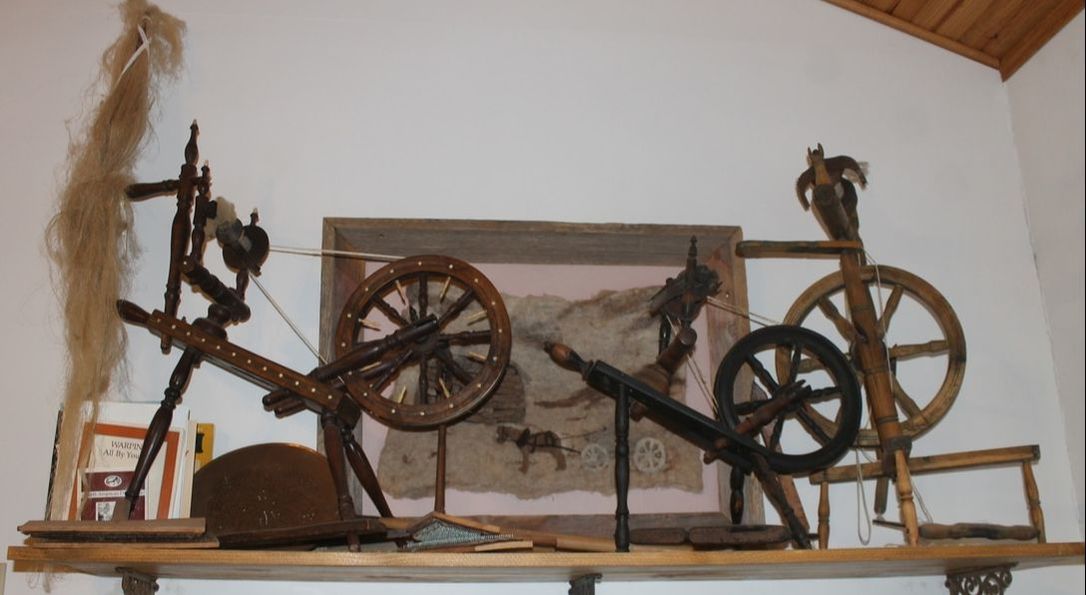 A couple of the spinning wheels in my personal collection. A museum’s job is to PRESERVE history, even with its flaws, not to re-imagine it to our own whims. Many treasures with important stories can be discovered in small/local museums, and the public needs to be able to trust in the museum for accurate information. Museums should be a place to invoke a curiosity of the past, but one should not come away from them having learned incorrect information. In my personal collection at home I have the advantage of being able to talk to every viewer of my artifacts from spinning wheel to arrowhead, and day dress to shoemaker’s tool.
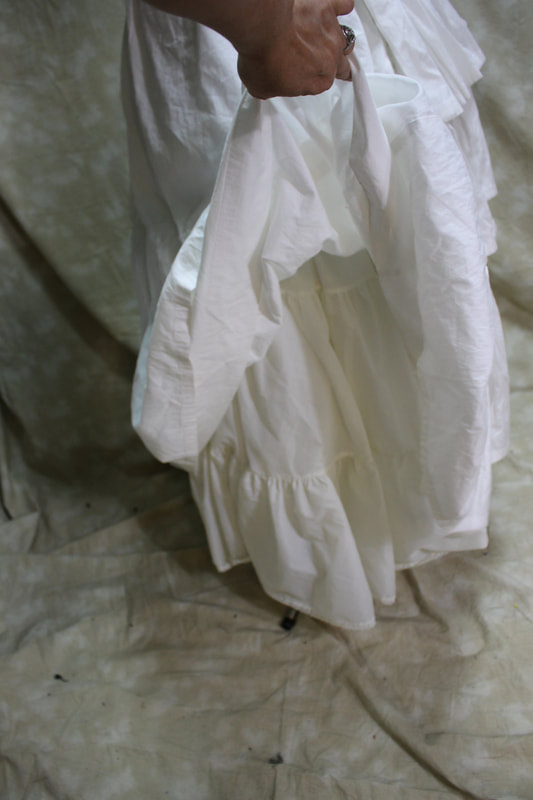
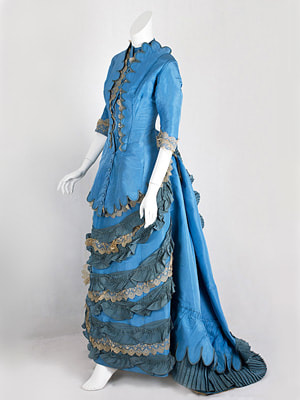
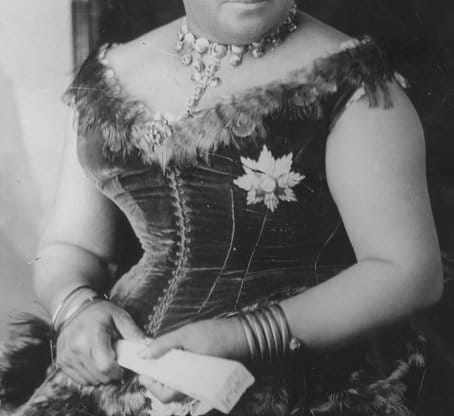
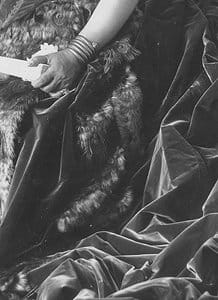
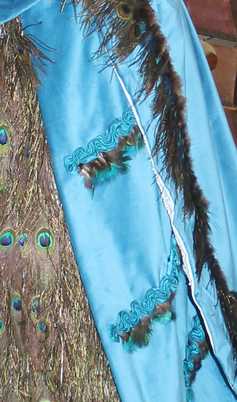
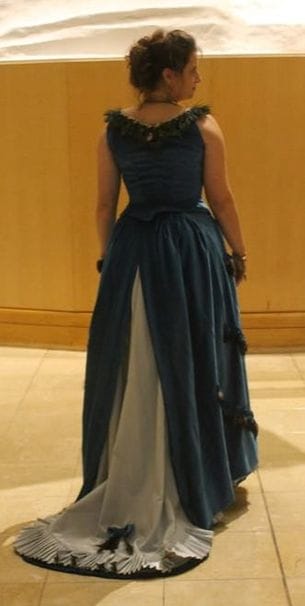
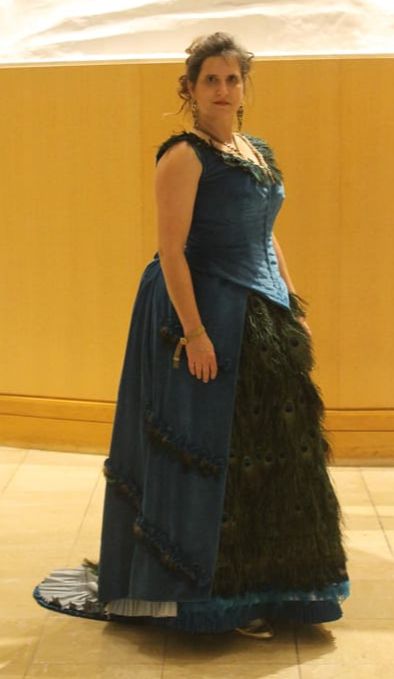
A museum’s displays have to speak for themselves. Are yours representing your history earnestly? Or are they whispering falsehoods to the public? 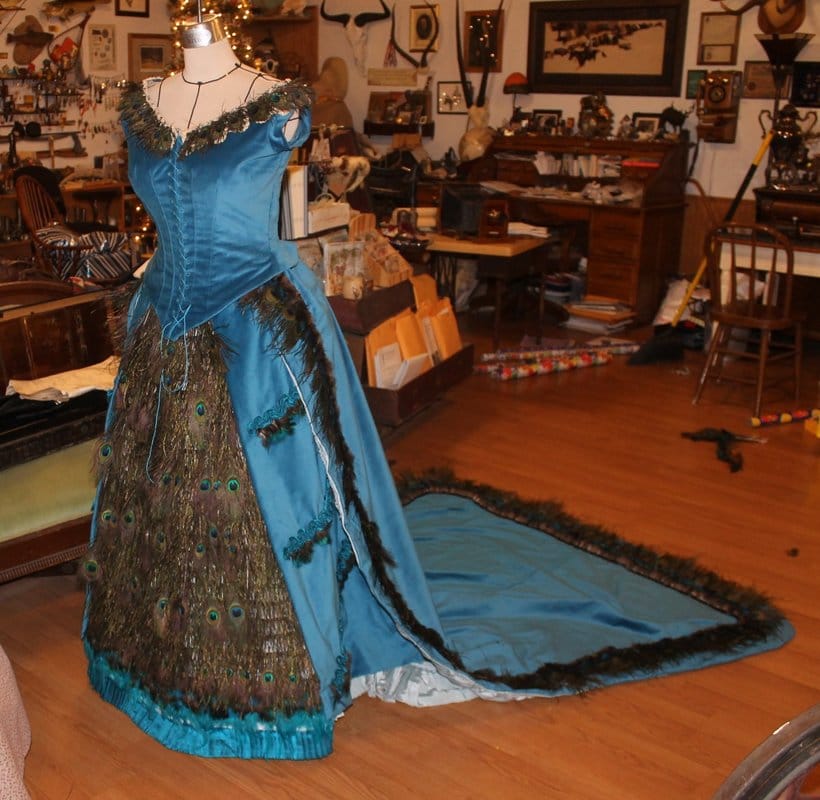 For my Christmas ballgown this year I decided I wanted a version of Queen Kapiolani's Peacock dress that was created for her attendance at Queen Victoria's jubalee celebration in 1887. My goal was to make the construction as close as I could to historic methods, taking clues from the description of her dress in the New York times as well as the photographs in the gown. The fact that she was a larger woman appealed to me, as did the chance to make this dress more than a "costume copy" and more of a historical endeavor. My first challenge was finding fabric in the colors I desired. I had my heart set on the azure blue velvet and sky blue moire as described in the 1887 newspaper article. Knowing that I would be spending a hefty sum on feathers, keeping the price reasonable was also a concern. I finally settled on Kaufman's Lush cotton velvet, which has a nice sheen in person and was very lightweight. (another concern is the weight of the removable train). I found matching cotton/silk satin, and a light blue bengaline moire in rayon/cotton blend and I was ready to start!. I decided to build a foundation skirt typical of the late 1880's and the feathers would be sewn to the top layer of fashion fabric only. You can see some of the progress in the slideshow below. The advantage of building a ballgown like this in a period manner is that it really helps to support itself. The photo on the mannequin above only has a small bustle pad underneath the skirt of the dress and no petticoat (although I did drape the skirt over the petticoat I would be wearing, this was after the first wearing and my petti was still rumpled in the bathroom floor.)
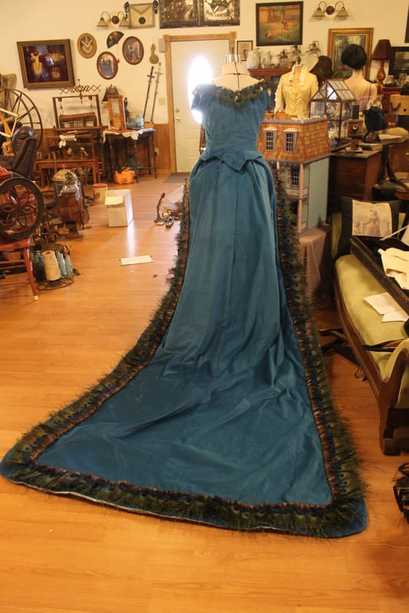 While my train is not quite as long as a true court train (only about two and a half yards long) I think it had a graceful effect. Being removable makes it a more functional dress for myself to wear to more events.
Me after an evening of dancing. I didn't quite get the removable train completed for the event. (I had an excuse- I had to make a Father Christmas and a St. Nicholas outfit for the museum, AND two other ballgowns for my girls for this event!) 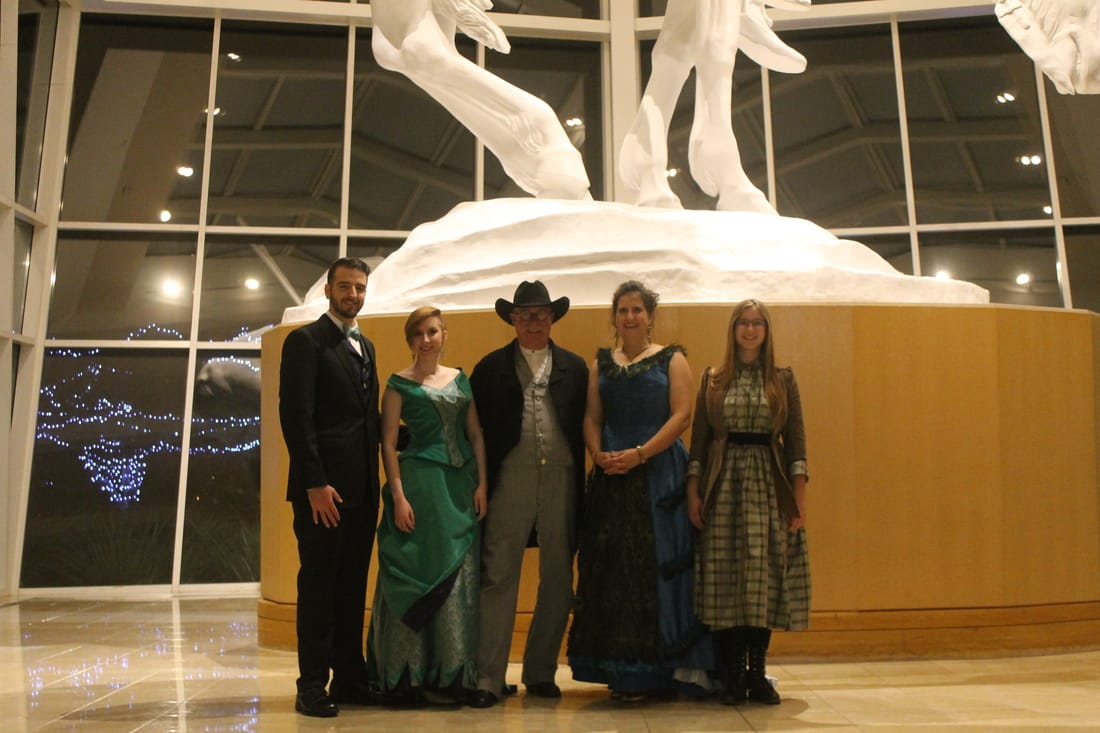 What the item is: Peacock Ballgown
The Challenge: Special Occasion Fabric/Materials: 10 yds of blue moire, 10 yds of cotton velvet, 4 yds cotton skirt lining, 6 yds silk/cotton satin, 1 yd netting for hem interfacing, 1 yd cotton twill to line bodice, 1 yd cotton twill for skirt hem. Pattern:My own Year:1887 Notions: Feathers- yards and yards of feathers- 12 yards of herl, 100 peacock feathers, 10yds of short peacock feathers, boning How historically accurate is it? Not too bad maybe 80 percent? Hours to complete: I kind of lost track. First worn: Dec. 16th Total cost: Sorry I am not admitting to total cost on this one. :) we must have some mystery from our husbands.... |
AuthorPainfully obsessed clothing historian, Archives
January 2022
Categories
All
|


 RSS Feed