|
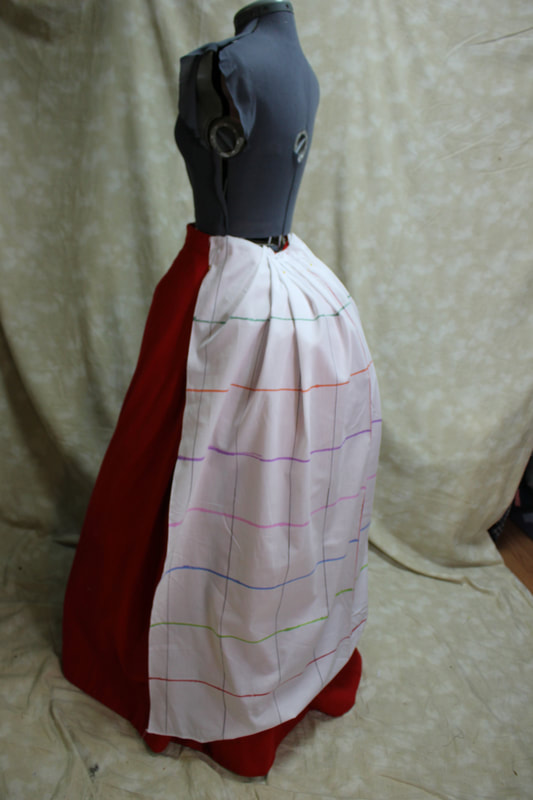
Have you ever seen a dress you wanted to reproduce, but did not have access to it in person? This post is going to help you try to read the lines of a draped overskirt to bring a bit of understanding to how draping works, and how to read a photograph to give you some starter guidelines while you are draping. 1. You HAVE to have a mannequin to do this- Or a good friend who is willing to stand while you drape. Draping involves fussing and adjusting to make sure the lines are reading like you want them.
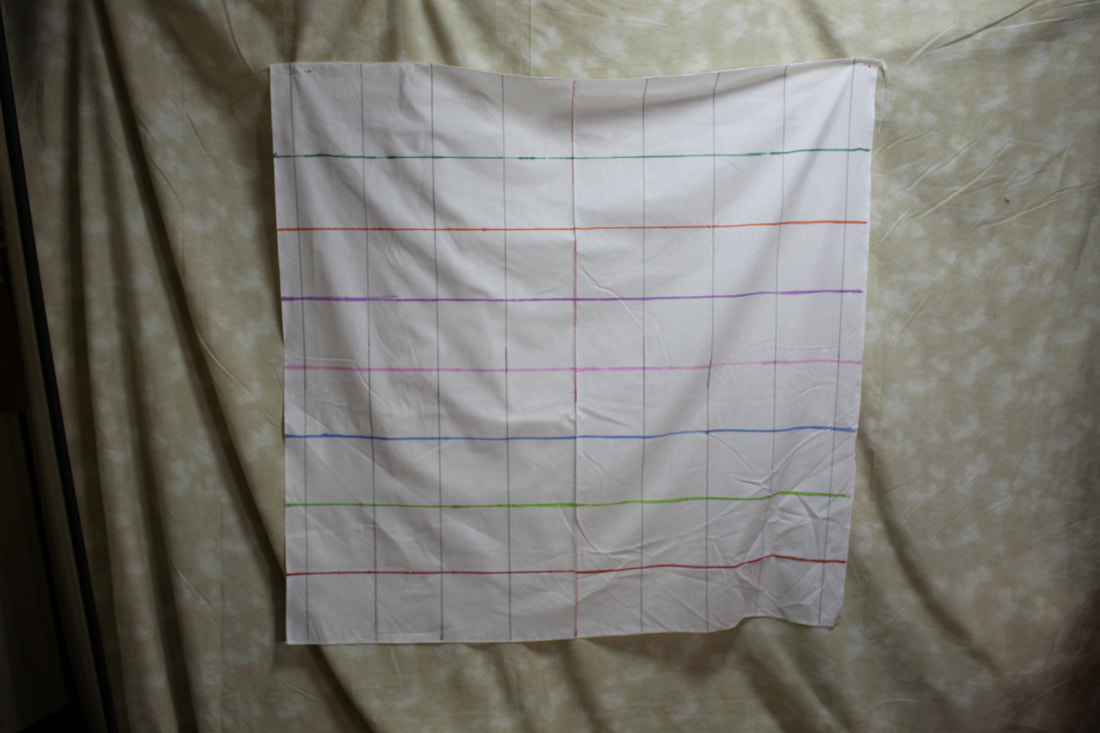
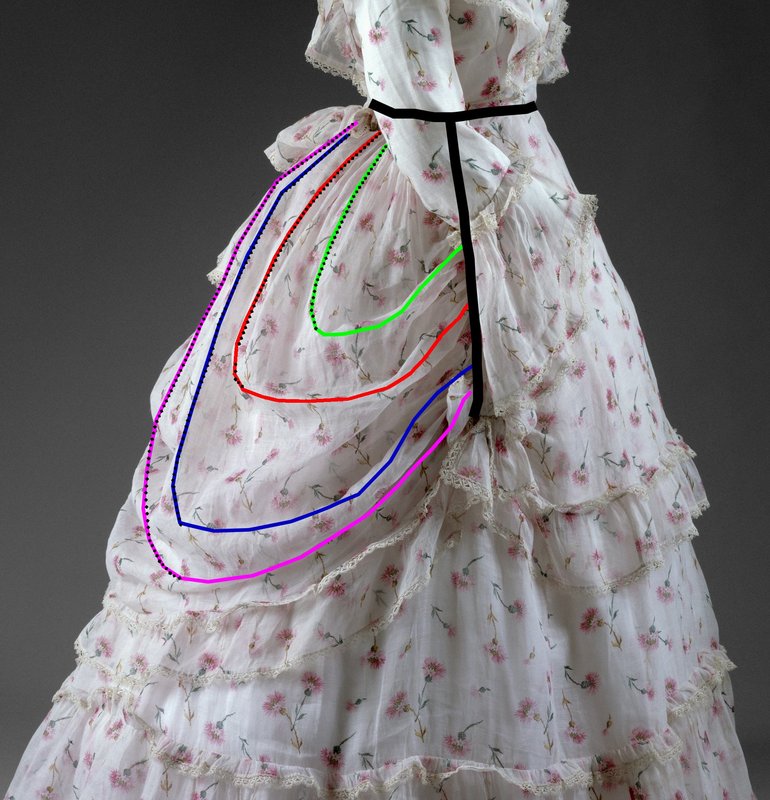
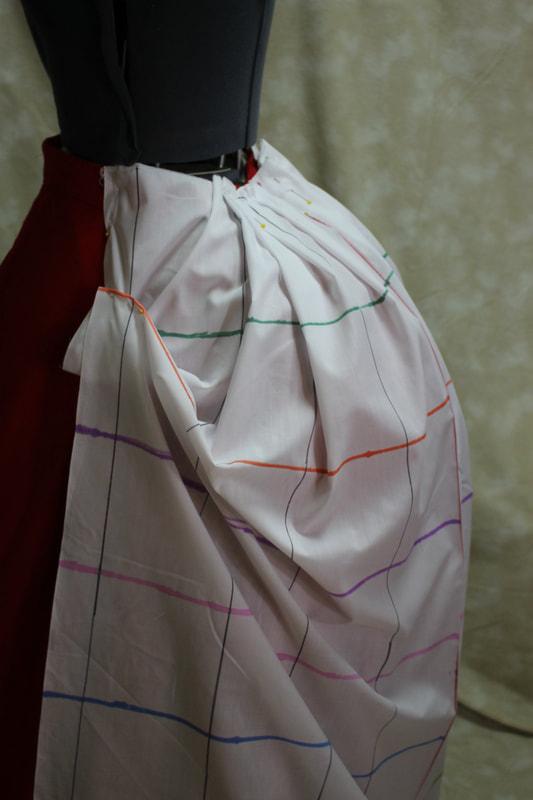
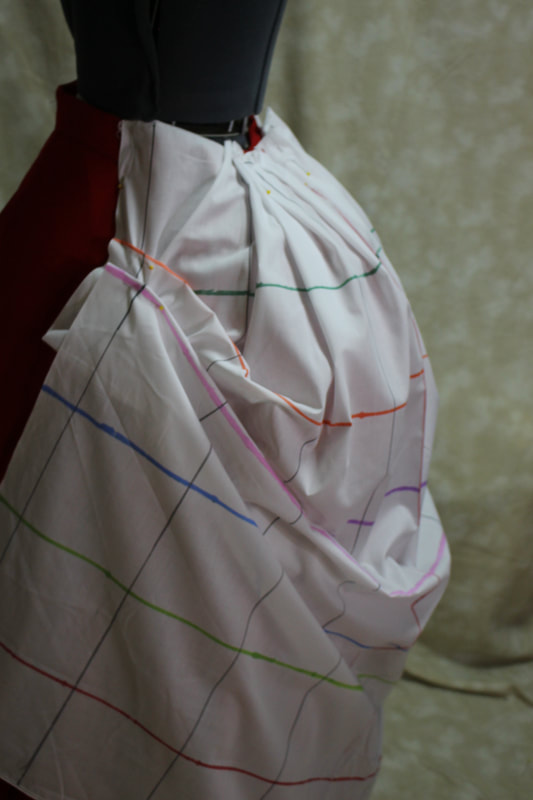
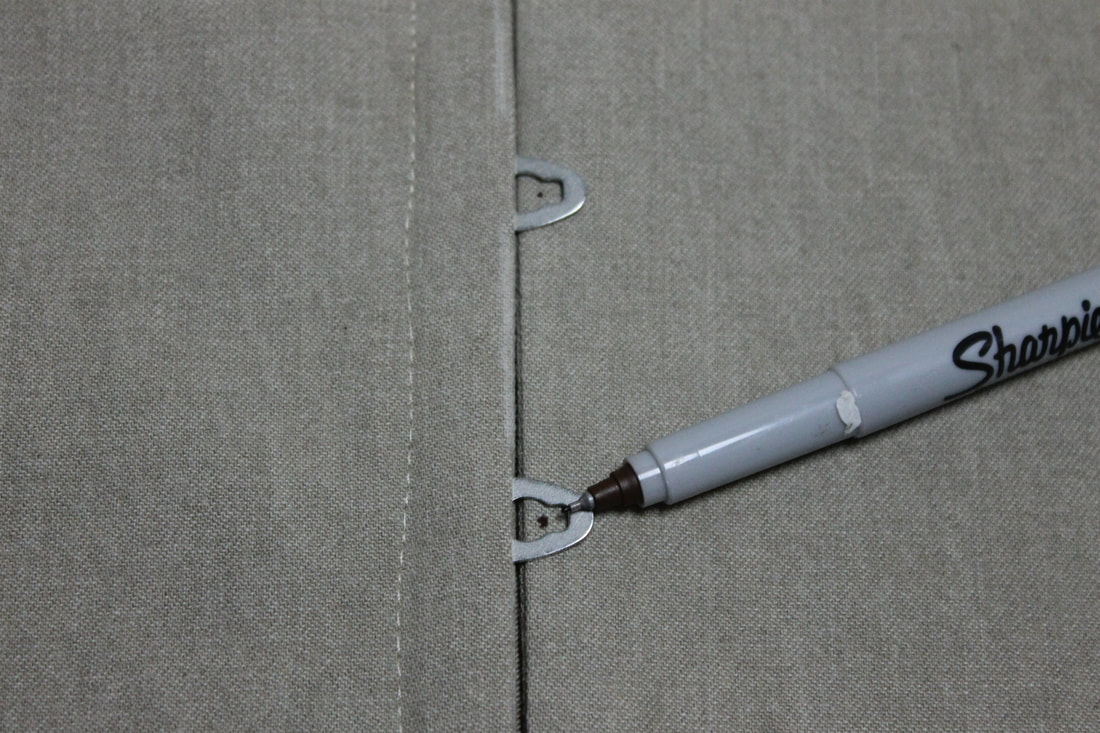
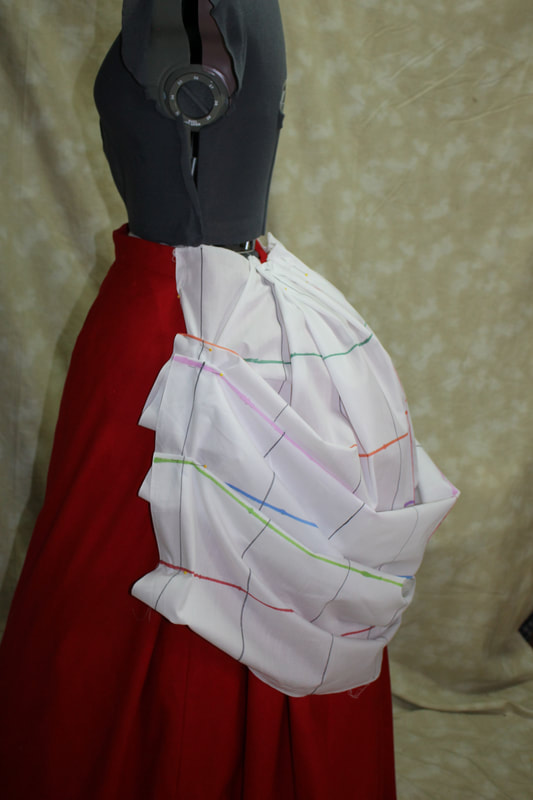
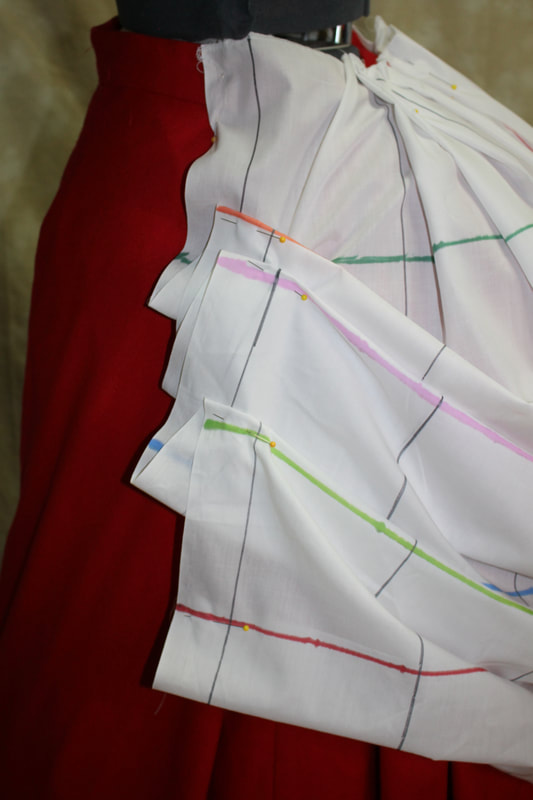
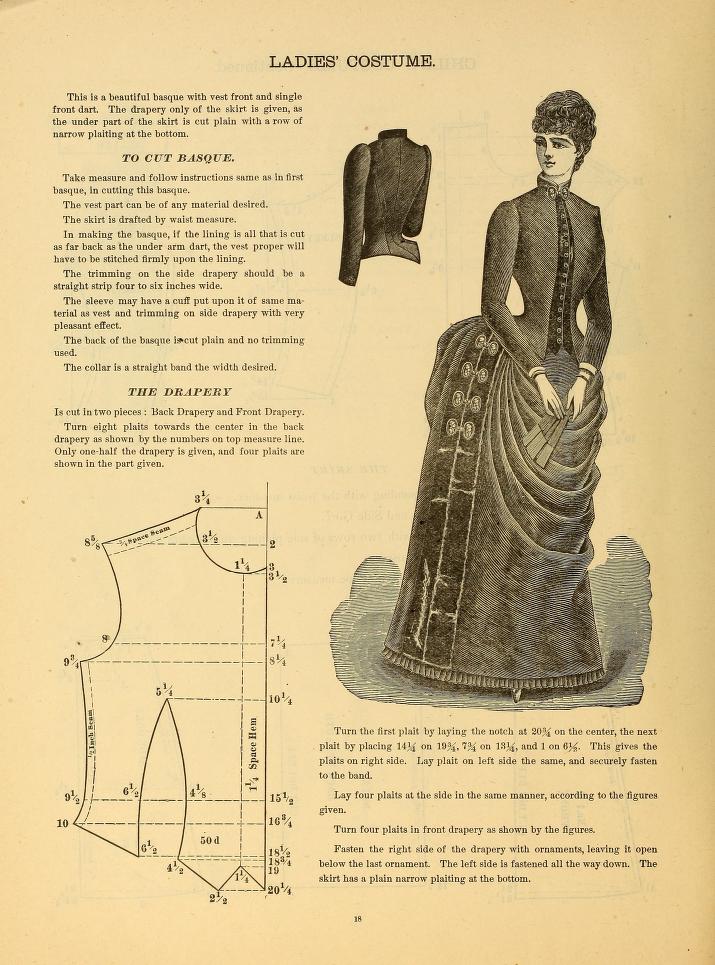
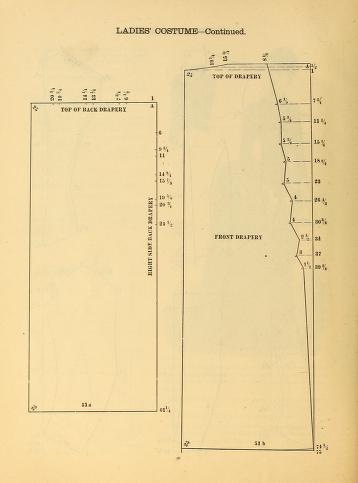
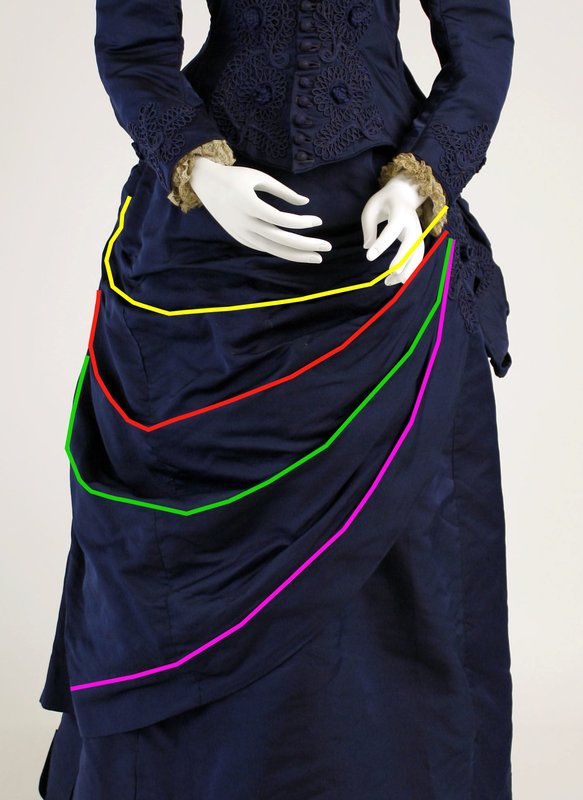
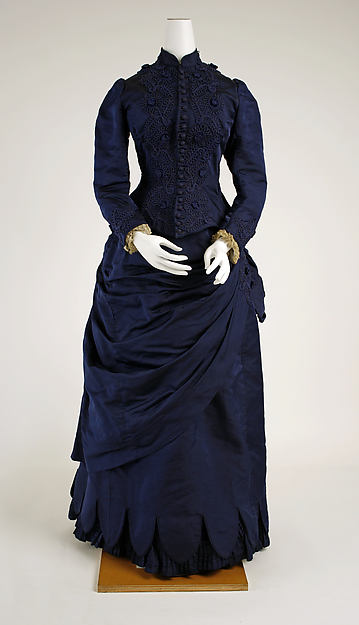
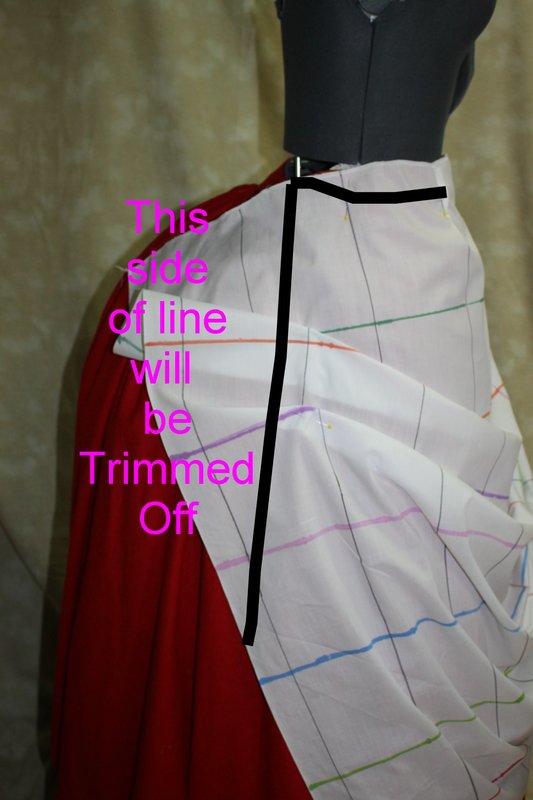
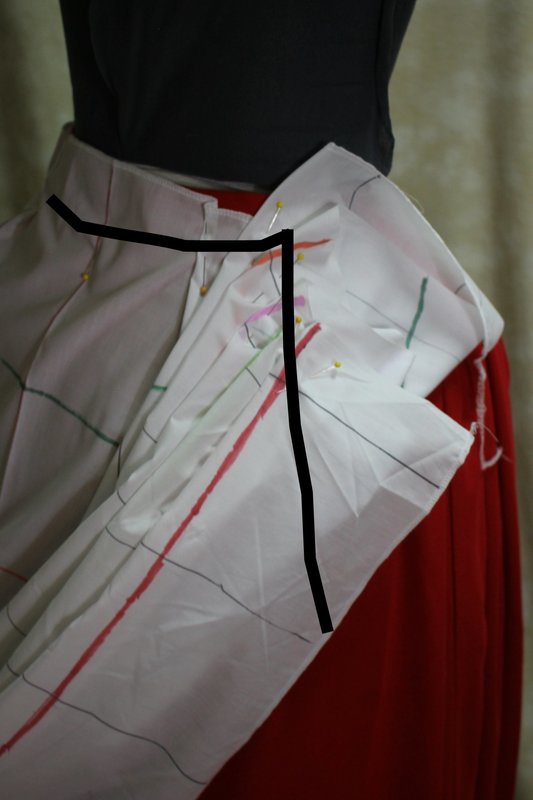
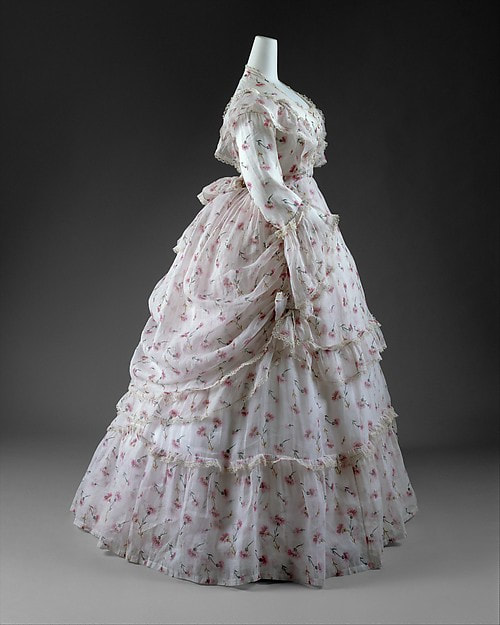 This is an early 1870's extant dress from the Met. The front overskirt is cut shaped narrower at the top, without gathers and is a flat "apron" shape. The back shape is soft and rounded and draped. Notice that it curves down and back up from side seam to side seam. It appears to be gathered along the side seam. We are going to focus on re-creating this back drape.
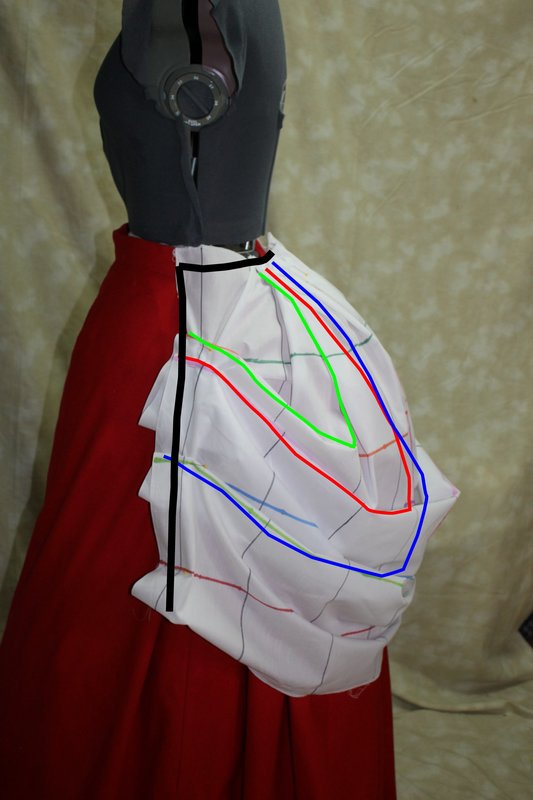
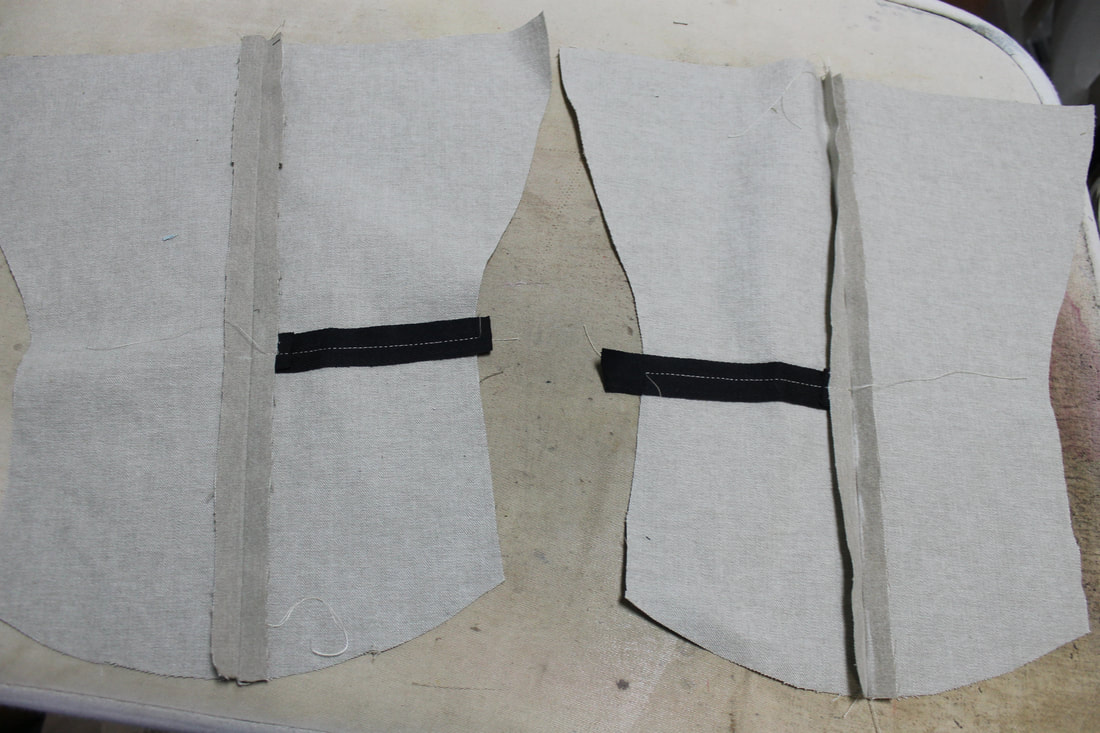
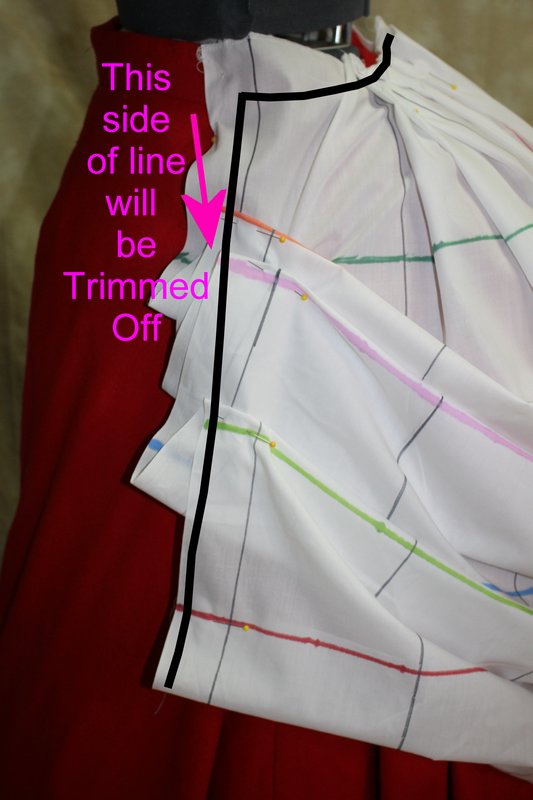
The heavy black lines on the two final photos show where the fabric is trimmed away after it is draped.
1 Comment
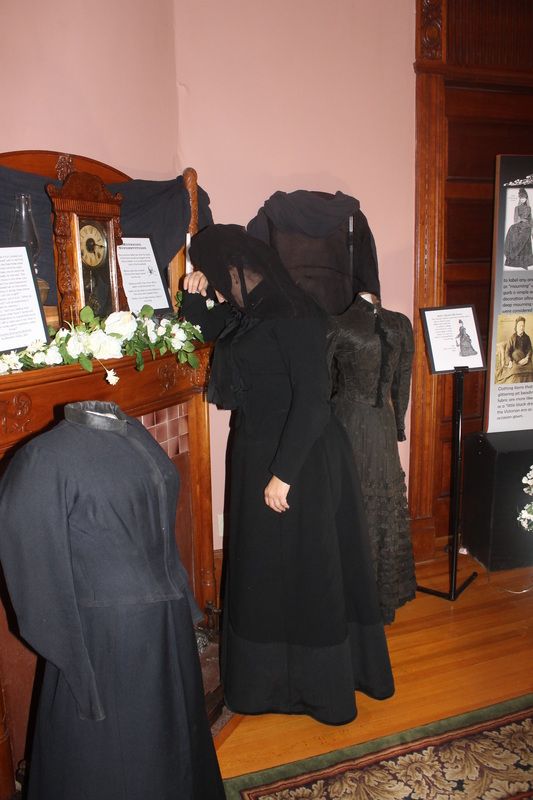 So, I love Halloween and I collect skulls- it only makes sense that I eventually put together a mourning exhibit right? So do I look sad? My goal was to put together a mourning dress that would be appropriate for opening of the Beyond the Veil exhibit I recently completed. As life is wont to do, after I had got the exhibit together and tended to the family- I had mananged to give myself 24 hours to complete the new dress. Not an ideal situation. But as my friend says, "Sleep is for the weak!" and I dove in. My advantages are: 1. I already have a personal master sloper with several sleeve and collar styles 2. I had the fabric already ordered and waiting on my table. 3. I have a 7 gore skirt pattern in production that was already altered to my size/height. so SURE I can make a dress in that amount of time. ;)  1898 Delineator 1898 Delineator I chose a high twist tropical weight wool crepe, and a silk crinkle crepe as my main fabrics. My goal was to create a dress that would give me a bit of leeway of the "when" of when I would wear it. Since I'm in my late 40's I can get away with being slightly out of fashion on smaller things. I had images of mourning fashion from Delineators in 1898 and 1901 - my goal was 1900 as Isabella Seay Collins had passed away that year, but I wanted to be able to "get away" with wearing it for the 1890's and early 1900's should I so desire it for another event. While I ADORED the 1898 trim that came to a point in the front- to me that read definately late 1890's, likewise, more fullness at sleeve heads or the adorable little tabs that decorate the shoulder. Because my waistline has grown in the past few years, I prefer to not choose a bodice that ends directly at the waist if I can possibly avoid it. I decided that the tabbed front, higher on the sides and slightly longer in the back would work for the time frame range I desired. 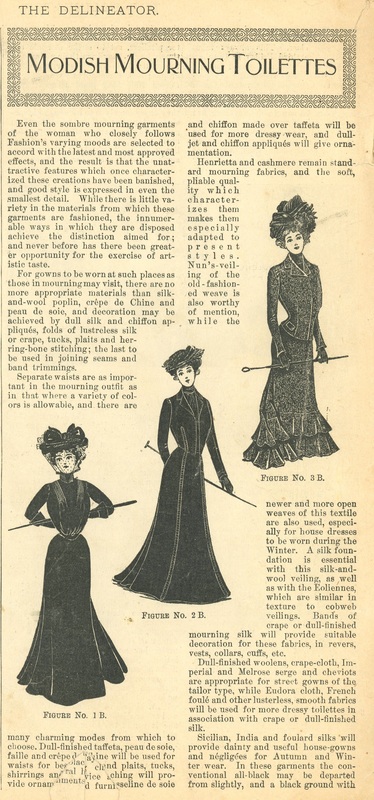 1901 Delineator 1901 Delineator One of the things I wanted to point out when I was talking to people was that not all black dresses meant the lady was in mourning. Having a best black dress has long been a lady's go to choice as appropriate for nearly any "best dress" situation. That meant I wanted to feature my crinkle crepe prominently on my dress to emphasize the mourning aspect. I decided upon a band 12 inches deep around the bottom of the skirt, and as the front inset and collar of my bodice. I liked the small turn back lapels and they were present in both of my Delineators, so I could feasibly use that design in my 1900ish dress. I proceeded to cut out my dress and jump into the sewing when I ran into my first problem- the lights above my ironing board decided to burn out. And these aren't just any light bulbs that you can run to the local store and purchase. I usually keep extra bulbs on hand, but evidently I had forgotten to purchase more after the last of my stockpile had been used. As I had already mentioned, I am getting older, and my eyes no longer see black as well as they once did. To compound the problem, the black wool seems to absorb light into its inkiness. This lead to some problems with the look of the front lapels (which were false lapels not actually cut onto the fronts) They will be redone as soon as my lighting issue is solved. As it was I managed to baste them in a bit unlevel and had to rebaste when I got to the museum. Thank goodness my personal exhibit building box always has needles and thread in black, beige and white! 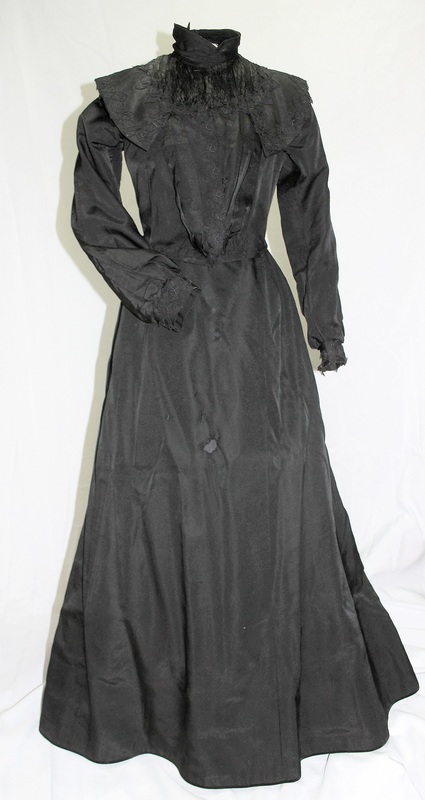 1903-08 Antique mourning dress - Marna Davis collection 1903-08 Antique mourning dress - Marna Davis collection My next big challenge was on the skirt. The crinkle crepe crawls, it stretches and pressing it can be somewhat problematic without crushing its depth. I ended up hand stitching the crepe panel to each completed skirt panel starting with center front. Pressing was done by hovering the steam iron just above the surface of the crepe on the front, or pressing from the back side of the garment. My construction was like this cut kona cotton lining, cut wool outer fabric, cut stiff cotton twill hem facing 12 inches deep. Stitch the hem facing to the inside of the kona cotton panel so that it will be sandwiched between the wool and the lining. Lay all pieces together on flat surface, pin in place. Next pin the crepe panel in place turning it down at the top and handstitch along top edge. Next each side front panel is completed in the same way making sure to measure the height of the crepe panel to make sure that it will match and be continuous along the top edge. The panels are then placed on the front skirt panel, matching first at the top line of the crepe (a bit off at top or bottom of the skirt panels can be trimmed- but you must have the the crepe trim presenting a level line). When all the panels were completed the bottom was hemmed with cotton velveteen (as that was what I had on hand) Skirts from this time frame often have a velveteen, or corduroy hem that shows a quarter inch below the bottom of the skirt edge. It can be anywhere from 1-2 inches finished. The antique mourning gown (Circa 1903-08) in my collection actually has what appears to be a ready made velvet hem facing that has a cord edge at the bottom. I didn't get any construction photos of this dress being made because I was racing against the clock to complete it in order to wear it!  Ten minutes before I wanted to leave, I completed sewing the hooks and eyes and enough boning in the bodice to keep it in place for the day (center back, sides, and one front bust dart each side). I hurriedly arranged my hair which was misbehaving wildly as it was a humid day bordering on rain, and went to grab my petticoats. It was at this point I remembered I had used my best petticoat to hold up the antique 1899 ish silk skirt I had on display. Ah well, the not quite as good petti would have to do for today! I made it out the door and to the museum in time to play hostess to the new exhibit! Hopefully better photos will come after I have had a chance to rework the bodice lapels a bit, and get a good petticoat that will support the skirt weight a bit better. 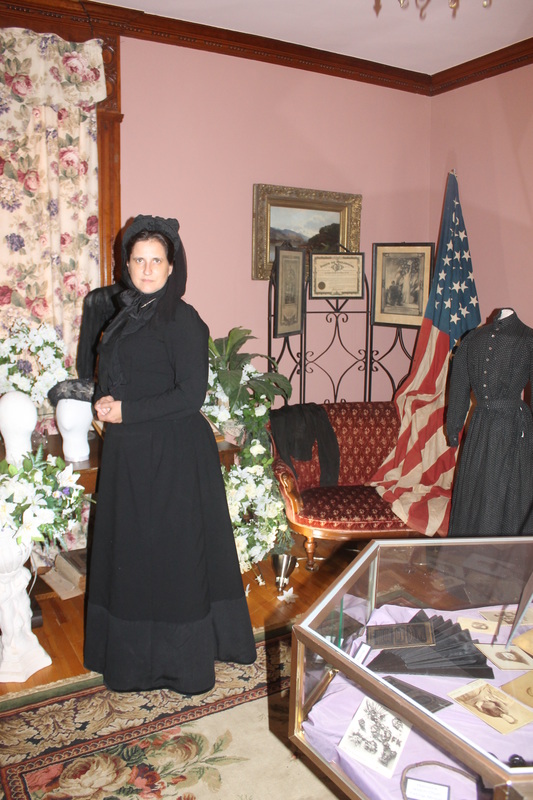 So despite the fact it is woefully late- I shall use this as my entry for July Historical Sew Monthly.
The Challenge: Monochrome Material: 5 yds tropical weight wool crepe $9.95/yd, 2 yds silk crinkle crepe $15/yd, kona cotton- lining, cotton twill skirt interfacing Pattern: My own patterns including my 7 gore skirt pattern Year: 1900 Notions: thread, hooks and eyes How historically accurate is it? Hmm, I think I'll give it about an 80% given my floating the time frame and the problem with finding really accurate black silk crepe for trimming. The cut is accurate, but I am going to do a bit of reworking on the silk front of the bodice to make it behave itself in a manner more pleasing to my eye. Hours to complete: 20 First worn: September 24, 2016 Total cost: about $100 |
AuthorPainfully obsessed clothing historian, Archives
January 2022
Categories
All
|


 RSS Feed