Marna Jean Davis- Clothing Historian
  • Home
  • My Work
    • Classes and Lectures
    • Museum Exhibits
    • Dress Gallery
    • Antique Sewing Machines
  • Books
  • Patterns
  • Blog
  • Contact
  • Etsy Shop
  • Classes
  • That Full Dinner Pail

Domestic Lady's
​Dressmaker

Deciphering Draperies- Recreating draped overskirts

8/7/2017

1 Comment

 
Have you ever seen a dress you wanted to reproduce, but did not have access to it in person? This post is going to help you try to read the lines of a draped overskirt to bring a bit of understanding to how draping works, and how to read a photograph to give you some starter guidelines while you are draping. 
1. You HAVE to have a mannequin to do this- Or a good friend who is willing to stand while you drape. Draping involves fussing and adjusting to make sure the lines are reading like you want them.
Picture
 2. Your mannequin (or friend) MUST have the proper petticoats and underskirt for you to drape over. Even with a mannequin, you will lack a bit of bulk where your petticoats will want to collapse over the single pole instead of your legs. Wrapping quilt batting or folding a pillow and taping it in place around the base of the pole will help offset this issue.  In the case of the base I am using for example in this post- I used an extra small bridal petticoat I found at the thrift store for a couple of bucks to fill out the space my legs would normally take up.
Picture
Picture
Picture
I'm putting a basic skirt on my mannequin that will serve as a nice contrast.  I also prepped a 42 inch by 42 inch piece of fabric with vertical lines (black except for center back which is red) and horizontal lines in varying colors so that you can see the draping just a bit better. In the photos below this is the piece of fabric being used. Bits outside the heavy black lines (or blue tape) would simply be trimmed off after I am finished draping.

Picture
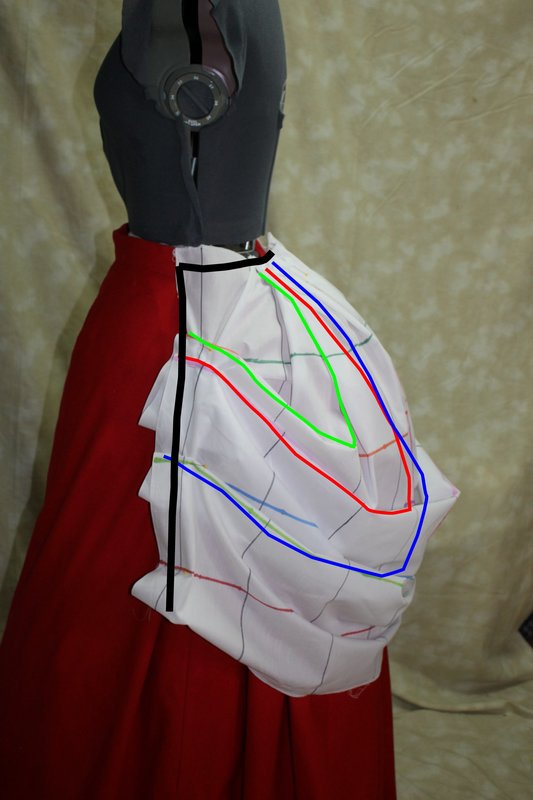
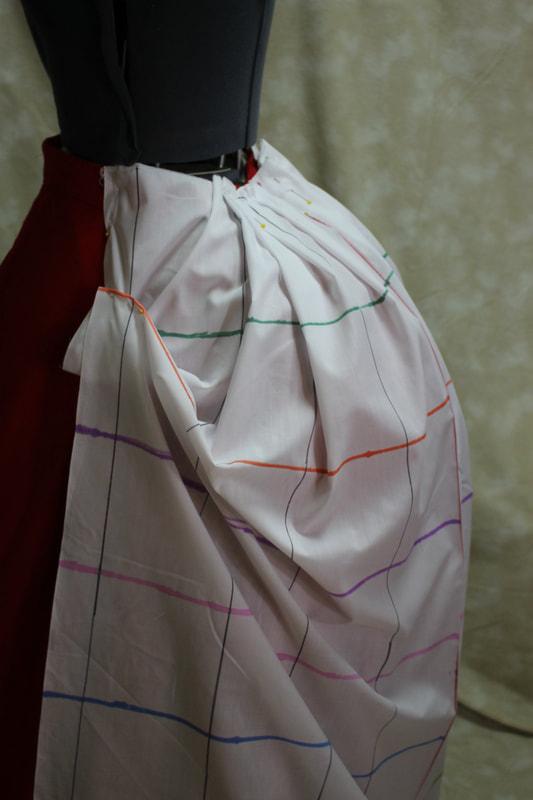
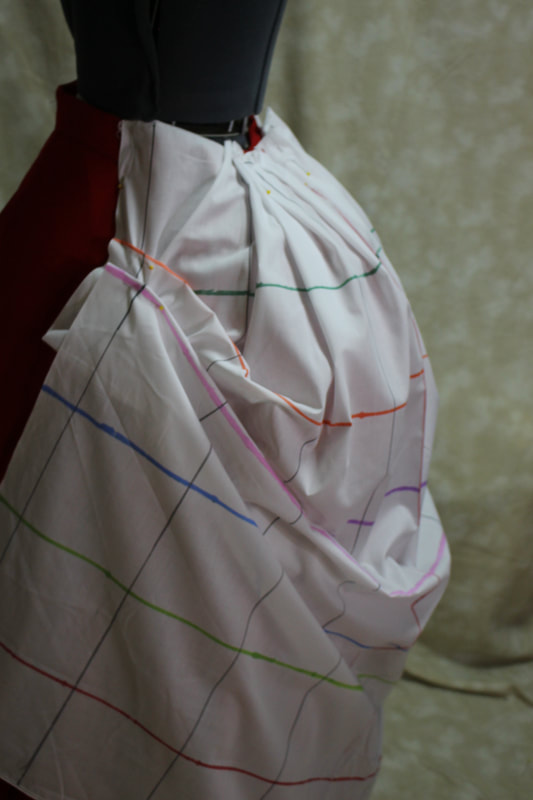
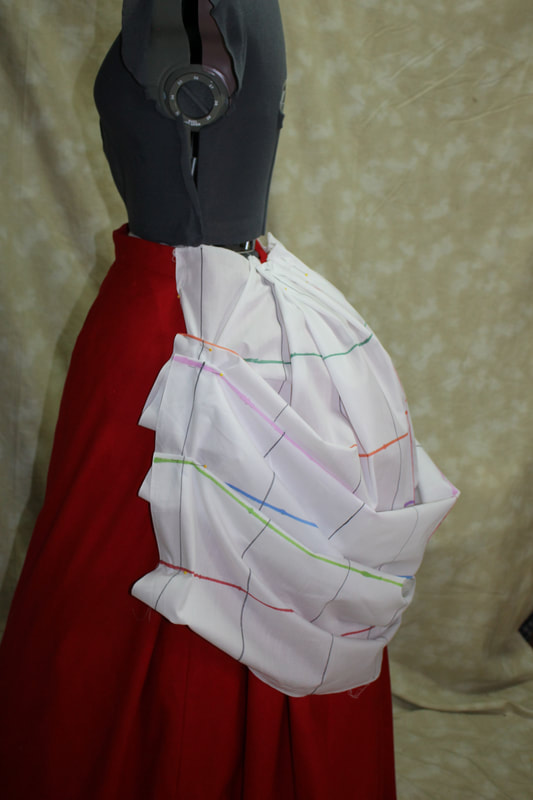
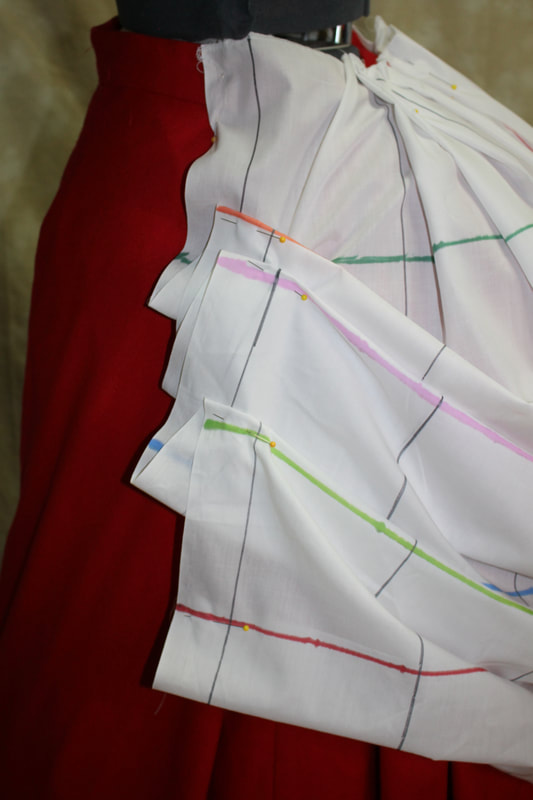
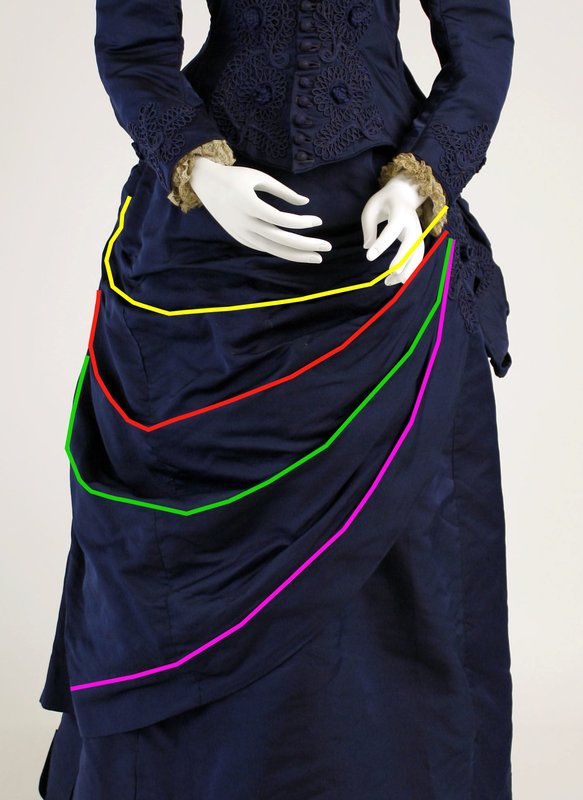
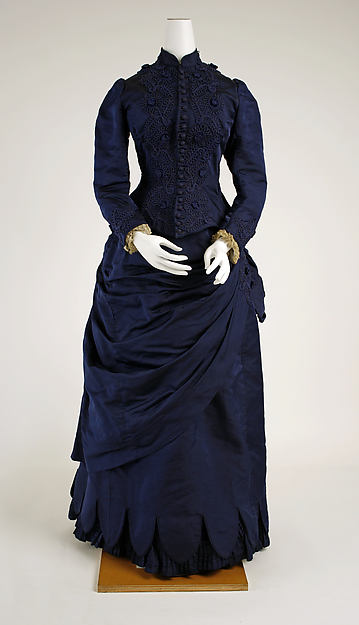
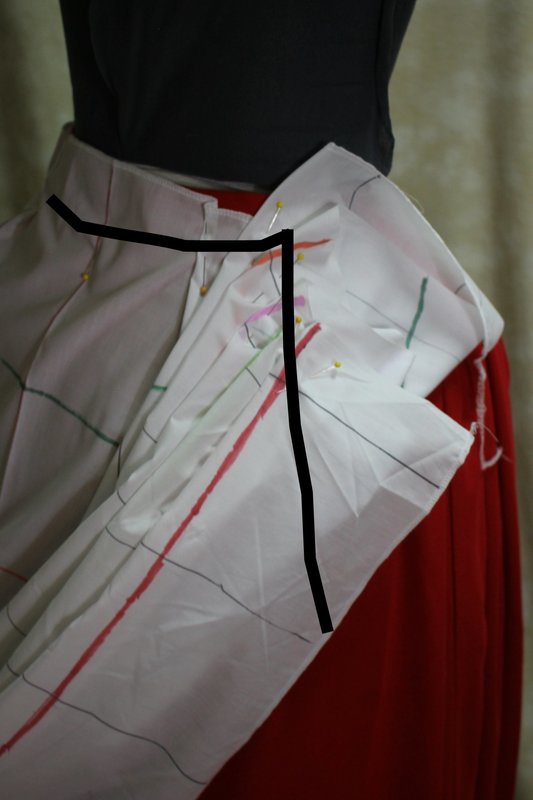
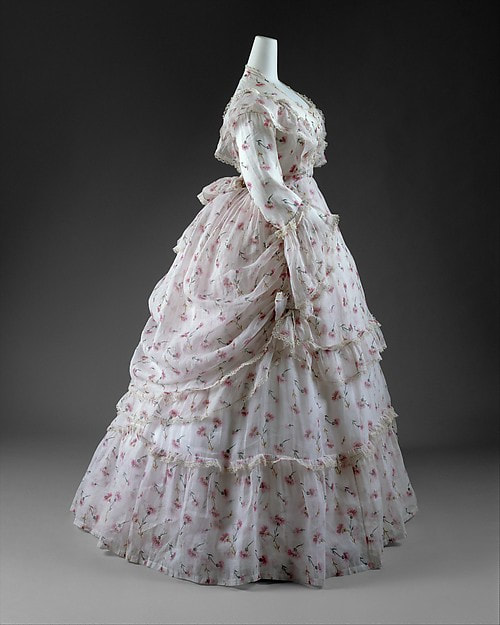
This is an early 1870's extant dress from the Met.

The front overskirt is cut shaped narrower at the top, without gathers and is a flat "apron" shape.

The back shape is soft and rounded and draped.

​Notice that it curves down and back up from side seam to side seam.

It appears to be gathered along the side seam. 

​We are going to focus on re-creating this back drape.

Pictureclick to enlarge
Heavy black lines show the waist and side seams.
 
The colored lines trace the drape of the skirt. A drape that follows a round shape all the way across the back will need to have the bottoms of the pleats pulled forward. If this does not happen then the center back will fall straight rather than continuing a curve around the back.
Try  printing out an image and tracing the lines to see what is happening with your drapery
​

Picture
WAIT you are saying- you cheated that one is pleated while the other one is gathered.

The key is to put pleats in first to control the way the draping falls.

If you want a gathered look the sides as pleated will be  longer than you want the finished length of the side to be. You will then run your gathering stitch OVER the pleats, and draw it up to the finished length.  

Pin drapery center back
Pin to sides
Pleat to fit waistline (or gather) I find pleating lets me control drape a bit better. Notice the fullness is concentrated at the center back third of the overskirt,
Pleat up and pin in place. Even if you want a gathered look, pleat with a longer finished length and then gather after adjustments are made.
Notice that the bottom of the pleat will be pulled forward. As you pin each pleat in place, adjust and repin the one above it to keep your lines smooth.
Overskirts with rounded bottoms like this one I usually tuck the bottom hem to the back and pin in place before the last pleat is pinned in place.
Moving the bottom fold of the pleat forward pulls the underside of the drape to the skirt and allows the top edge to fall outward in a curve.
Picture
Here is a similar rounded drape except on the front of a dress.
Picture
The front drape is on the right- notice the jagged looking side seam? This is much the same as your drape would look if you unfolded the pleats after trimming off the extra.
Picture
You can see if you follow the fold lines that the bottom edge is actually pulled up to within about 8 inches of the top.  
Picture
This is another Met dress from the 1880's 
This time we are looking at the front drape.

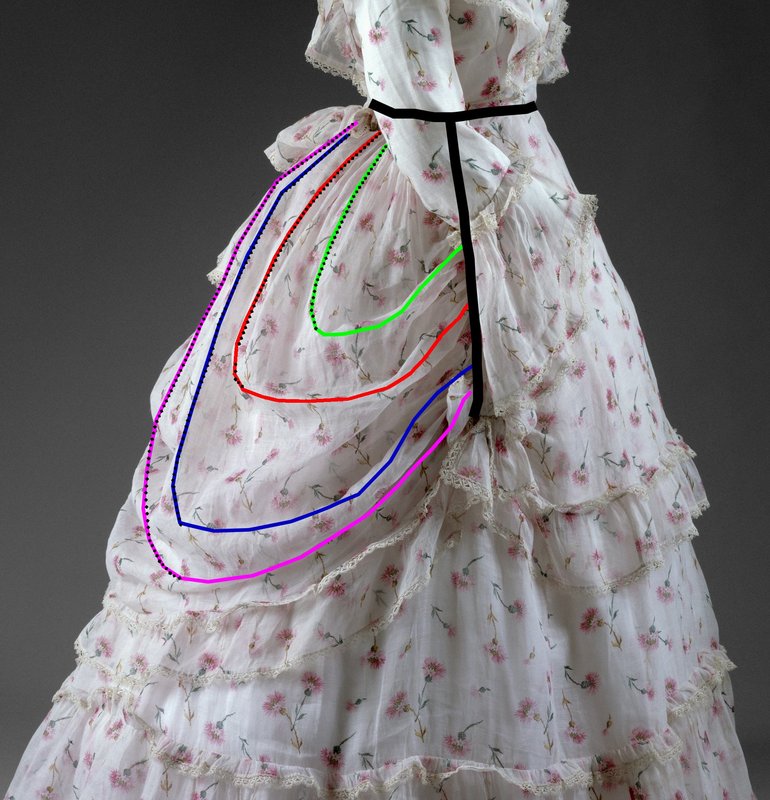
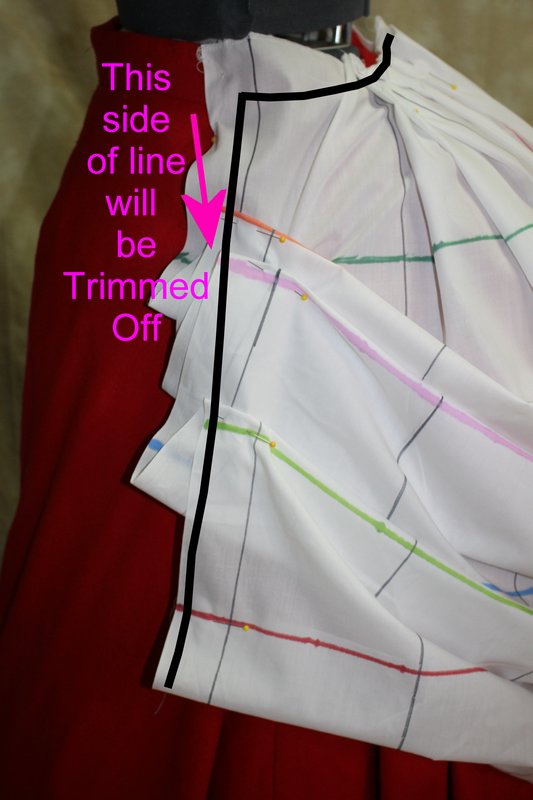
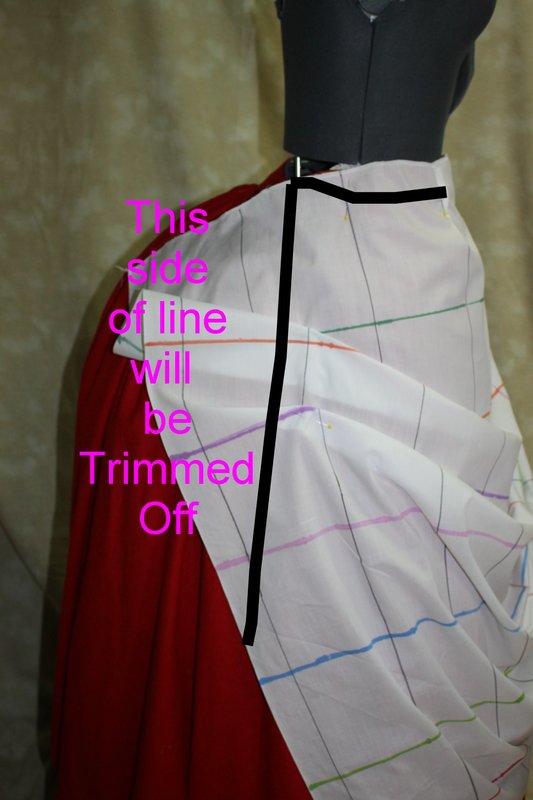
The heavy black lines on the two final photos show where the fabric is trimmed away after it is draped.
Picture
Picture
1 Comment

    RSS Feed

    Author

    Painfully obsessed clothing historian,
    mom,
    ​decendant of long line of farm women and seamstresses

    Archives

    January 2022
    December 2021
    June 2019
    February 2019
    October 2018
    August 2017
    February 2017
    December 2016
    November 2016
    September 2016
    August 2016
    July 2016

    Categories

    All
    Apron
    Artifacts
    Bustle
    Display
    Draping
    Dress
    Dye
    Early Bustle
    Fabric
    Housedress
    Identifying
    Magenta
    Mannequin
    Mourning
    Museum
    Pioneer
    Reproduction
    Silk
    Textile
    Victorian
    Washdress
    Wrapper

    RSS Feed

Proudly powered by Weebly
  • Home
  • My Work
    • Classes and Lectures
    • Museum Exhibits
    • Dress Gallery
    • Antique Sewing Machines
  • Books
  • Patterns
  • Blog
  • Contact
  • Etsy Shop
  • Classes
  • That Full Dinner Pail